¶ Advertisers
¶ Adding a new Advertiser
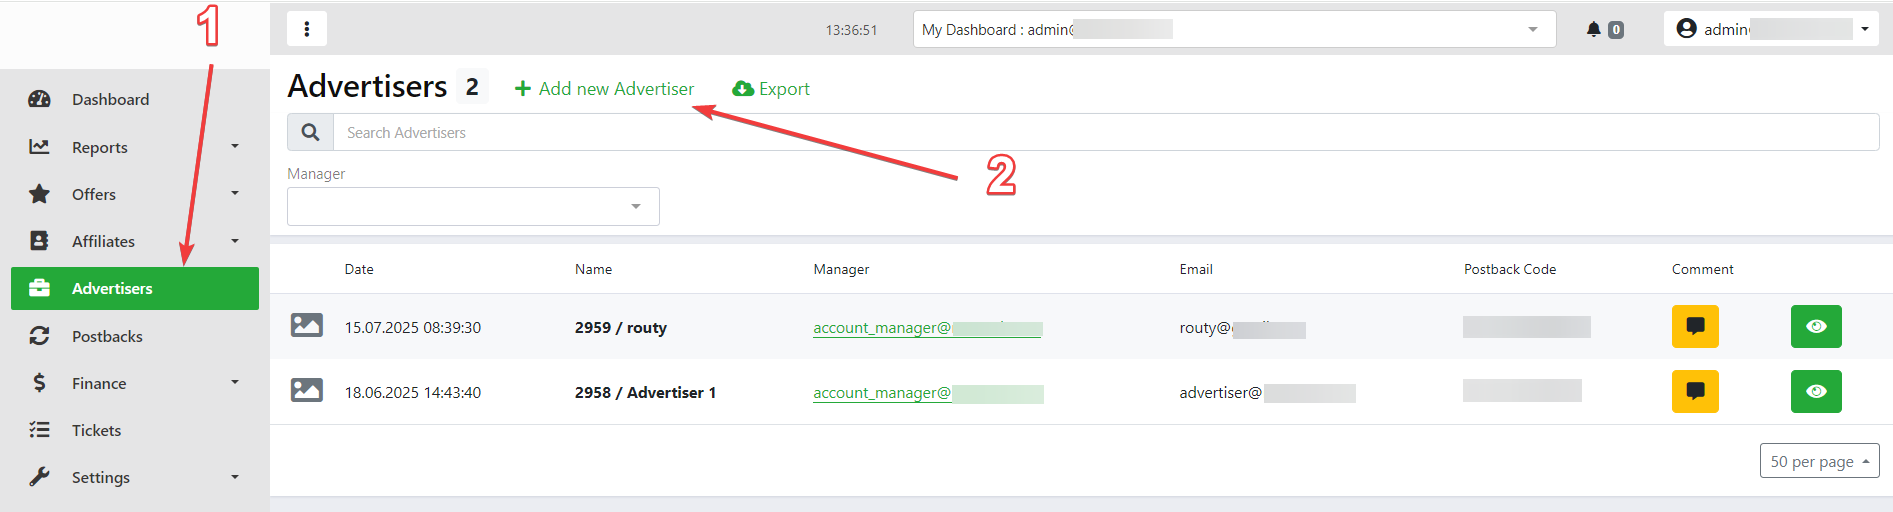
If you need to add a new advertiser
- Go to the Advertiser page
- At the top of the screen click the + Add new Advertiser button.
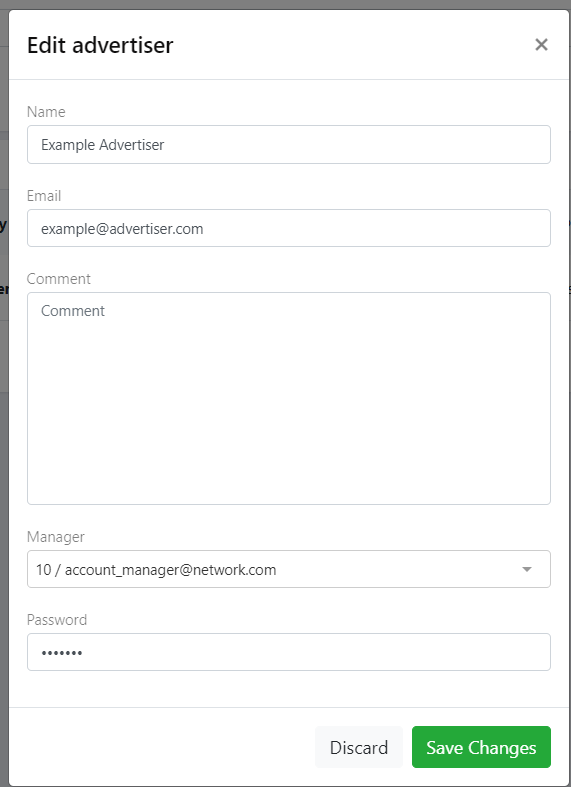
- In the form that opens, fill in the fields:
- Name
- Comment – add a comment if necessary (e.g., working conditions or notes).
- Manager – select a manager from the drop-down list.
- Password – set a password for the advertiser
- Click the Save Changes button.
- If you want to cancel the addition, click Discard.
After saving, the new advertiser will appear in the Advertisers section.

¶ Advertiser Postback
¶ Unique advertiser identifier
When an advertiser is created in the system, they are automatically assigned a unique key (Advertiser Postback Code).
Example: AP_E6VjRStHf
This code is used in all advertiser postback URLs.

¶ Postback templates
- Go to the Advertisers page.
- Find the advertiser you need in the list.
- To open the postback templates, click on the View postback templates icon.
- A window will open with ready-made links for all types of goals (SignUp, FTD, QFTD, ReDep, RS — select the desired goal from the drop-down list).
- These templates can be copied and sent to the advertiser for integration.
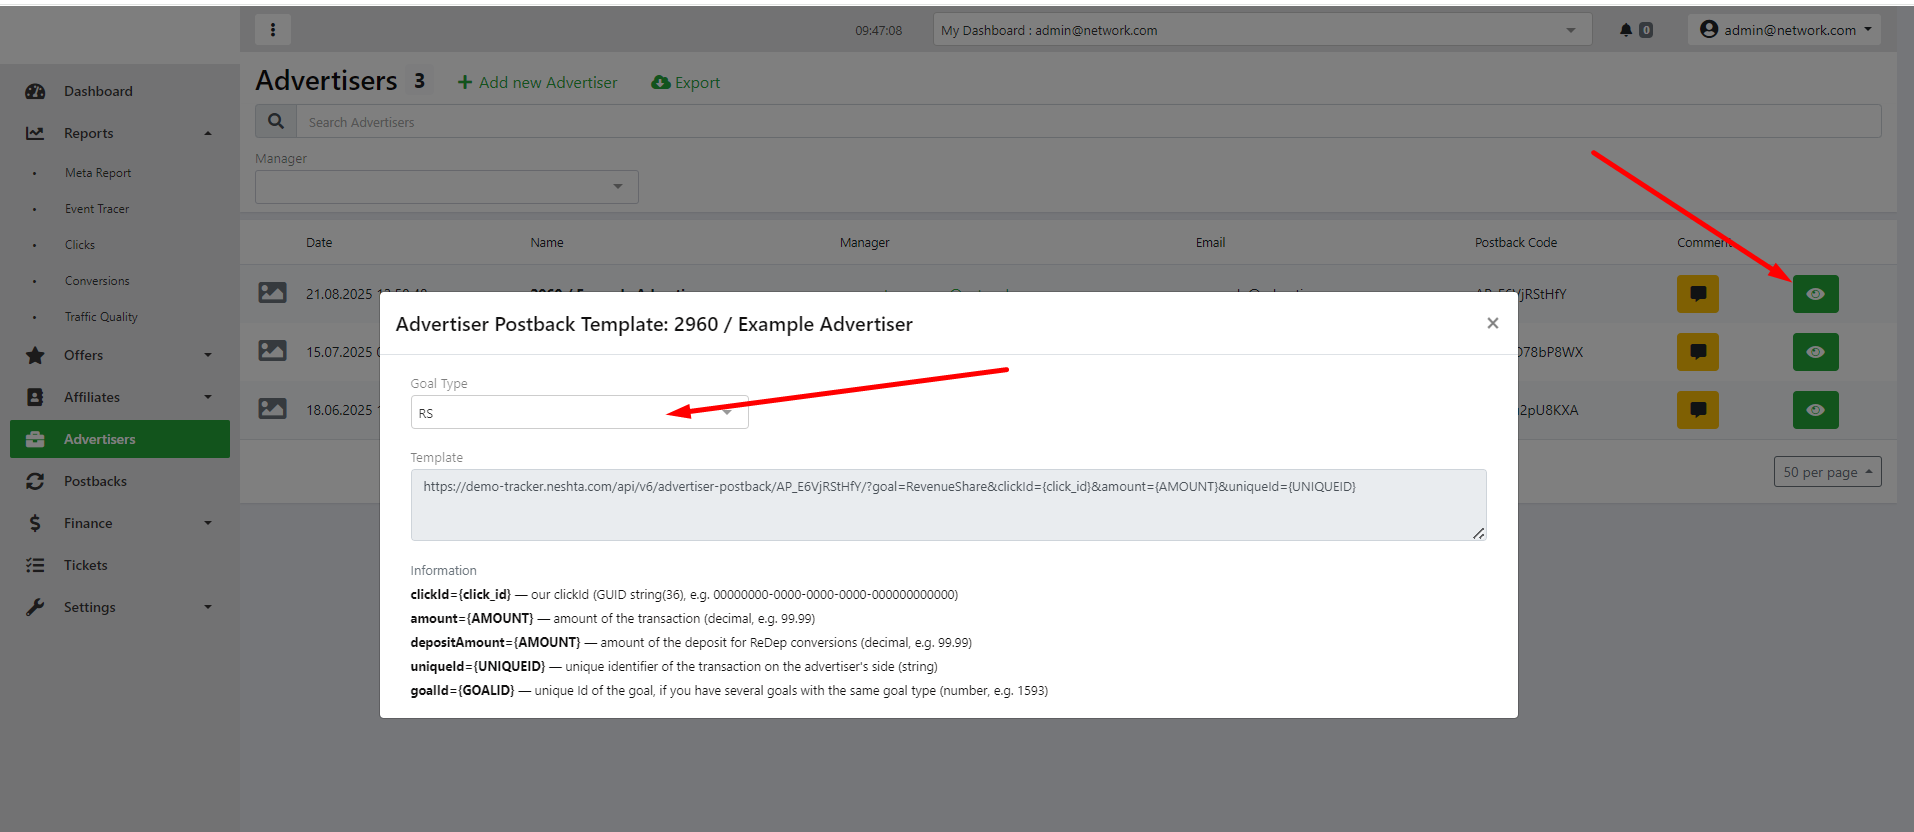
¶ Parameters
- clickId={click_id} — our clickId (GUID string(36), e.g. 00000000-0000-0000-0000-000000000000)
- amount={AMOUNT} — amount of the transaction (decimal, e.g. 99.99)
- depositAmount={AMOUNT} — amount of the deposit for ReDep conversions (decimal, e.g. 99.99)
- uniqueId={UNIQUEID} — unique identifier of the transaction on the advertiser's side (string)
- goalId={GOALID} — unique Id of the goal, if you have several goals with the same goal type (number, e.g. 1593)
¶ Configuration recommendations
- The advertiser should integrate postback data into their system in order to transfer conversion information.
- The appropriate template is selected for each type of goal.
- If the advertiser has several goals of the same type, it is essential to use the goalId parameter.
¶ Offers
¶ Adding a new Offer
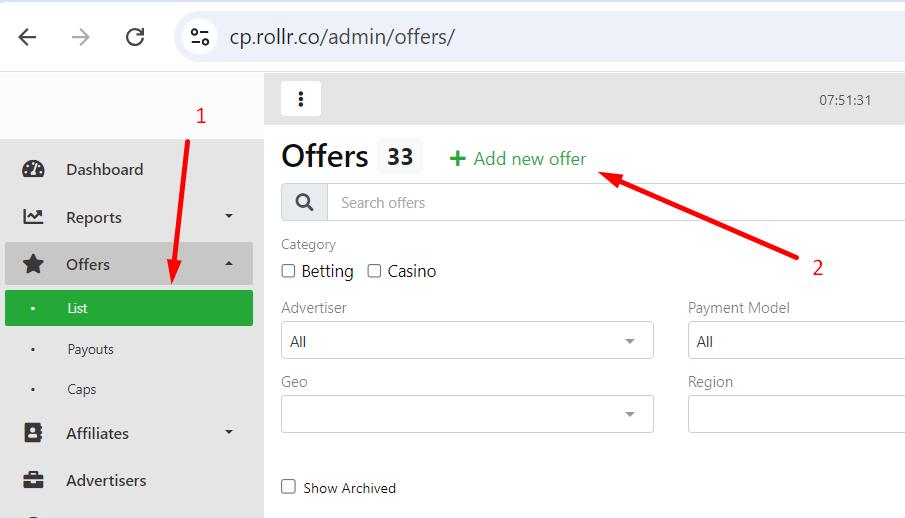
- Go to the Offers page (Offers -> List)
- At the top of the screen click the + Add new offer button.
- In the form that opens, fill in all the necessary fields:
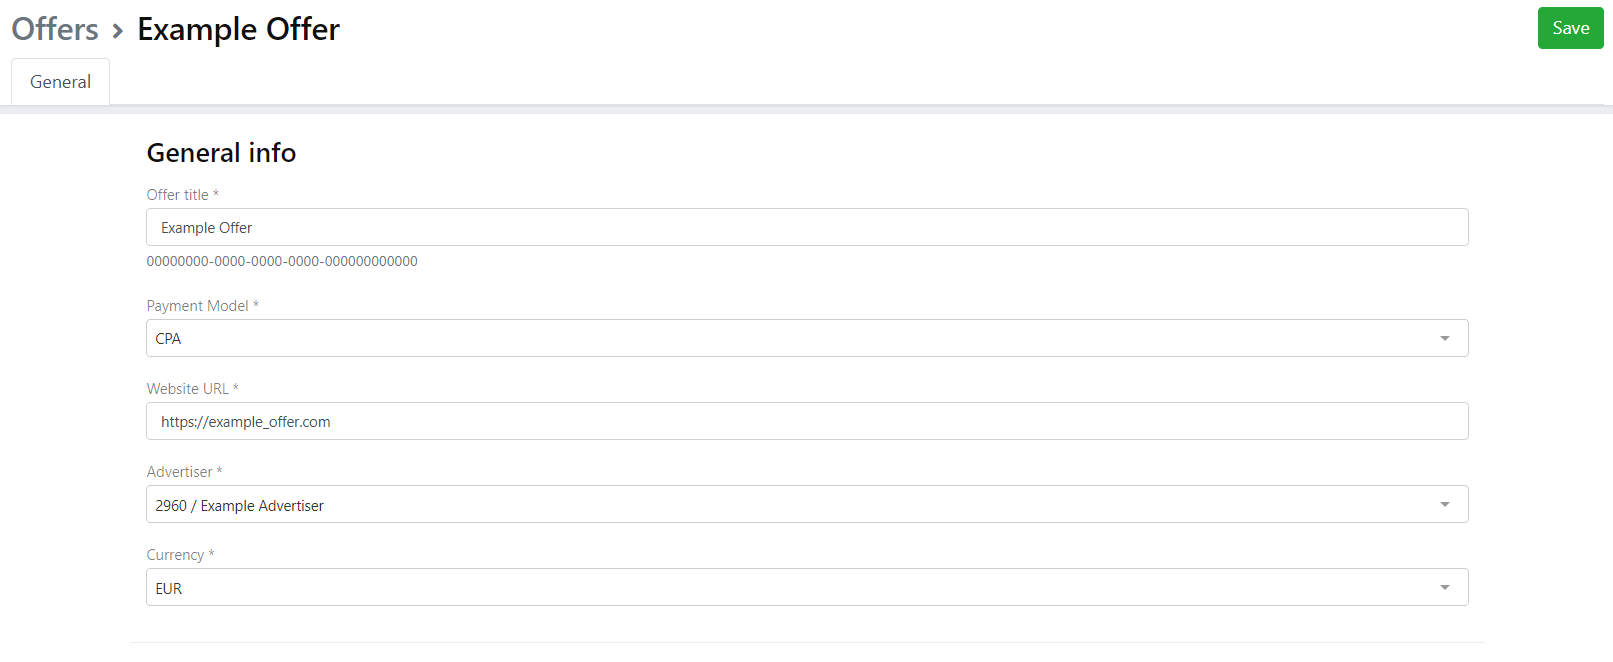
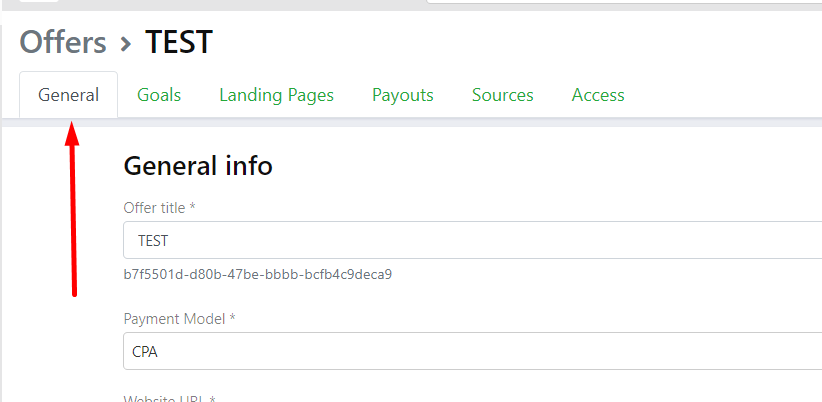
3.1 General info
- Offer title
- Payment Model - choose model (CPA, RS, Hybrid)
- Website URL
- Advertiser - choose an advertiser from the list. If the advertiser you are looking for is not on the list, add them on the Advertisers page.
- Currency - choose currency from the list
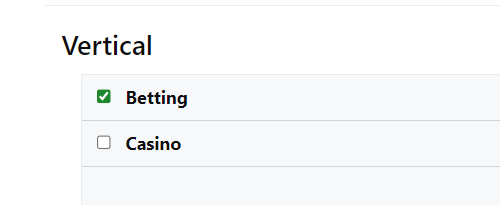
3.2 Vertical
Select a vertical from the list
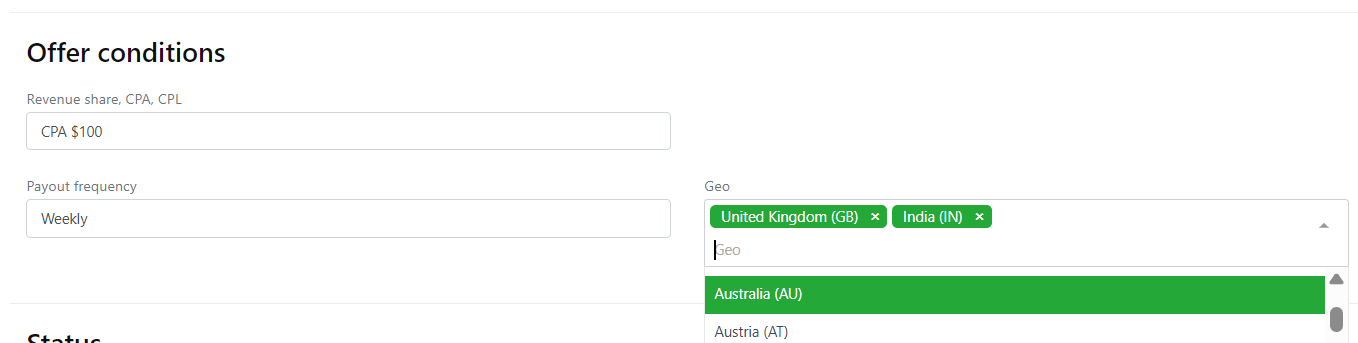
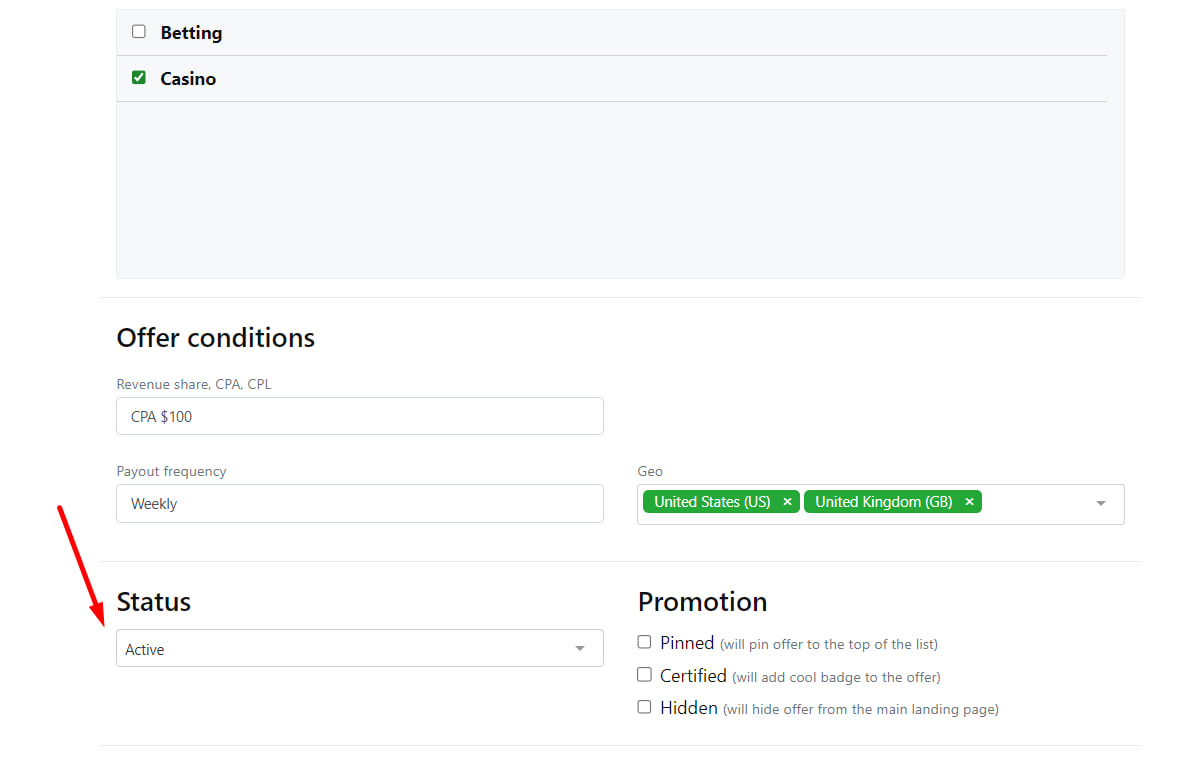
3.3 Offer conditions
Fill in the conditions for the offer
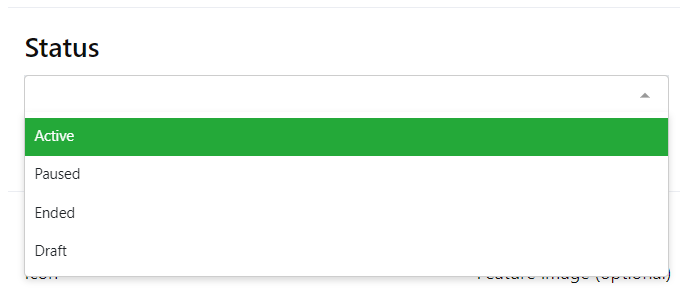
3.4 Status
- Active
- Paused - new links will not work, conversions from existing links should come through.
- Ended - all new conversions will be ignored
- Draft
3.5 Promotion
- Pinned - will pin offer to the top of the list
- Certified - will add cool badge to the offer
- Hidden - will hide offer from the main landing page
3.6 Offer images & Creatives
You can add Icon, Feature image and/or Preview image to the offer; as well as banners and other visuals, that could help affiliates to promote offer.
3.7 You can also add an Offer description, KPI and Manager private comment.
- Save the offer by clicking on the Save button below the description or at the top of the page.
- After saving the offer, new tabs will become available for editing. For more information, see Offer editing section.
¶ Offer editing
You can edit an offer right after adding or by going to the edit page from the Offers page and clicking on the offer name.

In addition to general information about the offer, you can manage
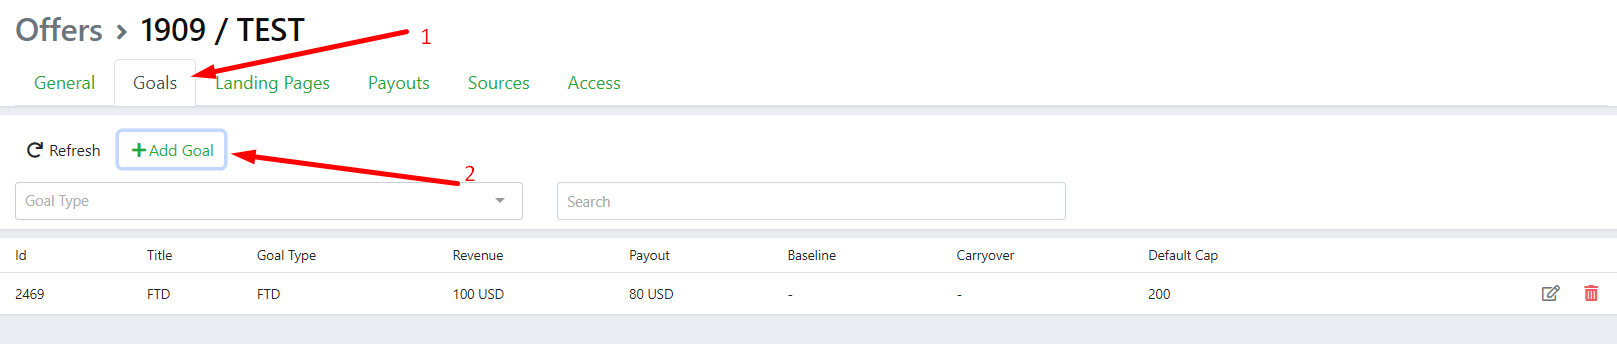
¶ Goals
- To add a goal, go to the Goals tab on the offer editing page and click the + Add Goal button.
- In the window that opens, select Goal Type:
- Sign Up
- FTD
- QFTD
- ReDep
- RS (Revenue Share)
- Fill in all necessary fields
- Title, Revenue, Payout - for all Goal Types
Revenue and Payout are indicated as percentages for RS goals; for other goals, they are indicated in the currency of the offer.
- Default Cap - for Sign Up, FTD, QFTD, ReDep
- Baseline - for QFTD
- Negative Carryover - for RS:
a. With Negative Carryover - losses or negative balances from one period are carried forward to offset future profits or gains
b. No Negative Carryover - negative balances are reset to zero at the end of each period, preventing them from affecting future earnings
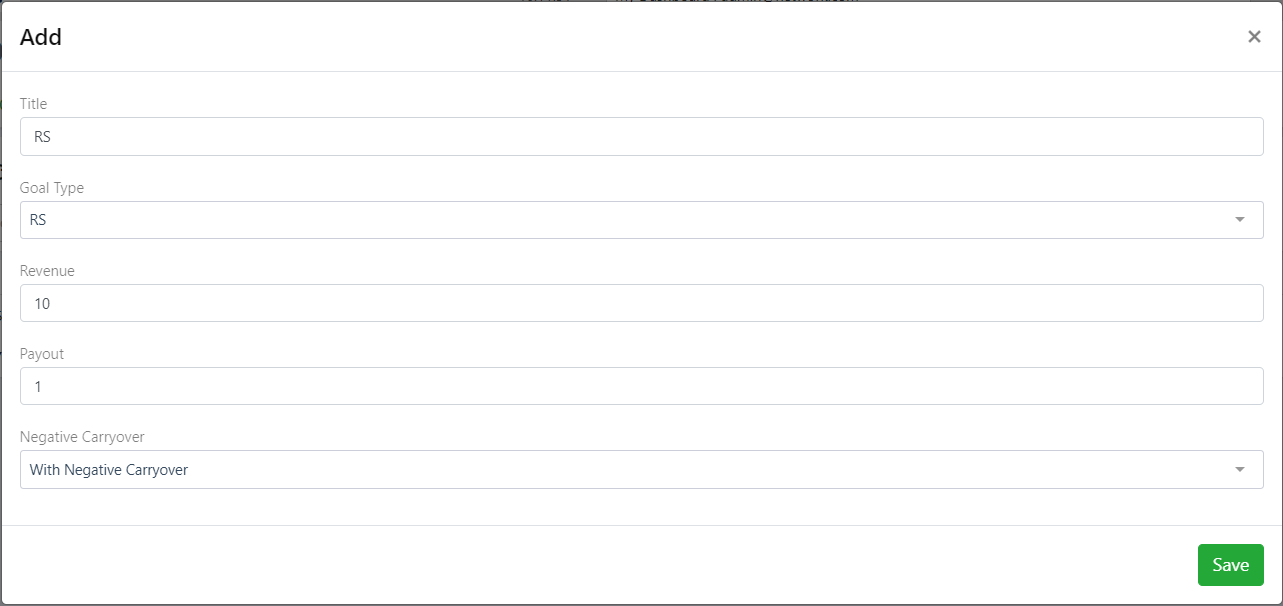
- Click Save. The Goal will appear in the table.
- If you need to edit a goal, click Edit in the row of the needed goal.

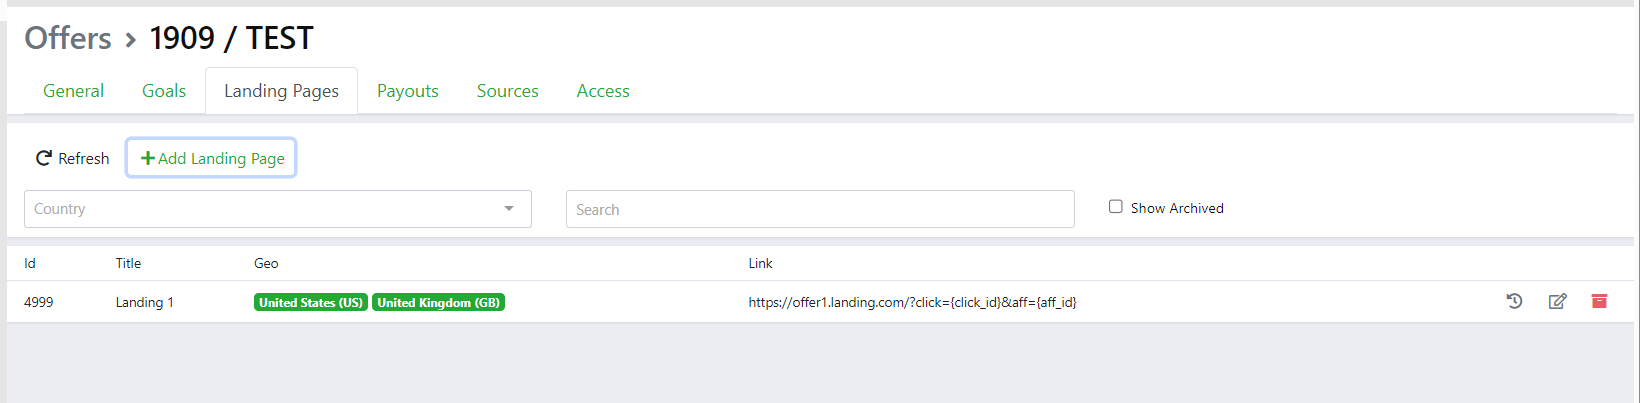
¶ Landing Pages
- In the offer card, go to the Landing Pages tab.
- At the top of the page, click the + Add Landing Page button.
- A form for adding a landing page will open:
- Title – enter the name of the landing page.
- Tracking Link – paste the link to the landing page. You can use parameters in the link.
{click_id} – unique click identifier.
{aff_id} – affiliate ID.
{aff_source_id} – affiliate traffic source.
{dp1} – {dp5} – additional parameters for passing custom values.
Example: https://domain.com?click={click_id}&version={dp1} .
- Countries – select the countries for which this landing page is available.
- Click Save to save the landing page.
The new landing page will appear in the list in the Landing Pages tab of the offer. - The added item will be displayed in the list of landing pages: its ID, Title, Geo, and link.
You can copy the link and use it for traffic.
¶ Payouts
- In the offer card, select the Payouts tab.
- Click the + Add Payout button.
- In the Add Payout window that opens, specify:
- Goal – select a goal from the drop-down list.
The goal must be created in advance in the Goals tab of the offer.
- Landing Pages – select one or more landing pages from the list.
Landing pages are added in advance in the Landing Pages tab of the offer.
- Countries – select the country or countries for which this payout applies.
- Revenue – the amount of income.
- Payout – the amount paid to the affiliate.
- Click the Save Payout button. The new payout will appear in the list in the Payouts tab of the offer. If necessary, you can edit or delete the payout.
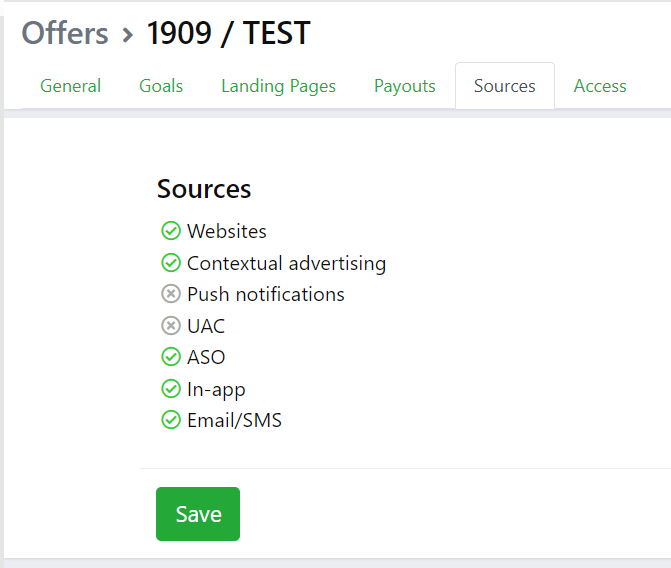
¶ Sources
- To add sources to an offer, open the Sources tab in the offer.
- Select available sources. The list contains various types of traffic sources:
- Websites
- Contextual advertising
- Push notifications
- UAC
- ASO
- In-app
- Email/SMS
To add a source, simply put a green tick next to the desired item. A grey cross means that the source is turned off.
- After selecting the sources, click the Save button at the bottom of the page.
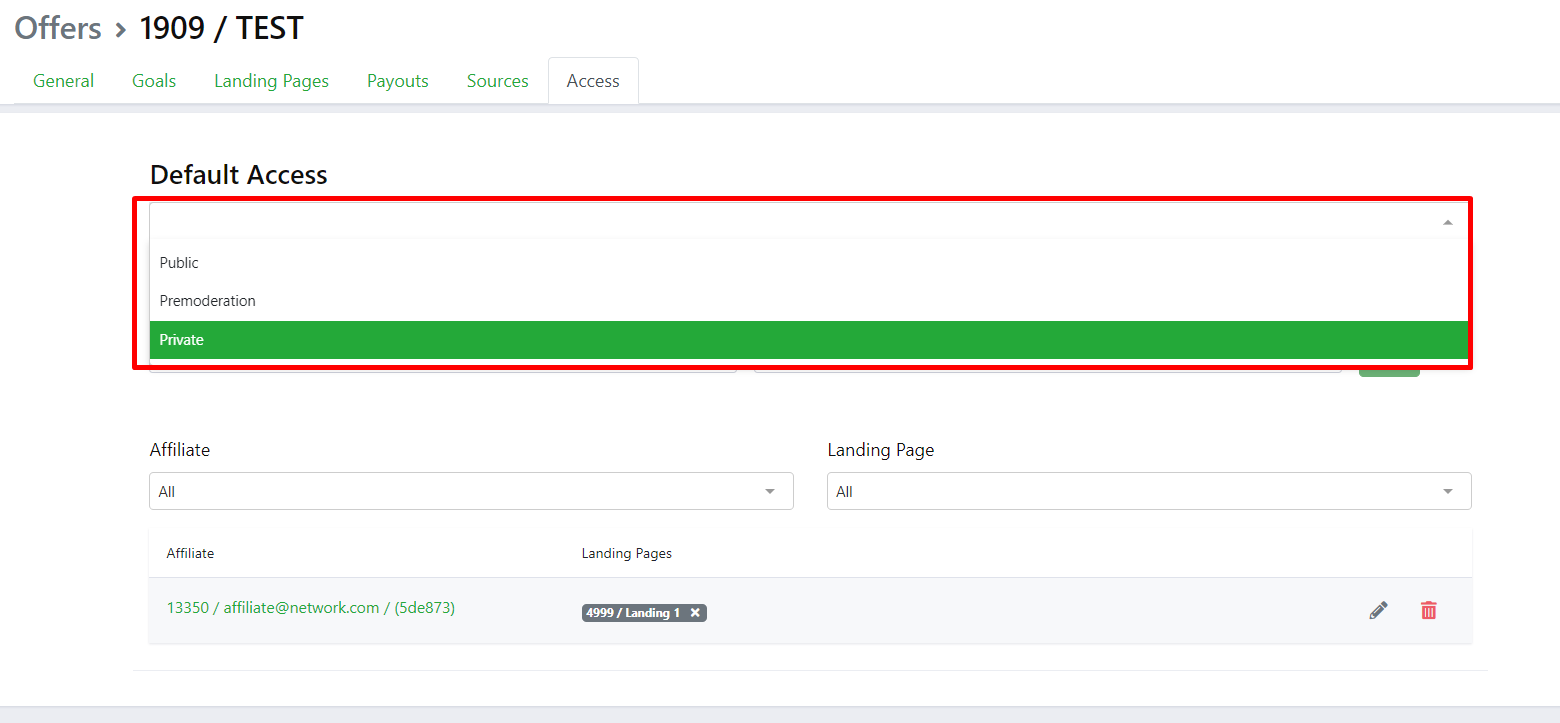
¶ Access
On this tab, you can set up affiliate access to the selected offer.
- Choose the default access
- Private - the offer is not displayed to the affiliate until the manager provides access.
- Premoderation - the offer is displayed in the list of offers in the affiliate's personal account, but the affiliate will only be able to create a link after the manager has given access.
- Public - the offer is available to all affiliates.
2. Give Access to the Offer
2.1 In the Affiliate drop-down list select an affiliate.
2.2 Then select a landing page for them (from the ones added to the offer).
2.3 To save the settings, click Add
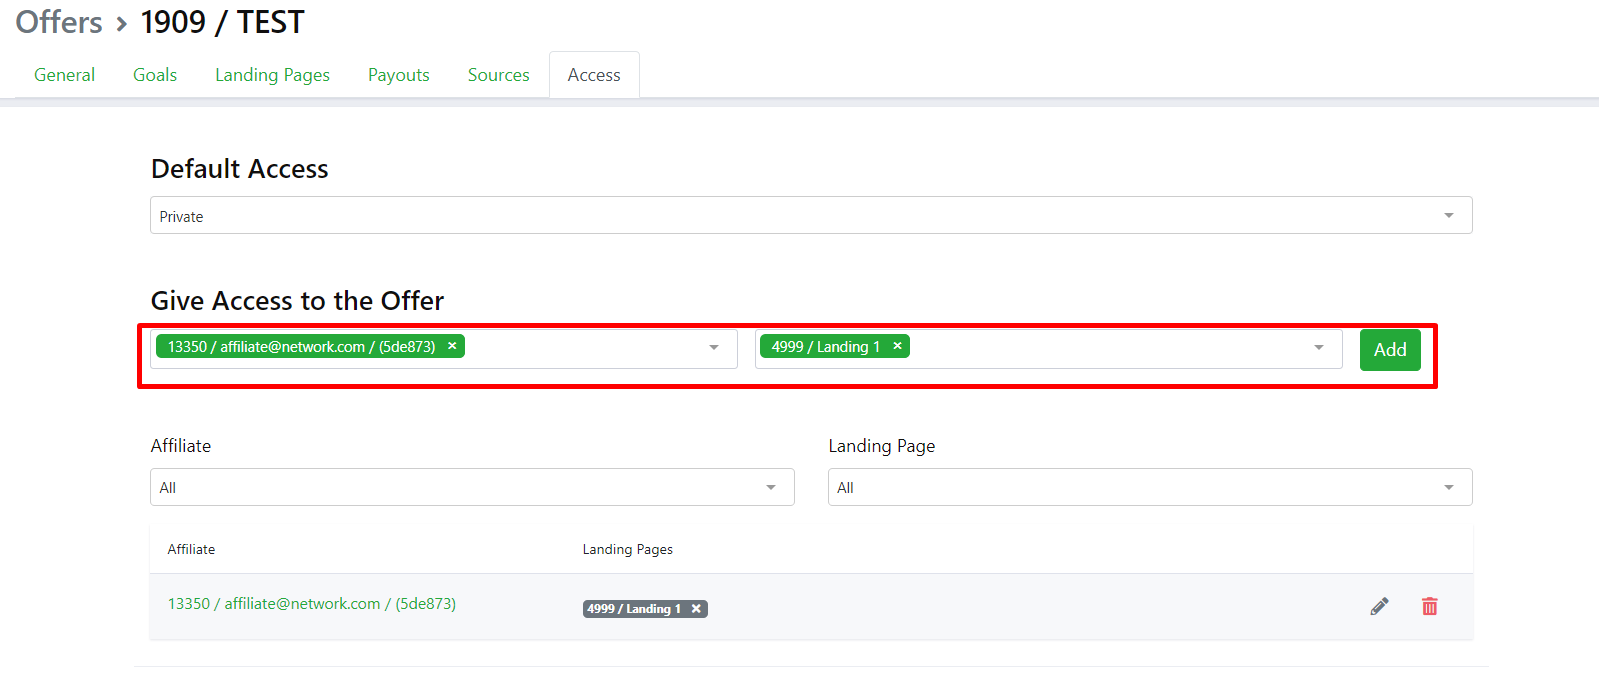
3. The added affiliates will be displayed in the table at the bottom of the page.
For convenient interaction with the information in the table, use the Affiliate and Landing Page filters.

¶ Assigning account manager to offer
It is not possible to assign a manager directly in the offer. The responsible Account Manager is assigned to the advertiser. Therefore, when selecting an advertiser in the offer, the manager associated with them is automatically activated.
¶ Changing the offer status
An offer can have several statuses:
- Draft – the offer is not active;
- Active – the offer is running and available to affiliates;
- Paused – the offer is temporarily suspended;
- Ended – the offer is terminated.
There are two ways to change the status:
Option 1: via the table on the Offers page
- Go to the Offers → List menu.
- Find the offer you need.
- To the left of the offer name, click on the status icon.
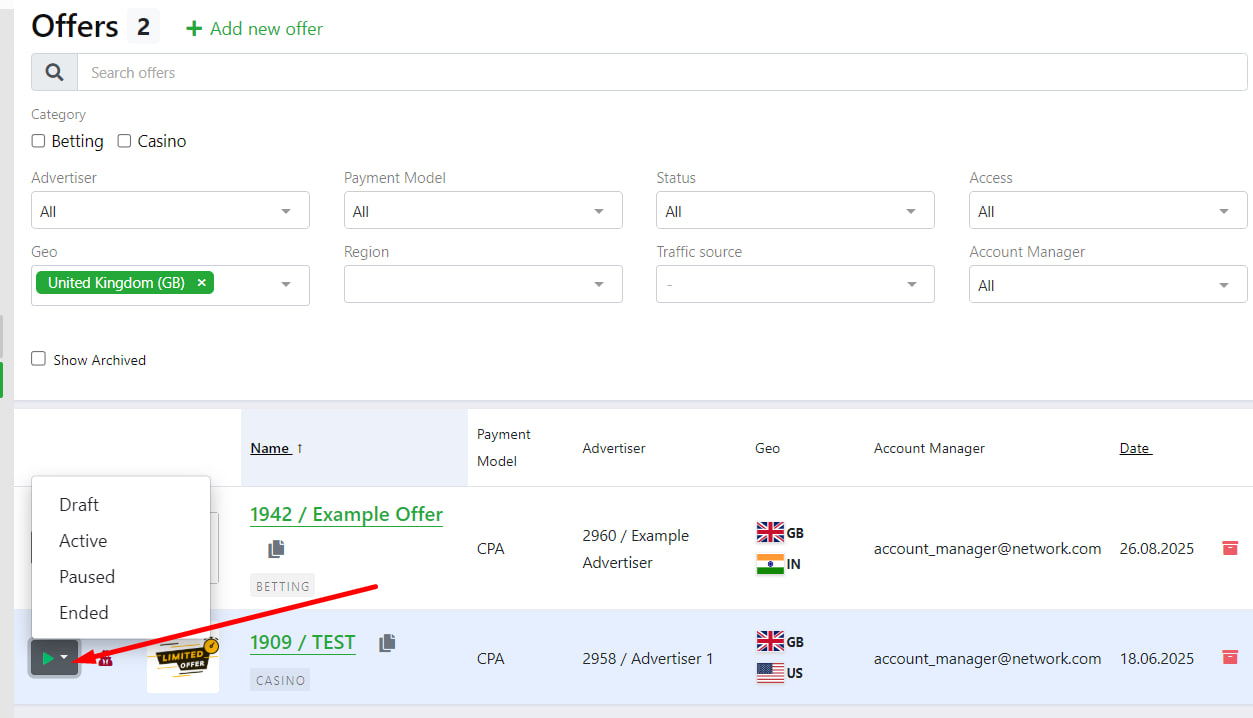
- Select a new status from the drop-down list: Draft, Active, Paused, Ended.
- The status will change immediately in the table.
Option 2: in the General tab when editing an offer
- Go to the desired offer → the General tab will open.
- Find the Status field.
- Select the desired status (Active, Paused, Draft, Ended) from the drop-down list.
- Save your changes.
¶ Individual payouts
¶ Adding individual payouts
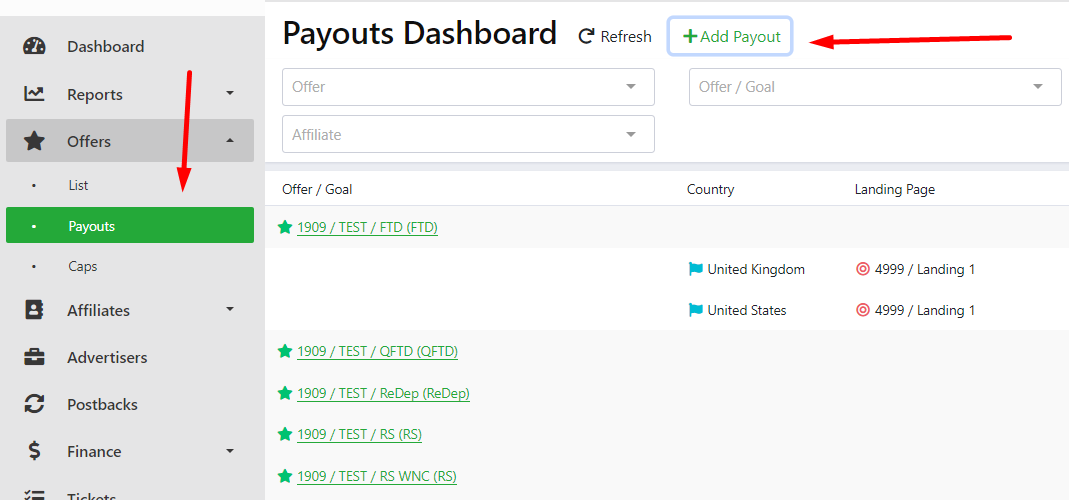
- To add a new payout select Offers → Payouts from the menu.
- At the top of the page, click on the + Add Payout button.
A form for adding a payout will open. - Fill in the required fields:
- Offer / Goal – select the offer and the desired goal.
You can choose any goal except ‘Sign up’. - Countries – specify the country for which the payout will apply.
- Landing Pages – the list of landing pages depends on the selected offer in the Offer / Goal field.
- Affiliates – select an affiliate if the payout should be individual.
- Revenue – the amount of income.
- Payout – the amount paid to the affiliate.
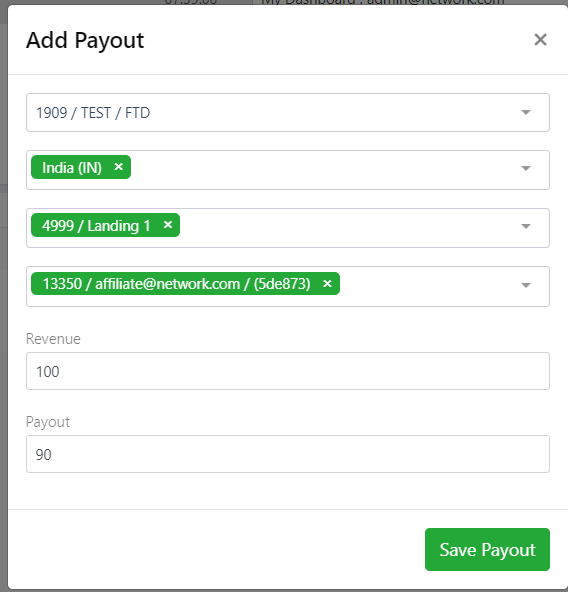
- Click the Save Payout button.
The new payout will appear in the Payouts Dashboard table in the main goal block.
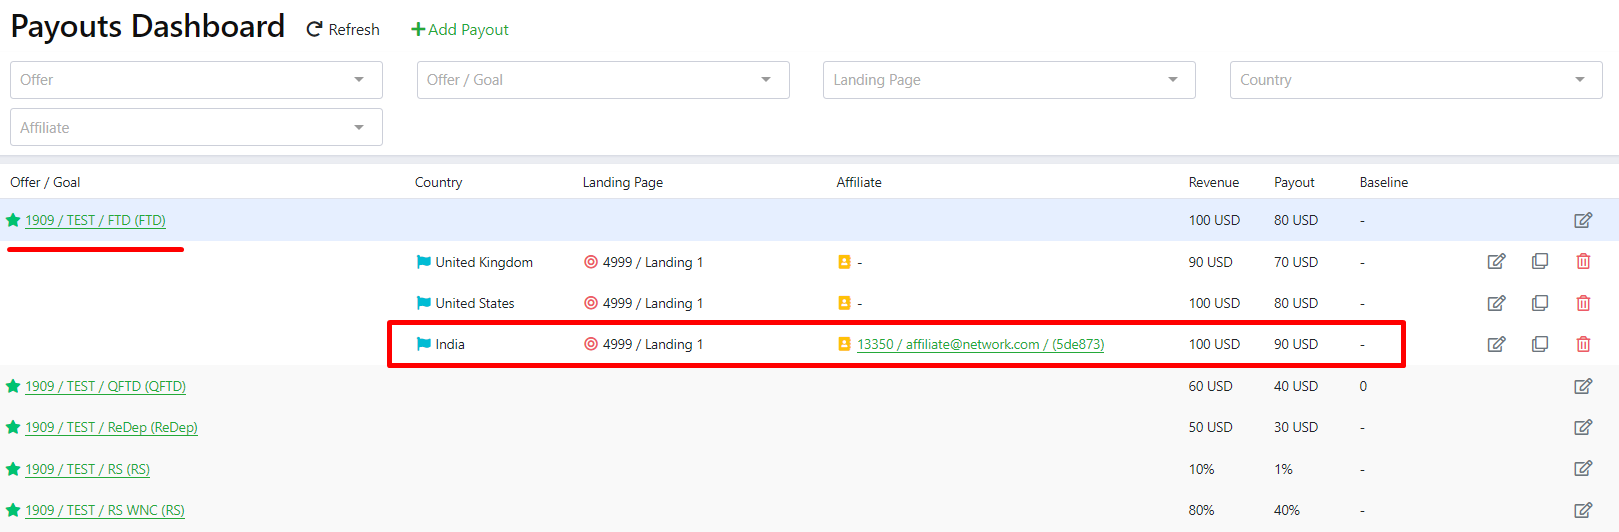
You can combine different countries and affiliates, creating flexible settings for specific conditions.
¶ Editing individual payouts
To edit Payouts rules globally for the offer goal and/or the individual ones, click the Edit button in the row with the required payouts.

You can only change Revenue and Payout. If you need to make changes to the Countries, Landing Pages, and/or Affiliates fields, you must create a new rule.

¶ Caps
¶ Adding a Cap
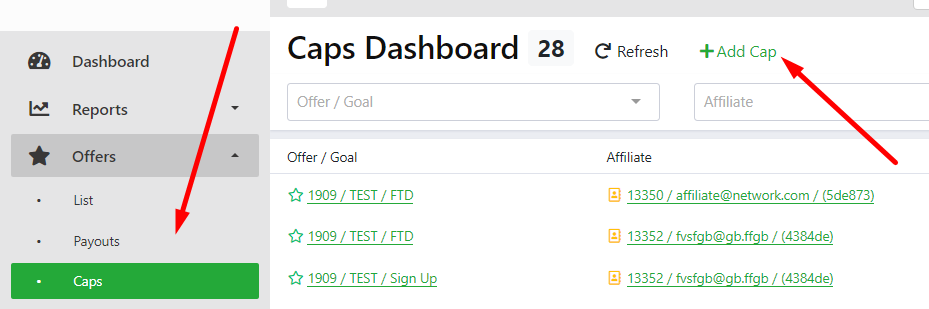
- Go to the Offers → Caps menu.
- Click the + Add Cap button at the top of the screen.
- Fill in the fields in the form that opens:
- Offer / Goal – select the offer and goal for which you want to set a limit (only for FTDs and QFTDs).
- Affiliates – set a cap for a specific affiliate.
- Countries – you can limit traffic from a specific country.
- Cap – specify the limit (for example, 100).

- Click Create Cap to save. The new cap will appear in the Caps Dashboard table.
Caps can be assigned for the Affiliate to the entire offer (offer + affiliate) or to a country (offer + affiliate + country). This allows you to flexibly limit traffic under different conditions.
¶ Caps Dashboard
The table displays all created caps.
Columns:
- Offer / Goal – the offer and goal for which the limit is set.
- Affiliate – affiliates for which the restriction applies.
- Country – country (or All, if the cap is without geo).
- Count – total number of actions performed.
- Cap – set limit.
- Left – how many actions remain before the limit is reached.
- Progress – visual indicator of cap completion (in percent).
- Created / Updated – creation and modification dates.
Reaching the Caps limit does not stop traffic. This information is only displayed to the manager so that they can monitor the campaign's performance and make timely adjustments if necessary.
¶ Editing Caps
In Caps Dashboard, find the cap you need and click the Edit button.

- Changing the cap
You can specify a new value in the Cap field. After saving, a new countdown will start with the updated date.
Example: it was 100 → changed to 200 → from this moment on, the limit is considered edited.
- Restart without changing the limit
If you don't need to change the limit, but you need to reset the progress:
- Open editing,
- don't change anything in the values,
- just click Update Cap.
In this case, the countdown for the current limit will start again from the new date.
Update with a new limit = new limit + new counter.
Update without changes = the limit is the same, but the counter is reset.
¶ Affiliates
¶ Registering new affiliates
-
In the menu select Affiliates → List.
-
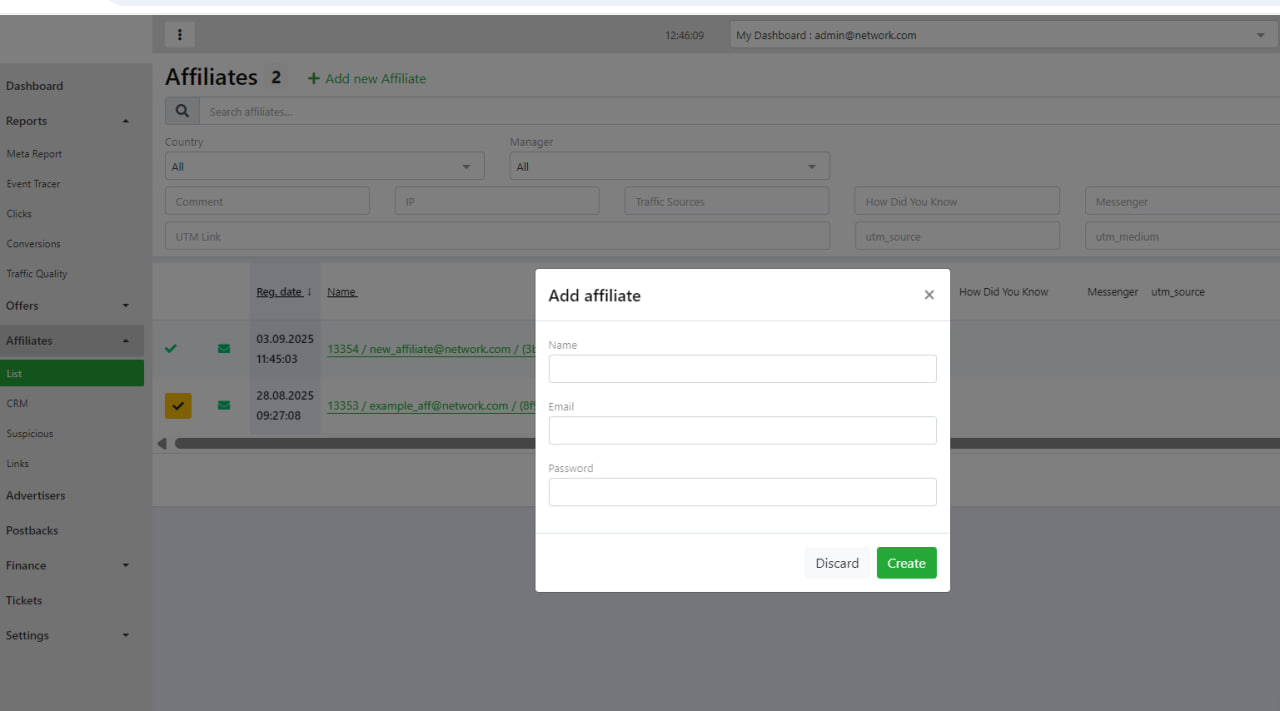
At the top right click the + Add new Affiliate button.
-
Fill out the Add affiliate form. In the window that appears, fill in:
- Name – the name of the affiliate (e.g., company or nickname).
- Email – a working email address that will be used for login and communication.
- Password – the password for logging into the system.
- Create an account by clicking the Create button.
- The new affiliate will appear in the list with their ID and email address. They will immediately be assigned Approved status.
A manager will be assigned automatically. For more information on changing managers, see Assigning affiliate manager to affiliate.
Affiliates can register themselves using the registration form on the platform.
After registration, the account is added to the list of affiliates and is available to the administrator for verification and assignment of conditions. In order for an affiliate to use the platform, their account must be approved (see Approve affiliate).
¶ Approve Affiliate
After registering a new affiliate, they will appear in the system with the status ‘awaiting confirmation’. To grant them access to work, you must approve their account.
Ways to approve:
Option 1. From the list of affiliates
- In the Affiliates → List section, find the desired user.
- Check the box next to the affiliate.
- Click the Approve button. After that, the status will change and the affiliate will receive access.
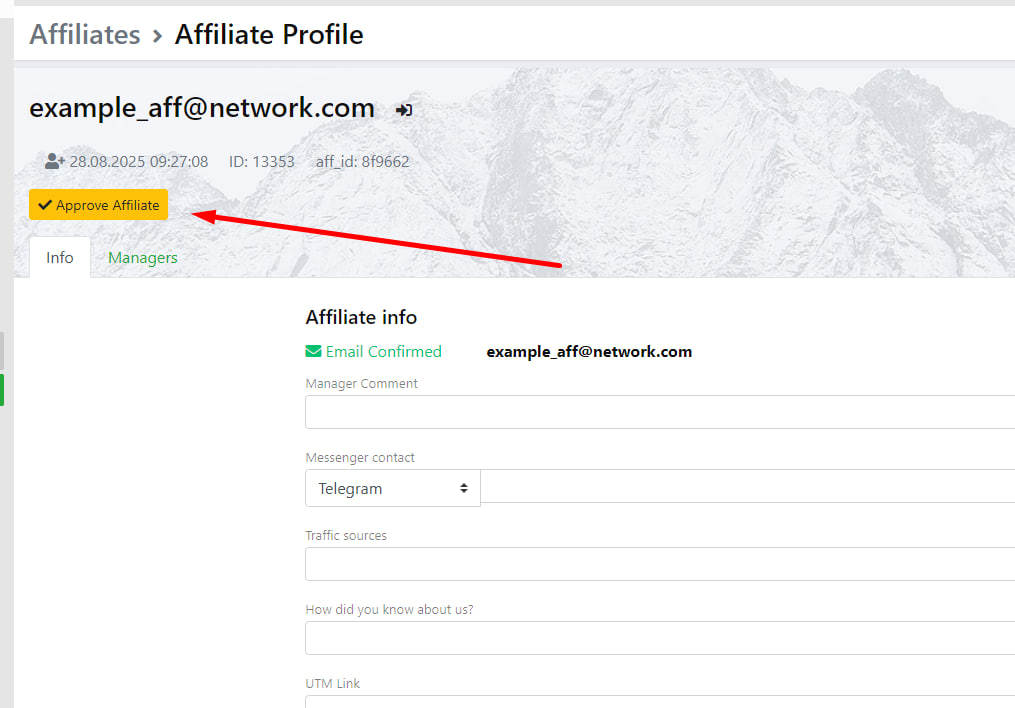
Option 2. From the affiliate's profile
- Go to the Affiliates → List section.
- Open the card of the desired affiliate by clicking on their email.
- At the top of the profile, click the Approve Affiliate button.
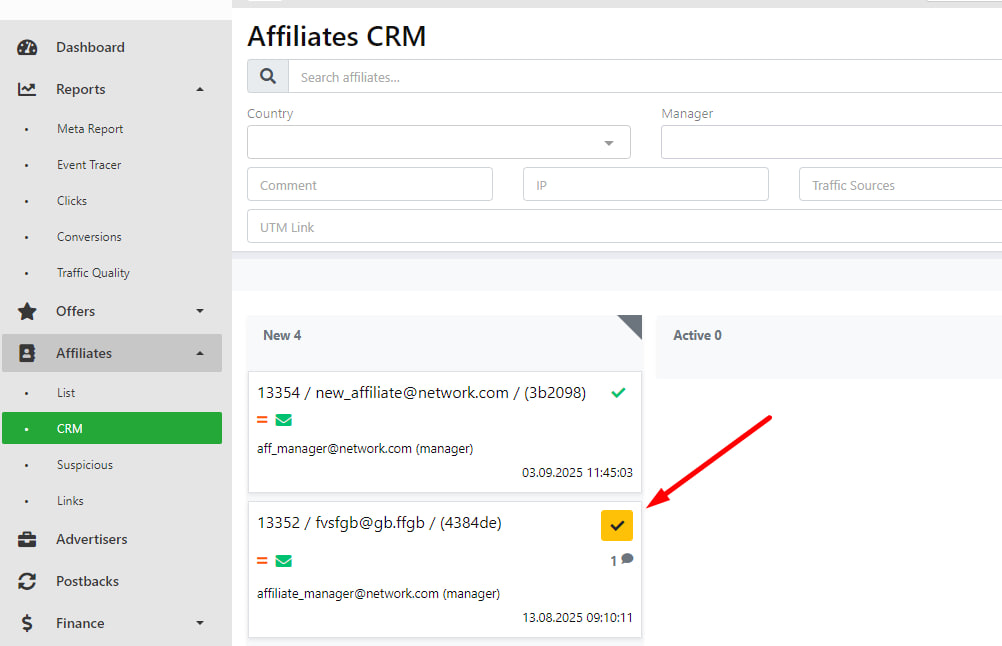
Option 3. From the affiliate CRM
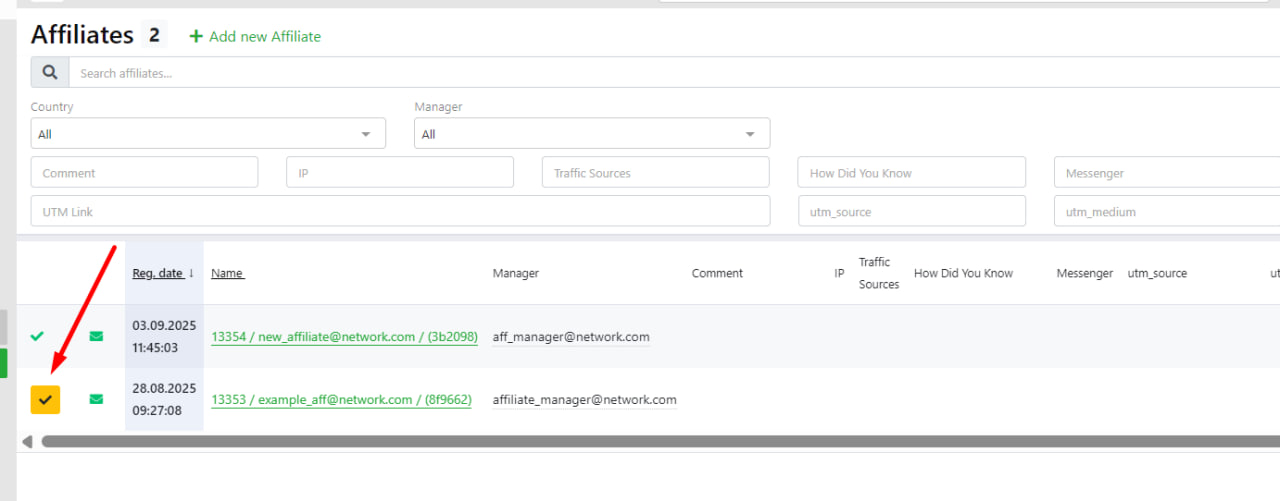
- Go to Affiliates → CRM.
- Find the new affiliate in the New block.
- Click on the status icon (yellow checkbox).
¶ Assigning affiliate manager to affiliate
After adding a new affiliate to the system, a responsible manager is assigned automatically. But if you need to change it, you can do so in the affiliate's profile
- Open the Affiliates page
- Click on the name of the affiliate for whom you need to change the manager.
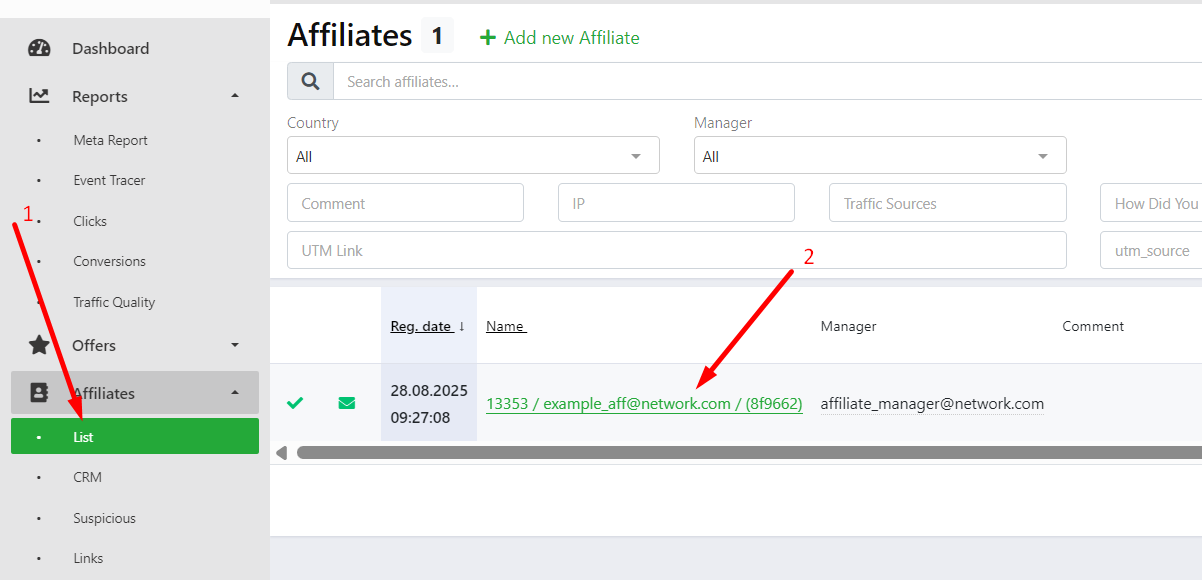
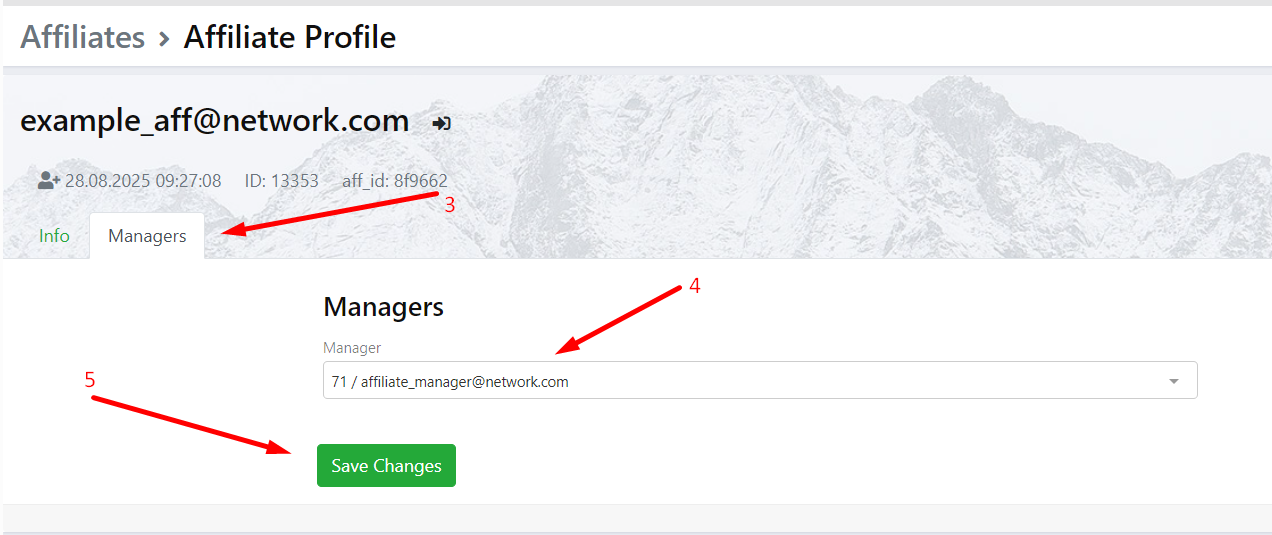
- The affiliate's profile will open in a new tab. Go to the Managers section.
- Select the required manager from the drop-down list.
- Save the changes by clicking on the Save Changes button.
¶ Affiliate postbacks
A postback is a URL to which the system sends a request when a conversion is recorded in order to notify the affiliate system about the event (e.g., registration, FTD, revenue share, etc.).
¶ Adding a postback
- Go to the profile of the desired affiliate.
- Inside the profile, select the Offers tab.
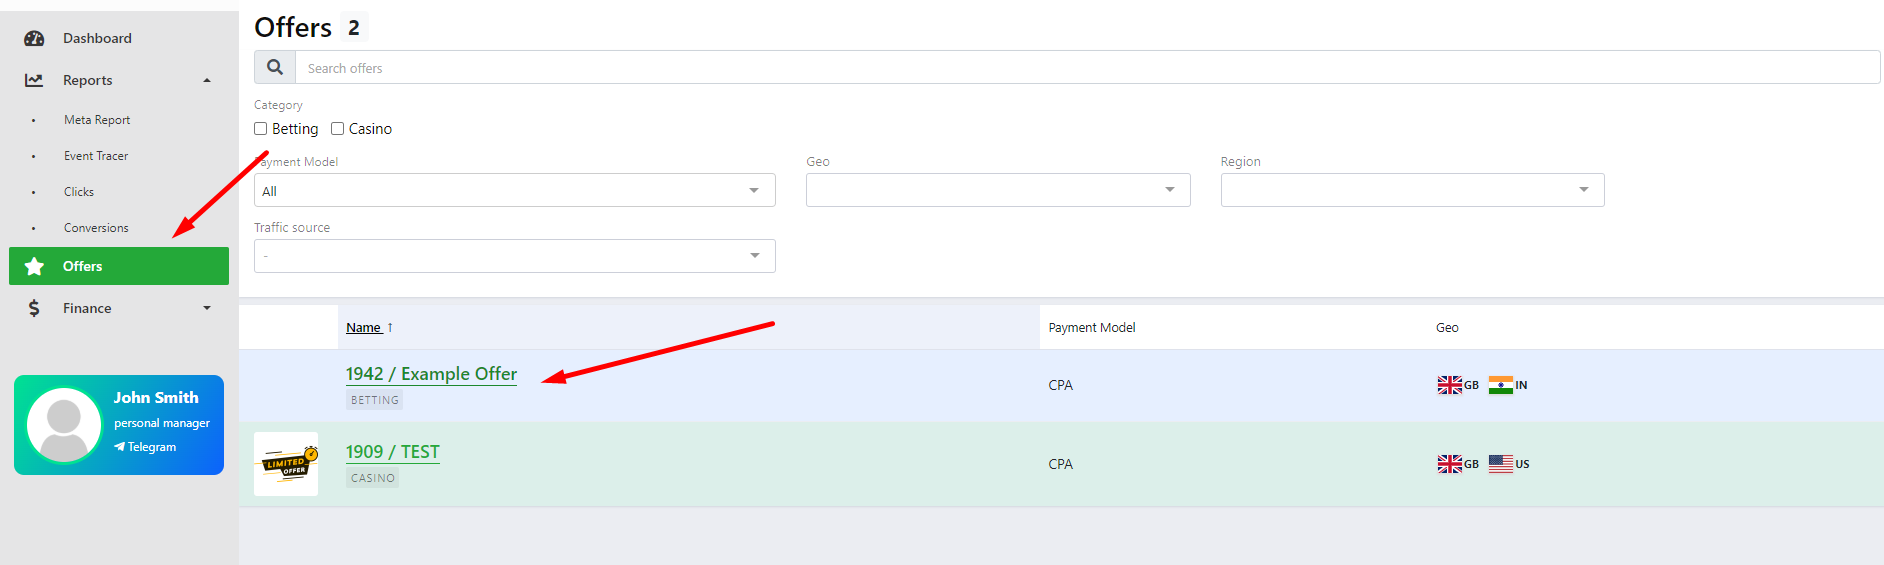
- Find the offer for which you want to add postbacks.
- Find the Postbacks section.
- Click Add first one (or Generate another one if you already have postbacks).
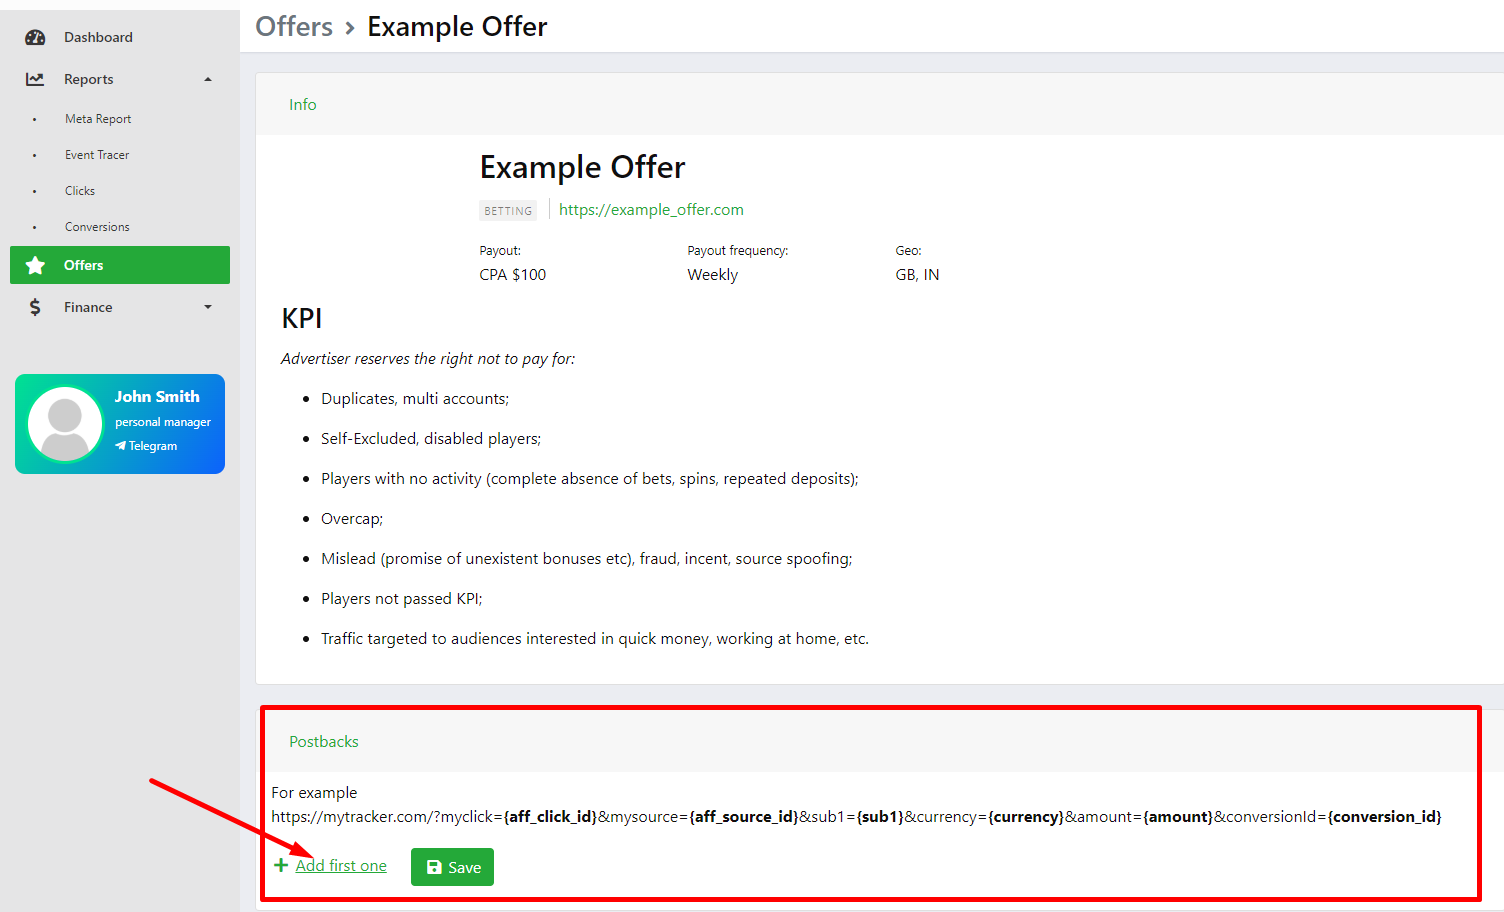
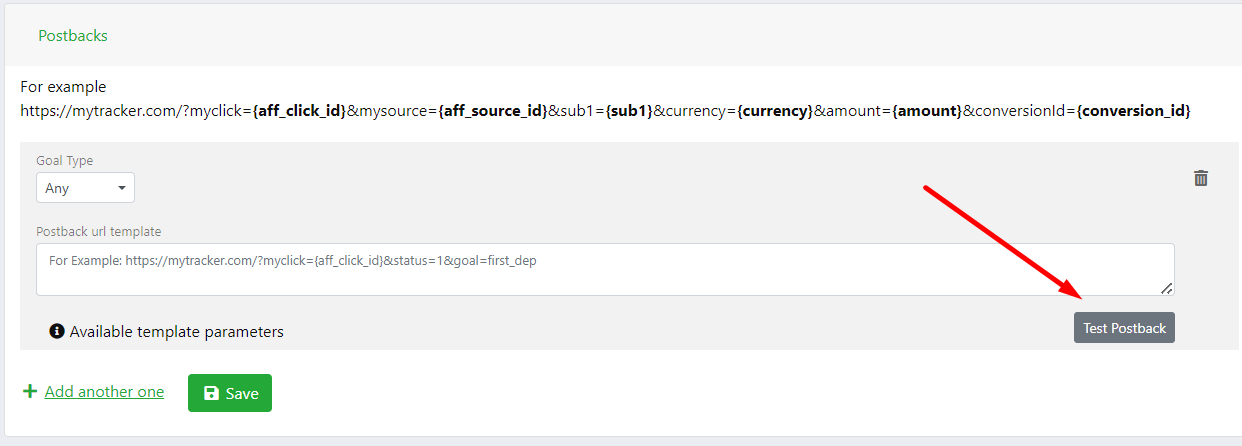
- Fill out the form:
- Goal Type — select an event (Sign Up, FTD, ReDep, RS, etc.) or Any if the postback should work for all events.
- Postback URL — paste the tracking link from the affiliate system.
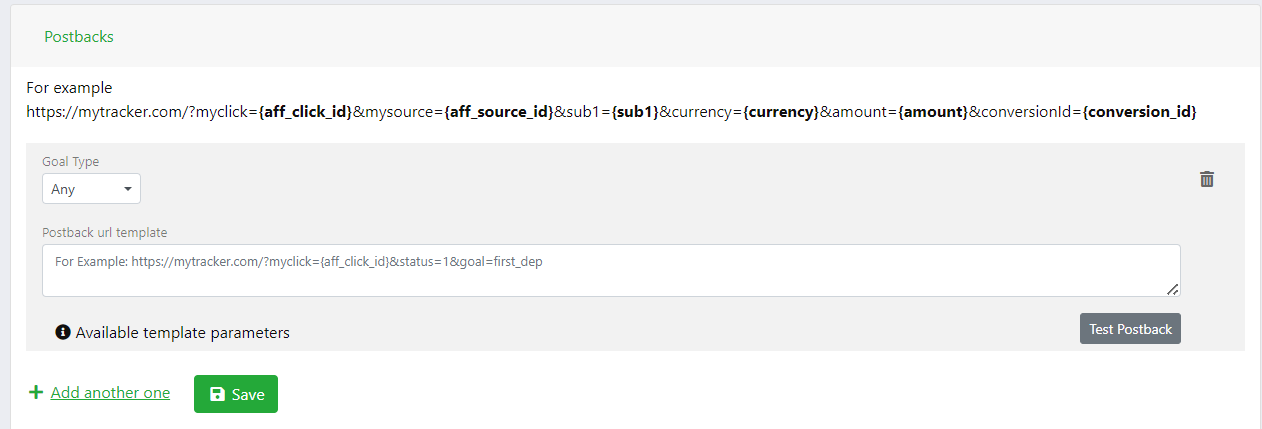
- Parameters
When configuring, you can insert parameters that the system will replace with actual values when sending the postback.
To view the list, click the (i) icon next to the URL field.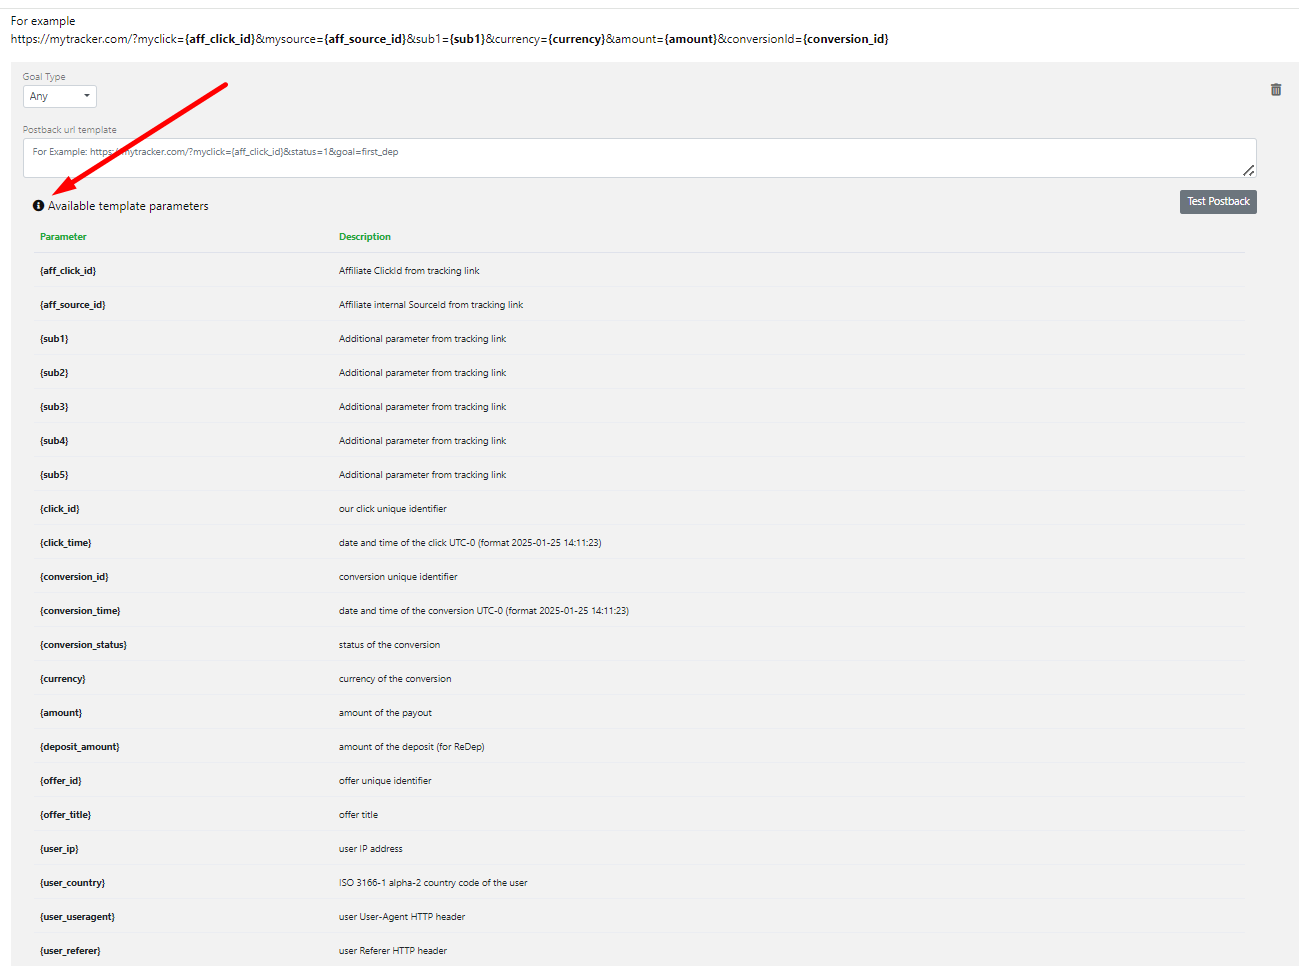
Postback example
https://affiliate-tracker.com/postback?click={aff_click_id}&src={aff_source_id}&sub={sub1}&cur={currency}&amt={amount}&cid={conversion_id}.
- After filling in the form, click Save. The postback will appear in the list of offer settings.
¶ Testing Affiliate Postback
The Test Postback feature checks whether the integration is working correctly.
- Click Test Postback next to the postback.
- In the window that opens:
- in the Insert your tracking link field, paste the tracking link from the affiliate system;
- if necessary, fill in the test parameter values.
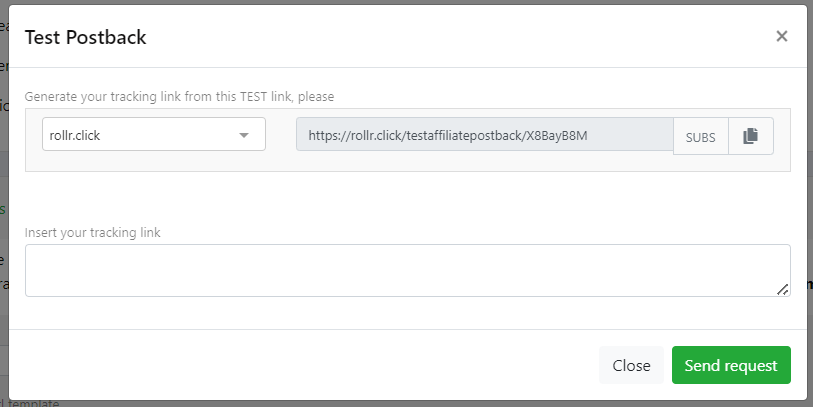
- Click Send Request.
¶ What will happen
- The system will follow your tracking link.
- A click will be created in our system.
- A test conversion of the selected Goal Type will be recorded.
- A postback will be sent to the affiliate system and a test conversion will appear there.
- Its type will match the selected Goal Type (for example, FTD).
- All parameters (clickId, sub1–sub5, amount, currency, conversion_id) will be transferred to the affiliate system.
¶ 💡 Tips
✅ Set up a separate postback for each Goal Type to keep your data structured.
✅ If an affiliate has several analytics systems/tools, you can add multiple postbacks for a single offer.
✅ Before launching traffic, be sure to test it using Test Postback.
✅ Check that all parameters (clickId, sub, amount, currency) are correctly saved in the affiliate system.
¶ Generating offer links for affiliate
Affiliate links are created in the affiliate's profile and are always linked to a specific offer and its landing pages.
¶ Steps to create a link
- Go to the profile of the desired affiliate.
- Inside the profile, select the Offers tab.
- Find the offer for which you want to generate a link.
- Open the offer – the system will show all available landing pages for it.
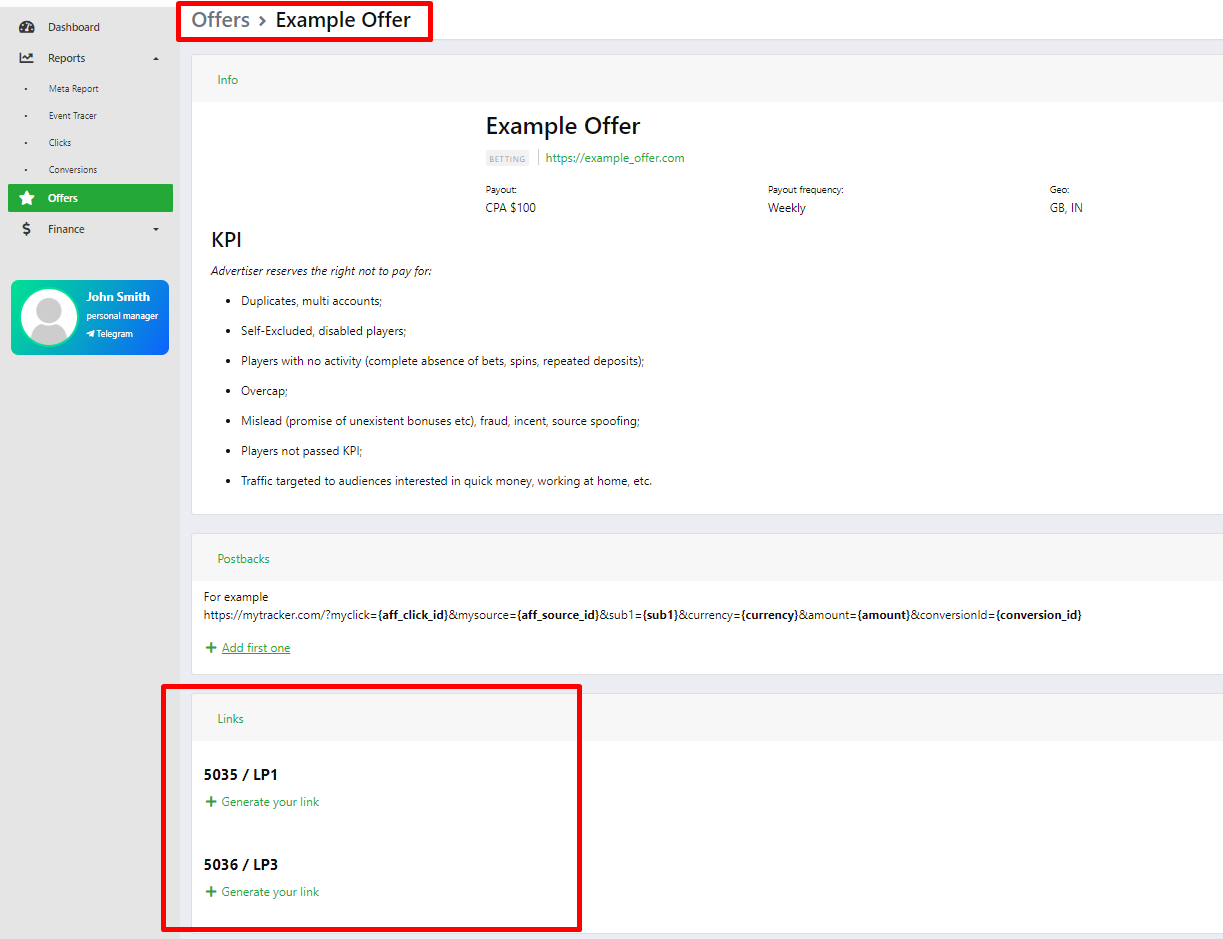
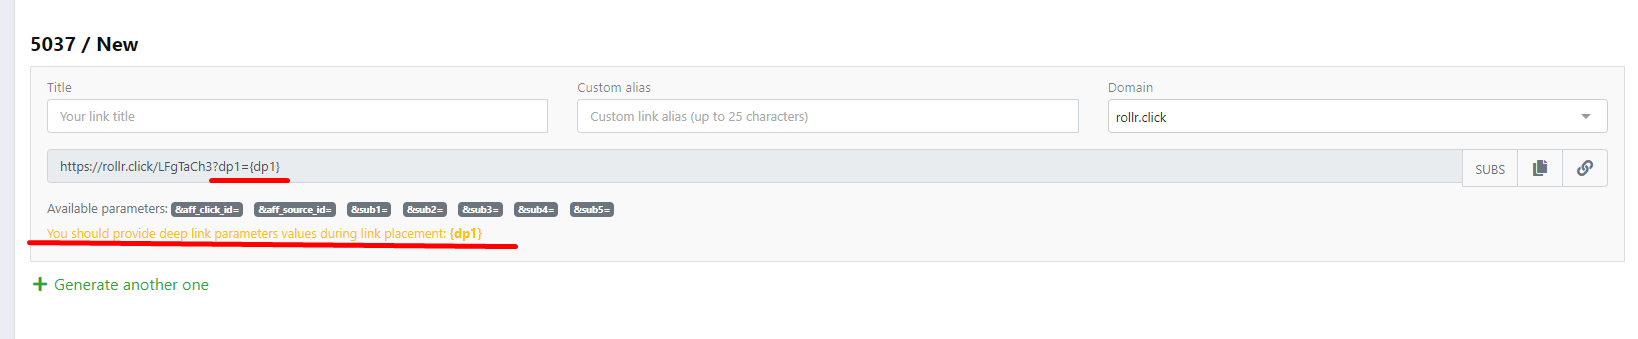
- You can create a link for the desired landing page (Generate your link button):
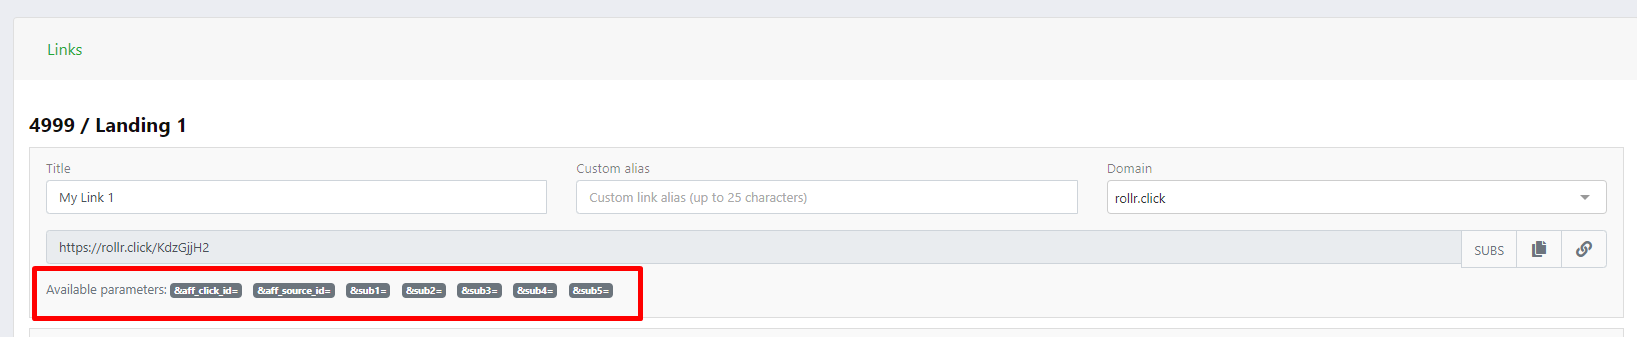
- Title – link name (for the affiliate's convenience, to distinguish between different links).
- Custom alias (up to 25 characters).
- Domain – the domain for redirection (select from the drop-down list; for example, rollr.click).

- Example of a generated link:
https://rollr.click/xxxxxx - Below each link, the available parameters that can be added to the URL are listed. Click on them to copy:
- &aff_click_id – click identifier,
- &aff_id – affiliate ID,
- &aff_source_id – traffic source ID,
- &sub1 – &sub5 – additional tags for tracking.
- .{dp1}…{dp5} – additional parameters (deep links) – required if added to the landing page Link
¶ Link management
You can create several links for one landing page (for example, for different traffic sources). The Generate another one button allows you to do this.
Available actions:
- 📋 (Copy Link to Clipboard) – quickly copy the link,
- SUBS (Add additional parameters) – view and add sub-parameters.
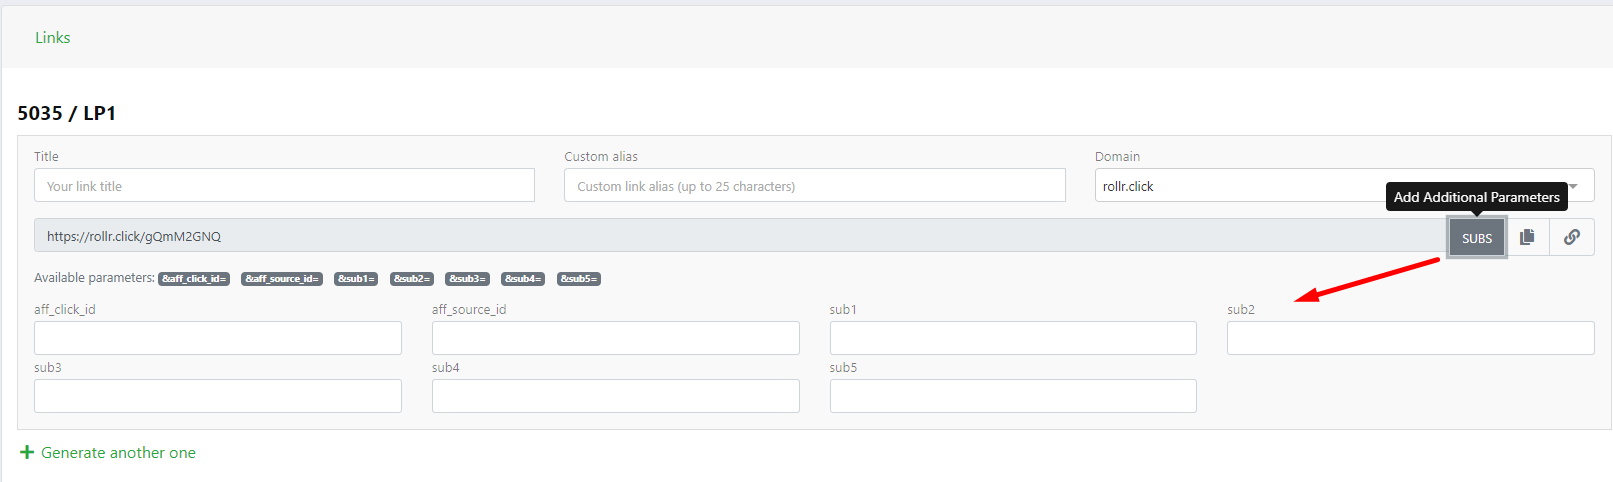
- 🔗 - Open Link in a new Window
¶ Connection with the offer and landing page
- The link is always connected to the landing page of the selected offer.
- When clicking on the link, the user will be directed to the landing page for which it was created.
- The administrator or manager can check and edit the created links in the affiliate's profile.
¶ Recommendations
- Create separate links for different sources (e.g., Facebook, Google).
- Use sub-tags for detailed campaign analytics.
- Check that the redirect leads to the landing page that is needed for the offer.
- All generated links for all affiliates can be found on the Affiliates -> links page.
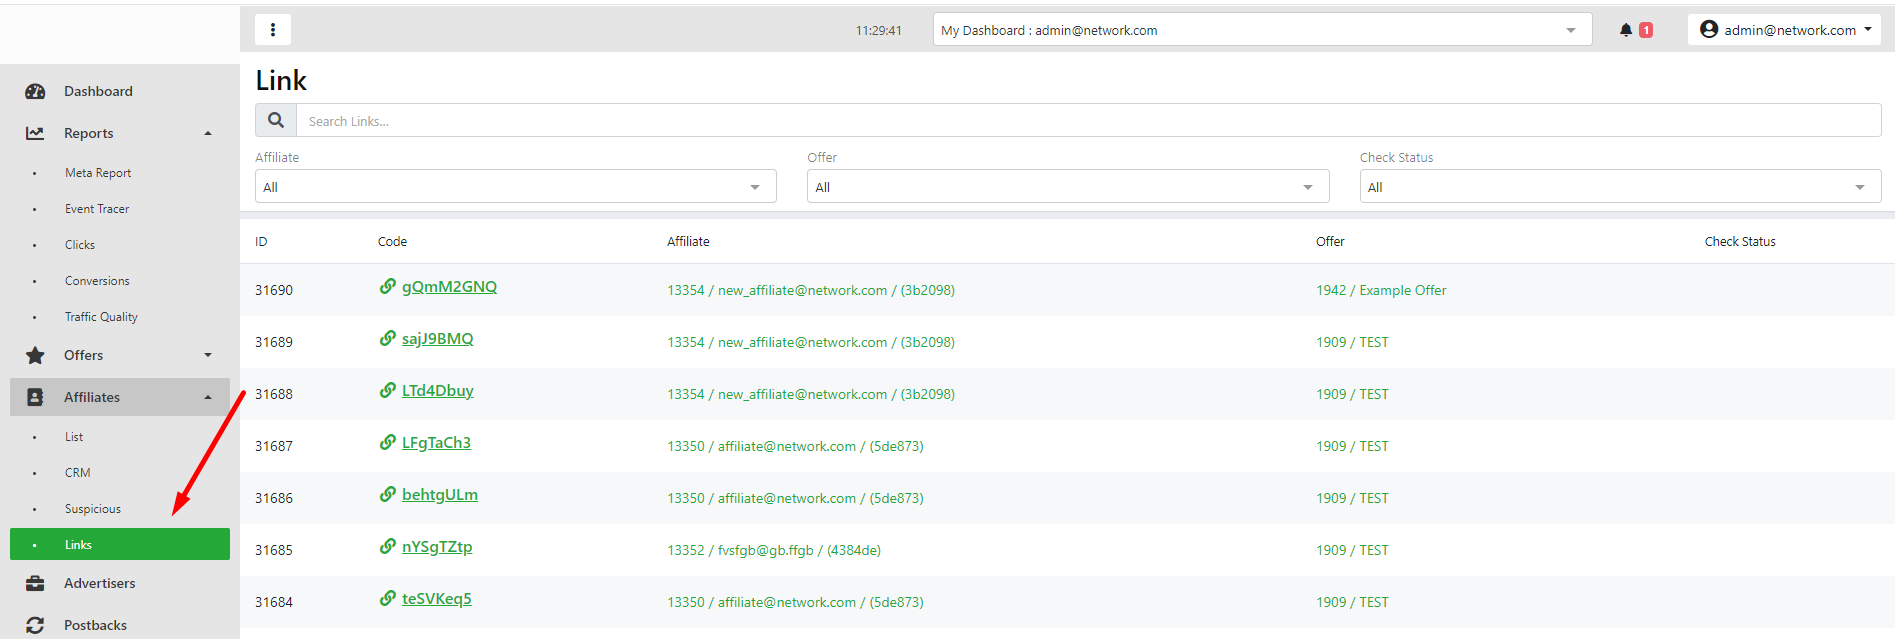 You can check the link on the same page by clicking on it. If the click went through, it should be in the Clicks report.
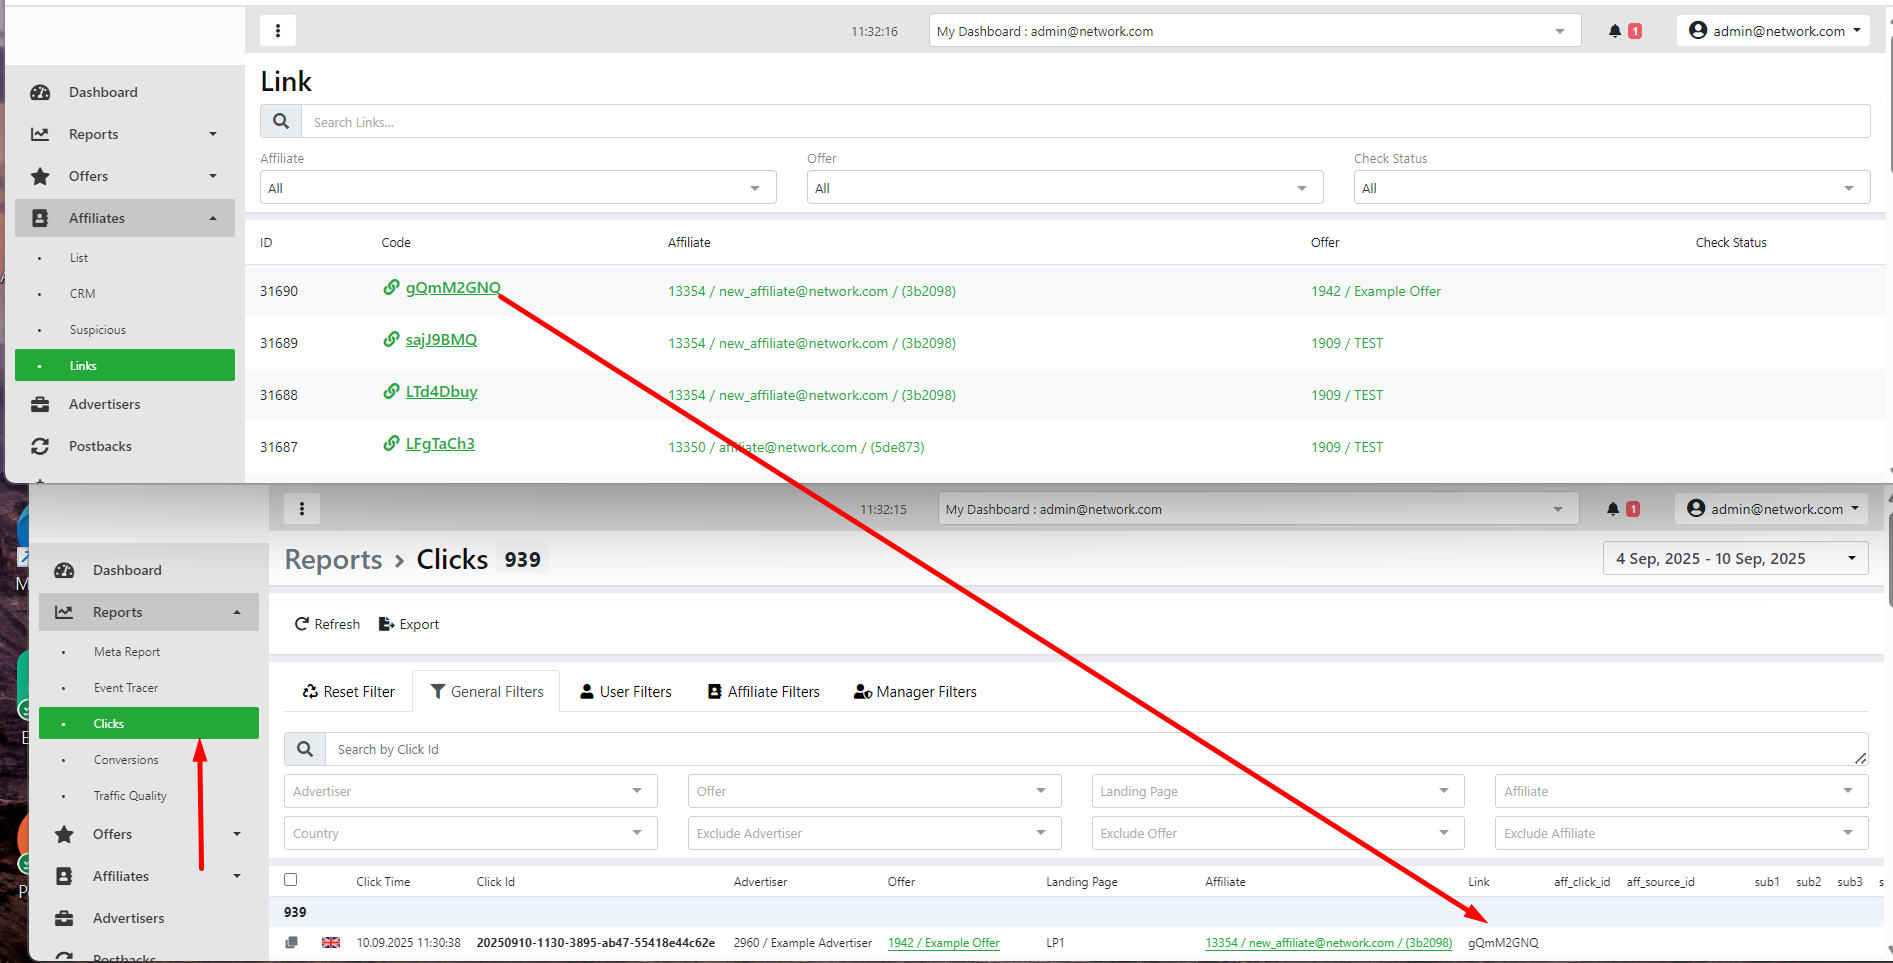
¶ Affiliate cards in CRM
¶ Why do you need Affiliate CRM?
The system helps managers:
- not lose new affiliates;
- store important information about each one;
- plan further contacts;
- manage priorities;
- exchange comments.
¶ Working with affiliate cards
- After registering a new affiliate in the system, a card is automatically created in the New column.
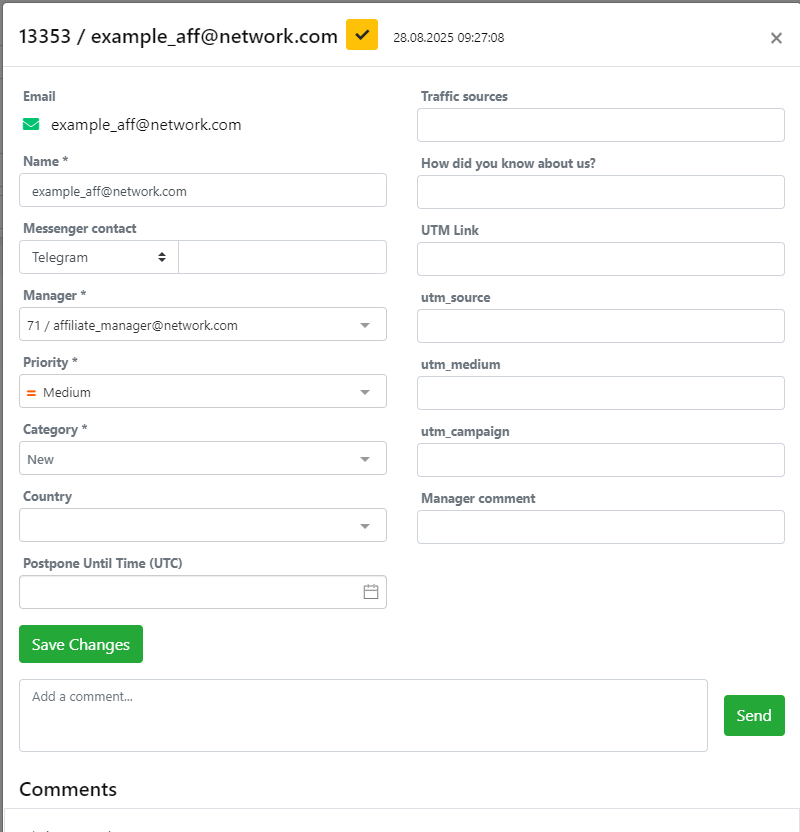
- Clicking on the card opens a profile where you can:
- View affiliate details (email, name, country, messengers, etc.);
- Approve the affiliate;
- Assign a manager;
- Add or correct information (for example, add traffic sources, UTM tags, comments);
- Specify the category (New, High Priority, Ping, Trash) - when the category is changed, the card is moved to the relevant column on the board;
- Set the time of the next contact using the Postpone Until Time (UTC) field;
- Add a comment for other managers.
¶ Affiliate categories
- New – all new affiliates are immediately placed here after registration;
- Active – affiliates are automatically moved to Active when they start generating traffic;
- High Priority – manually assigned by the manager for the most important affiliates;
- Ping – used if the affiliate has requested to be contacted later. This is a reminder not to forget to contact them again;
- Postpone – the card is displayed in grey if the time is set via Postpone Until Time. After the specified date, the card returns to work (displayed if the Show postpone checkbox is enabled);
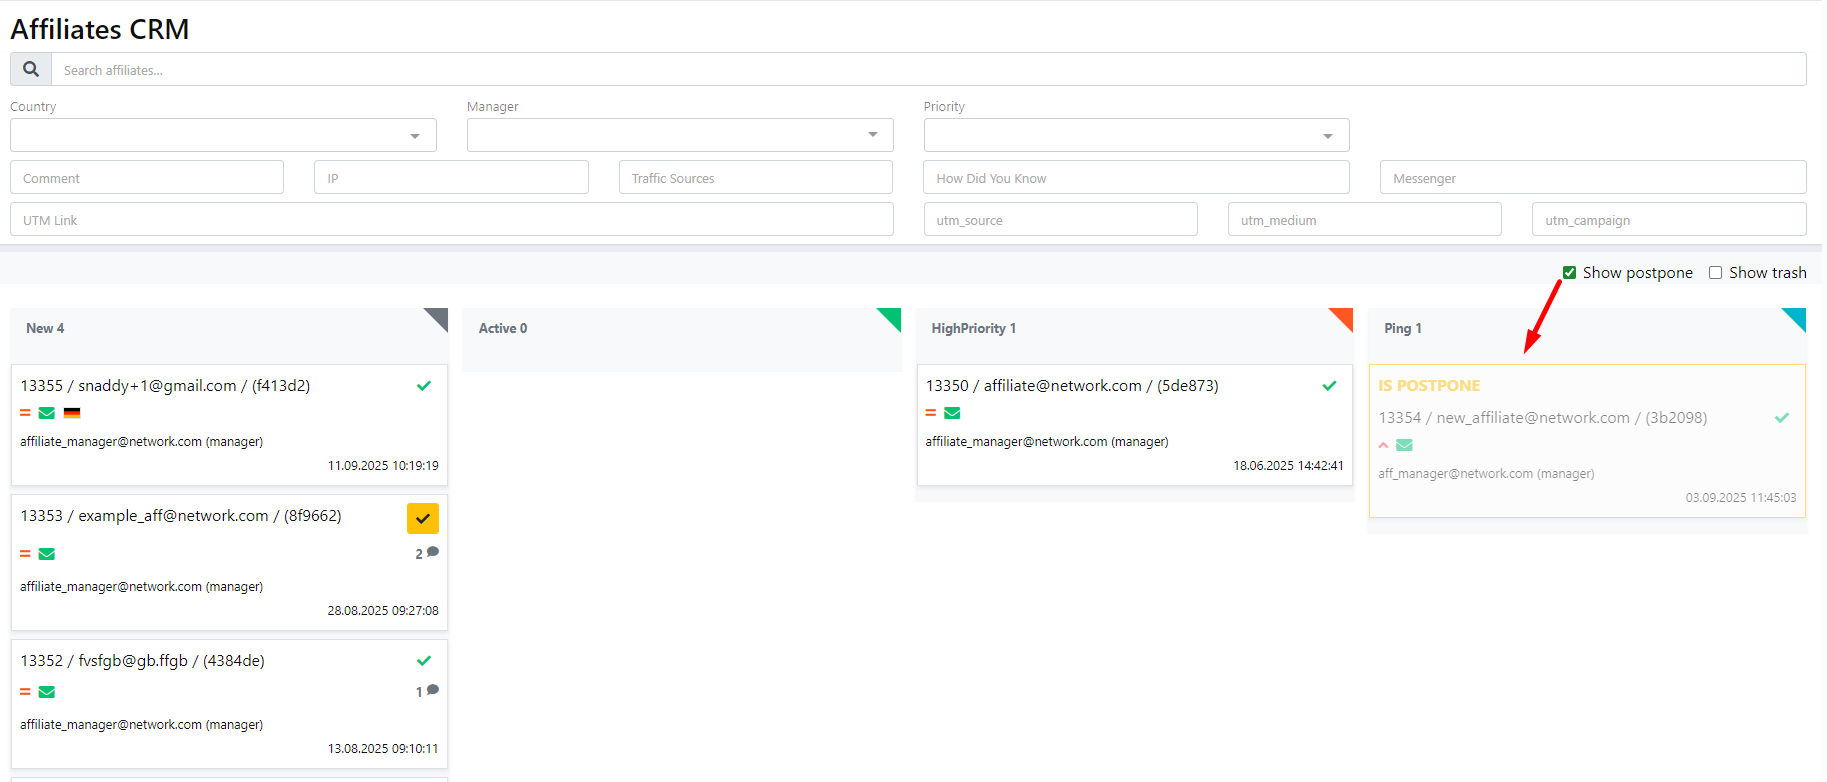
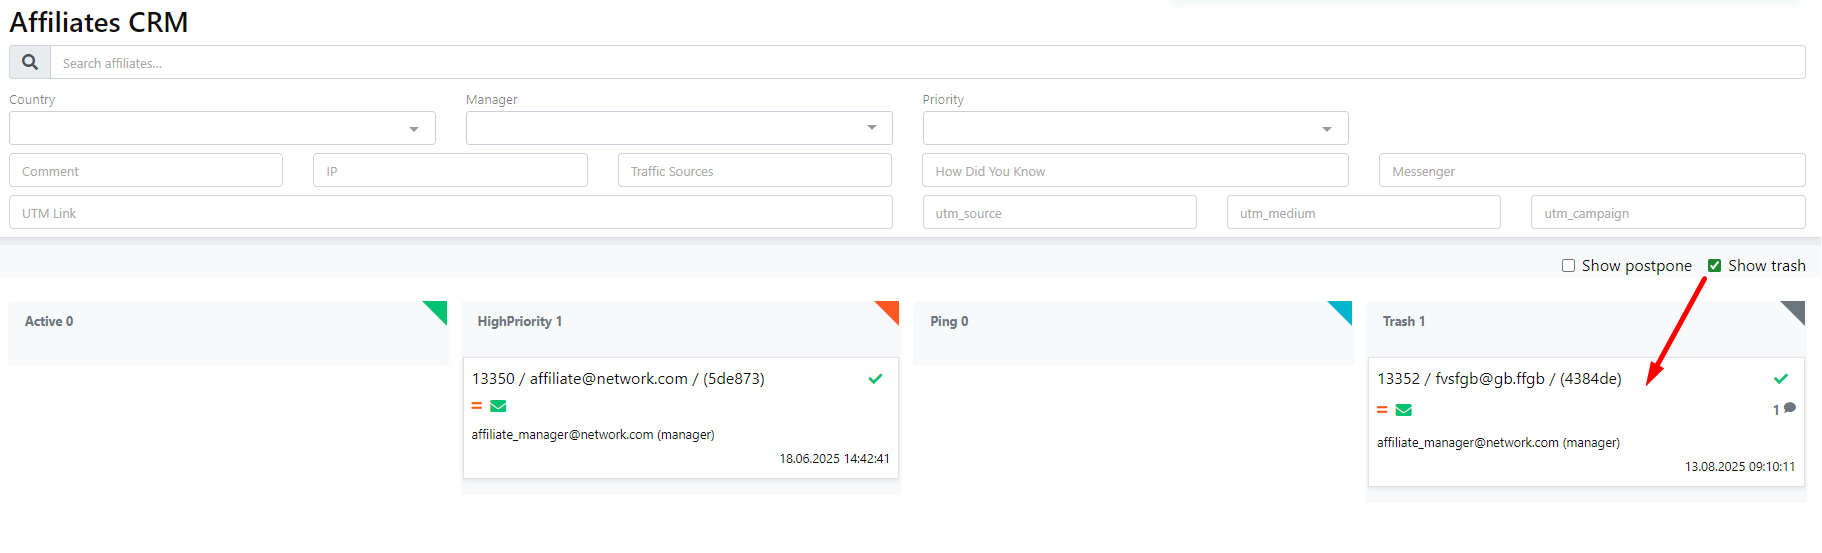
- Trash – affiliate cards that have been rejected or are no longer relevant (displayed if the Show Trash checkbox is enabled).
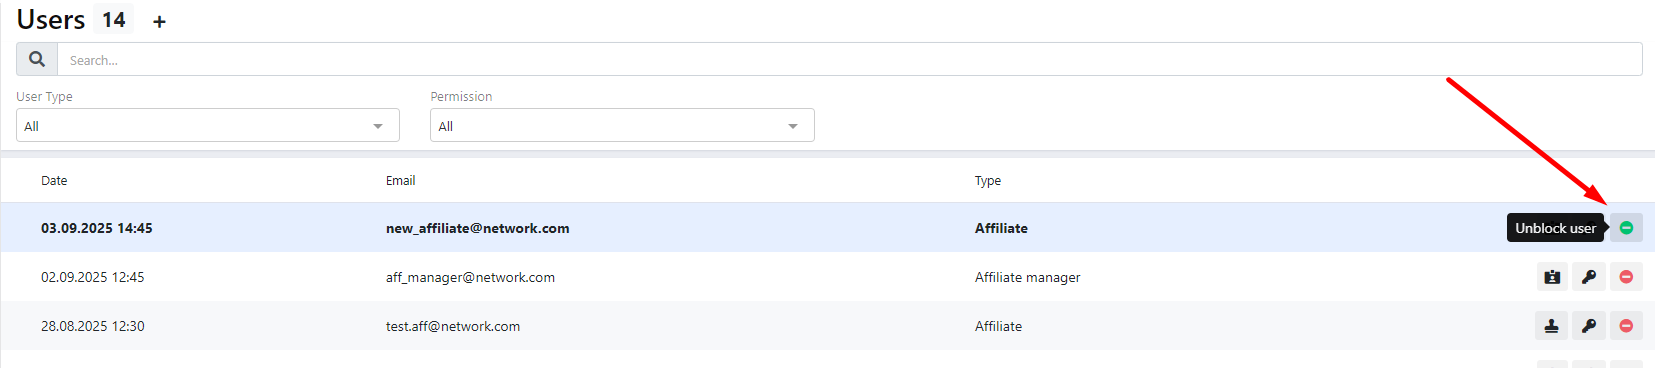
¶ Blocking affiliate account
- To block an affiliate account, go to the Settings section and then to the Users page.
- Find the affiliate's email address in the table.
- Click on the Block User icon.
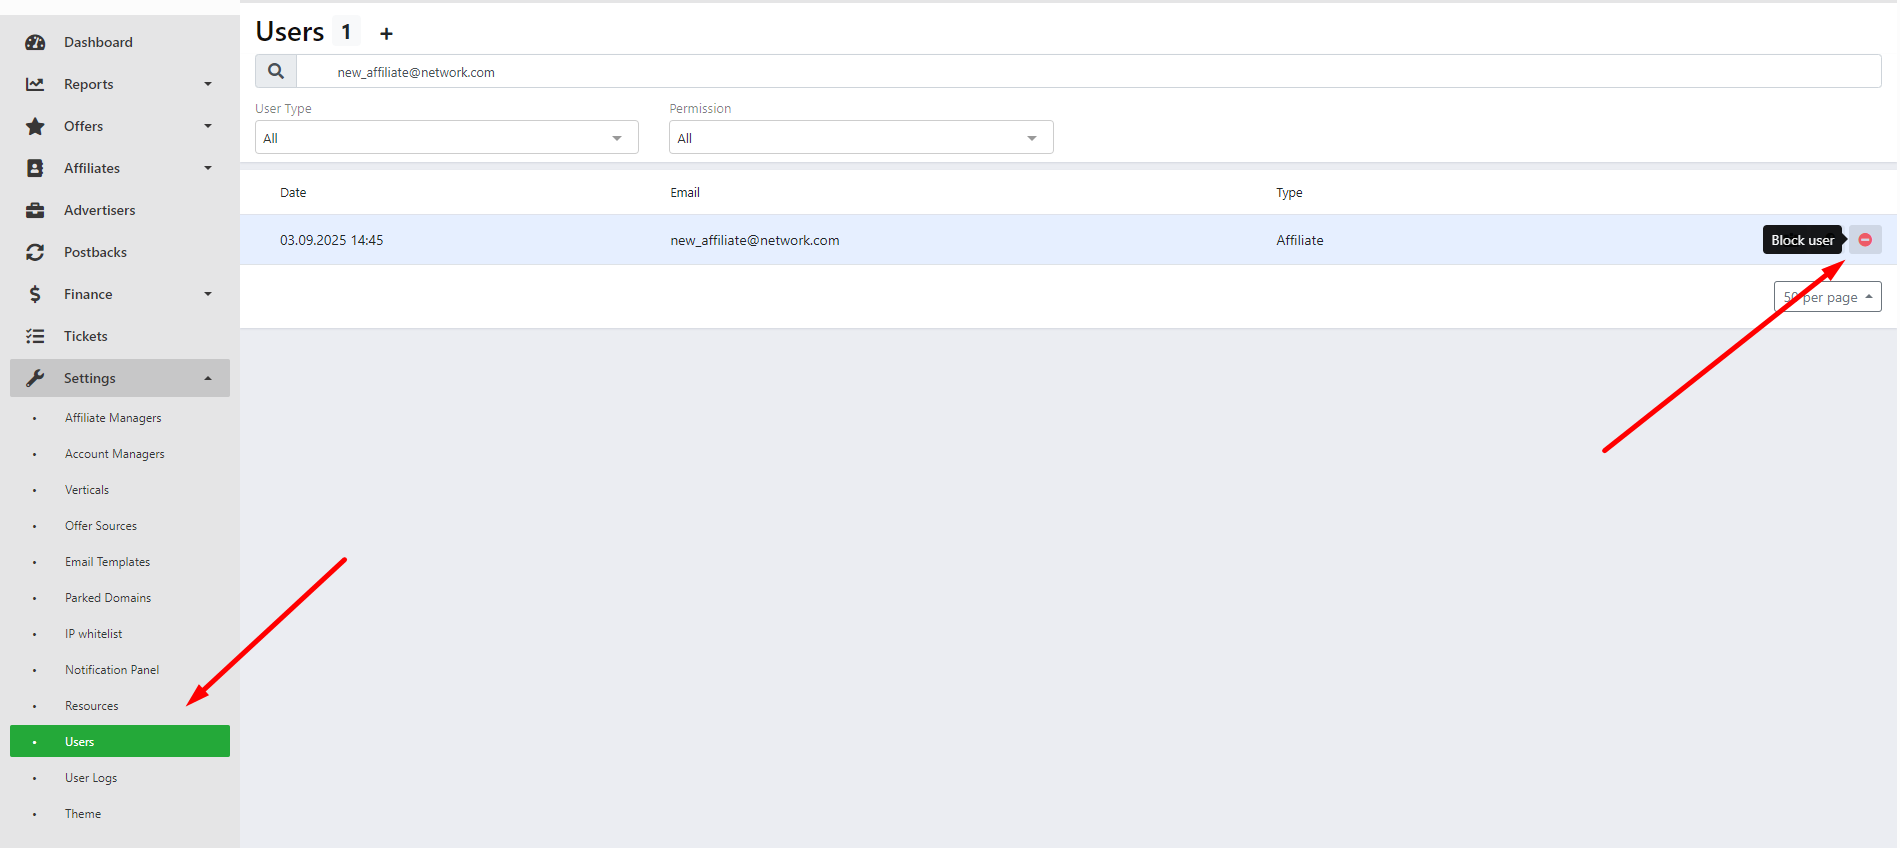
- The user will be blocked and will not be able to log in to the system. They will be highlighted in red in the table.
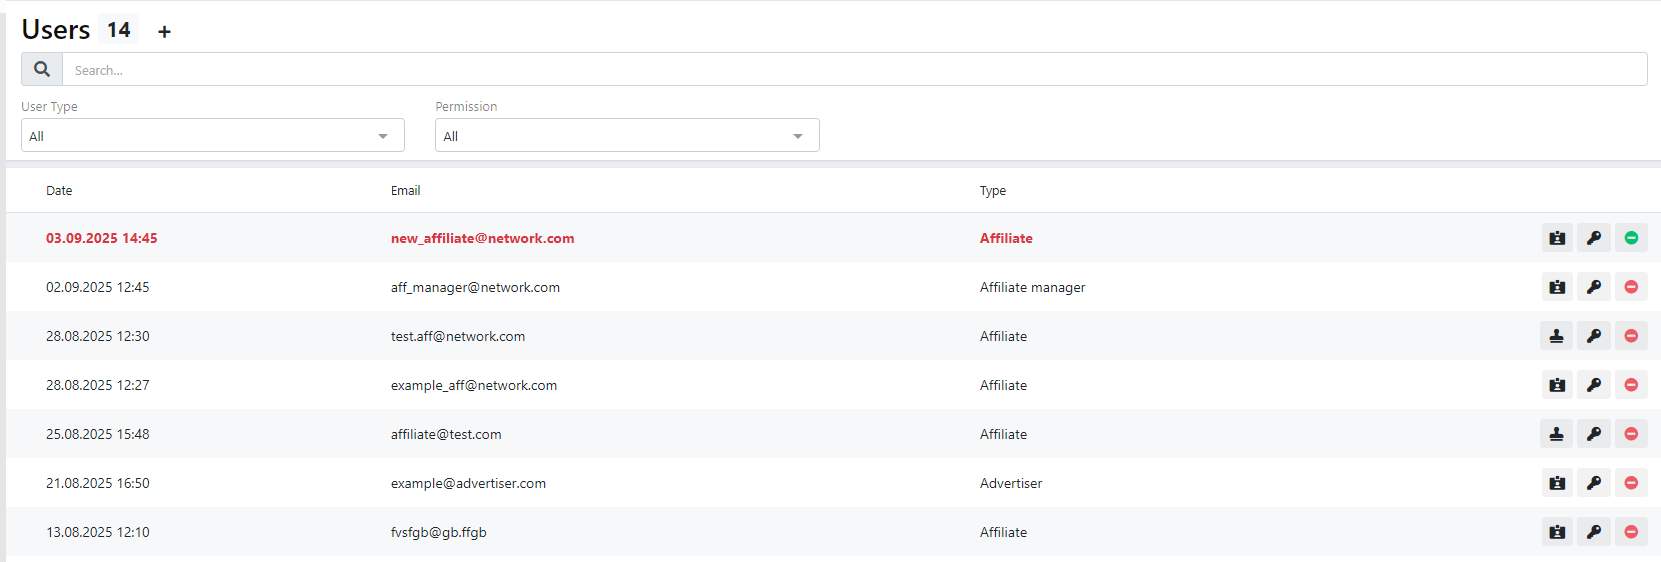
- If necessary, you can unblock them by clicking on Unblock User.
¶ Meta Report Filters
For more detailed analysis and monitoring of the campaign's performance, you can customize the parameters displayed in the report by selecting the appropriate filters on the Filter tab.
All filters are divided into 6 groups:
¶ General Filters
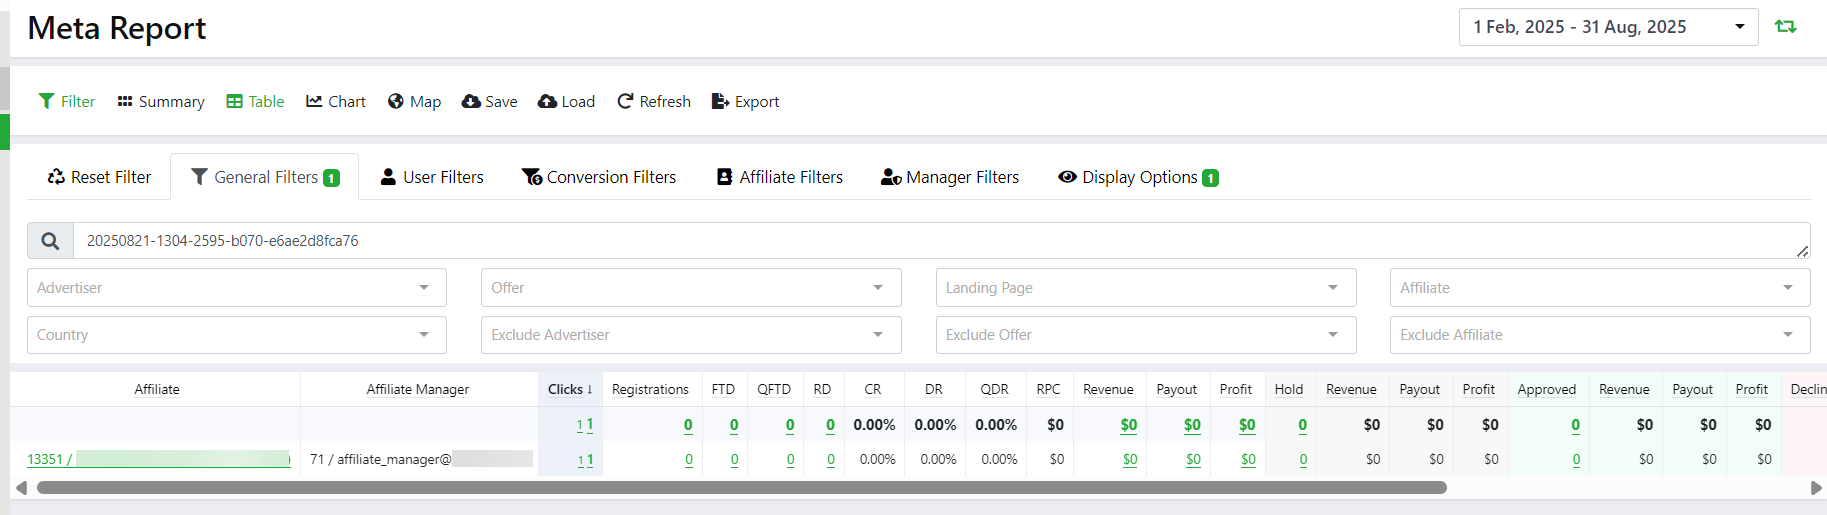
¶ Search
You can enter the ClickId of a conversion in the search field. The table will display information for this conversion only. The search works on a full match basis - you need to enter the full ClickId. Searching by ClickId will work regardless of the date set in the calendar.
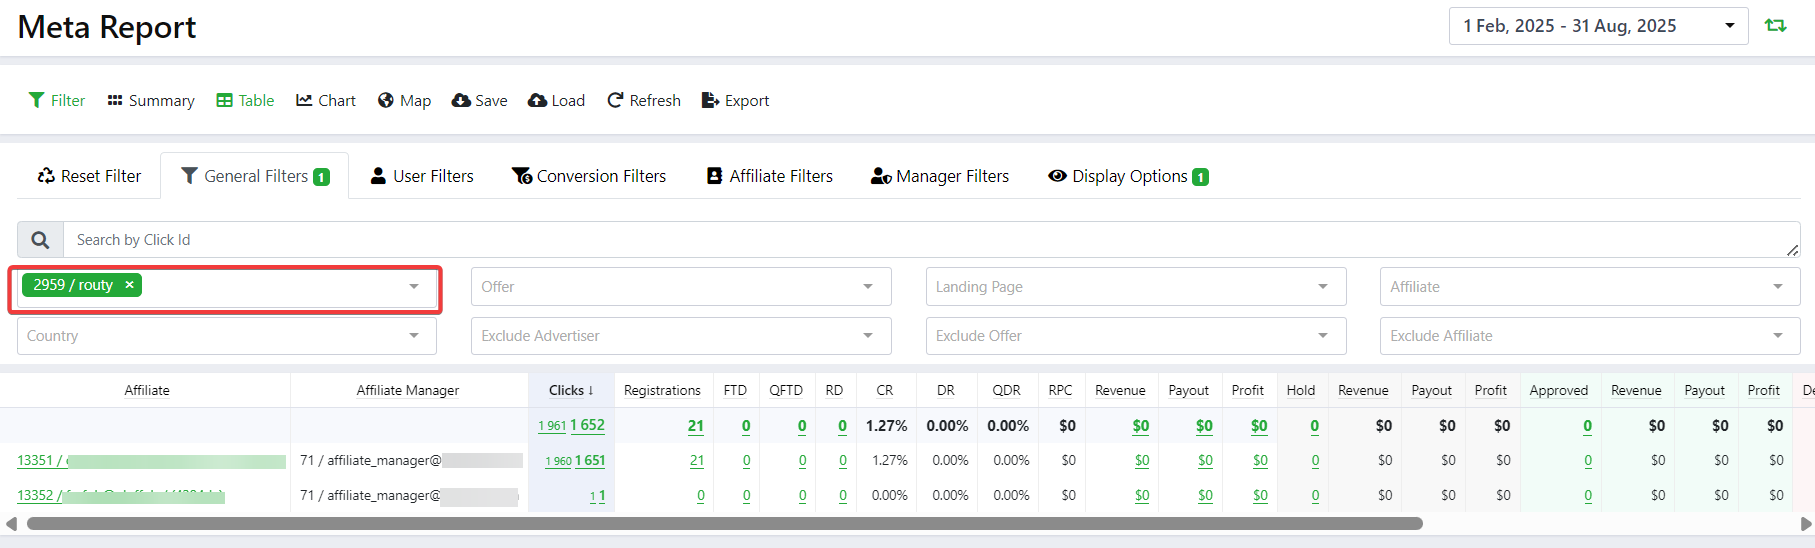
¶ Advertiser Filter
This filter will be useful if you need to review information about a specific Advertiser (one or several). The report will show the total information on all selected Advertisers, if you have not configured the breakdown by Advertisers in the Display Options filter group (for more details see Display Options section).
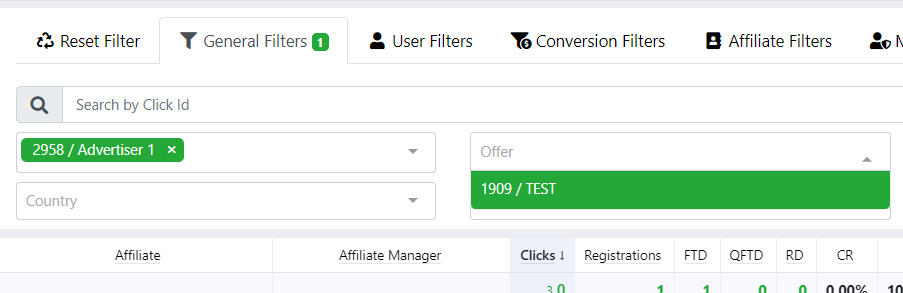
¶ Offer Filter
Using the filter by offer, you will be able to see information only on the selected offers. In the filter you can select several offers. The report will show the total information on all selected offers, if you have not configured the breakdown by offers in the Display Options filter group (for more details see Display Options section).

If you have previously set up the Advertisers filter, the list of the Offer filter will show offers related only to the selected Advertisers.
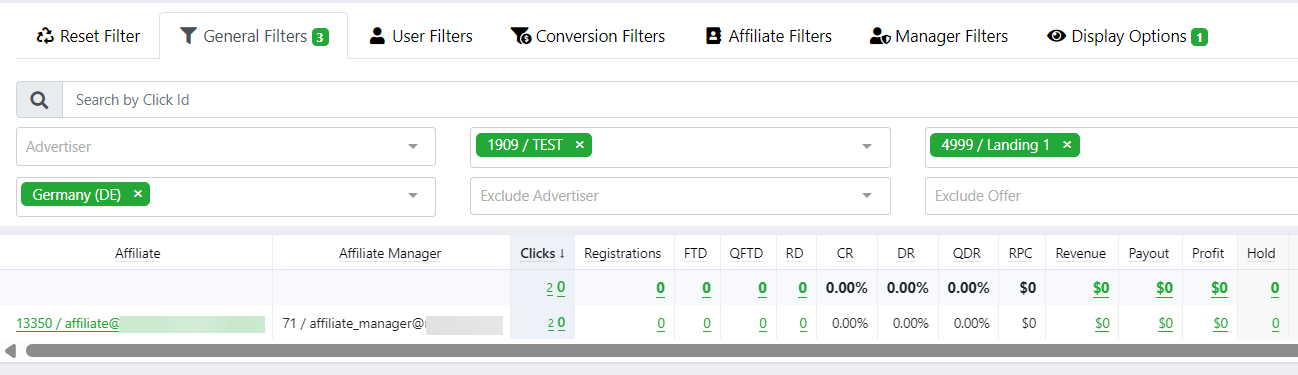
¶ Landing Page Filter
Using the filter by Landing Page, you can see summary information only for the selected Landing Pages. Multiple Landing Pages can be chosen. The report will show the total information on all selected Landing Pages, if you have not configured the breakdown by Landing Pages in the Display Options filter group (for more details see Display Options section).

If you have previously set up the Offer filter, the list of the Landing Page filter will show pages related only to the selected offers.

¶ Affiliate Filter
Using the Affiliate filter, you will be able to see information about the selected Affiliates only. You can select multiple Affiliates in the filter. The report will show the total information on all selected Affiliates, if you have not configured the breakdown by Affiliates in the Display Options filter group (for more details see Display Options section).

¶ Country Filter
Using the filter by country, you will be able to see information only on selected countries in total for all offers, if you have not set up the breakdown by offers in the Display Options filter (for more details see Display Options section).
You can select several countries in the filter.
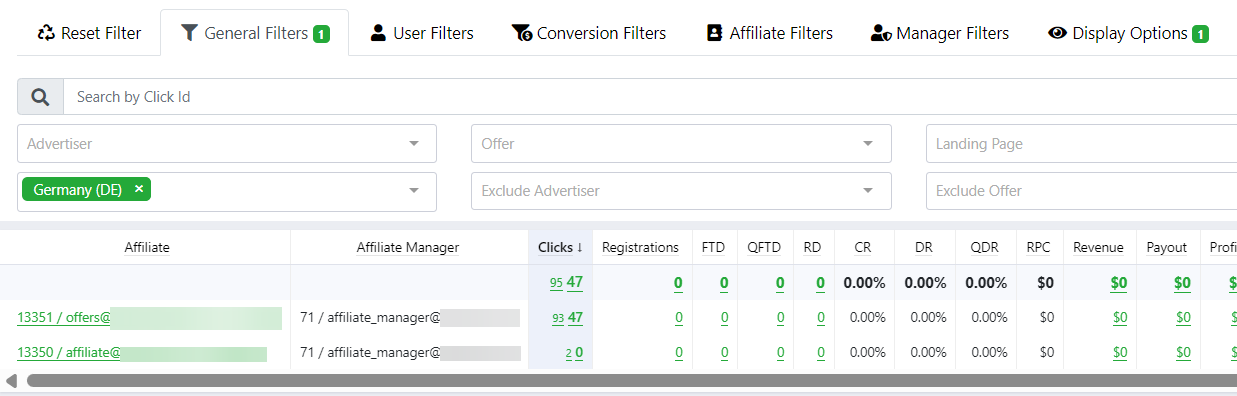
To display statistics by country for a specific Offer and/or Landing Page, set up Offer and/or Landing Page filters as well.
¶ Exclude Advertiser
By selecting an advertiser here, you will exclude it from the report. That means you'll get info on all advertisers for the selected period, except for the ones you set in the filter.
¶ Exclude Offer
This filter excludes a specific offer from the results.
¶ Exclude Affiliate
Allows you to remove data about a specific affiliate from the report.
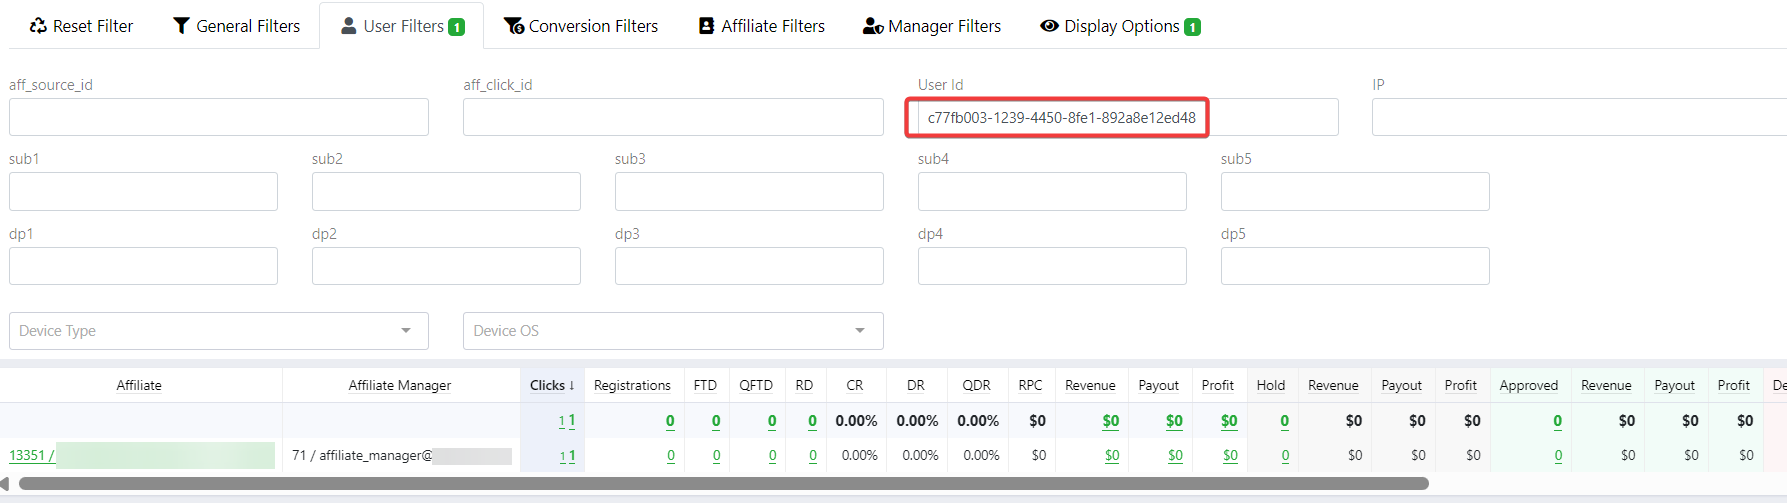
¶ User Filters
On this filter tab you can customize statistics on the following parameters:
- aff_source_id
- aff_click_id
- User Id
- IP
- sub1
- sub2
- sub3
- sub4
- sub5
- dp1
- dp2
- dp3
- dp4
- dp5
- Device Type:
- Desktop
- Mobile
- Tablet
- Other
- Device OS:
- Android
- iOS
- Linux
- Macintosh
- Windows
- Other
All fields are working on exact match search, i.e. you should enter the parameter value completely, otherwise the search will not work.
¶ Conversion Filters
After selecting parameters in the filters of this block, the report will contain data on clicks for all offers, but conversions will only be shown for the selected parameter.

¶ Goal Type Filter
customize the display of conversion statistics according to the goal type:
- Sign Up
- FTD
- QFTD
- ReDep
- RS (Revenue Share)
¶ Goal Filter
Using this filter, you select an offer and the goal that is added to it.
¶ Currency Filter
filter by set payout’s currency
¶ Conversion Kind
- Ordinary - regular conversions
- Correction - these are special conversions created by the system at the end of the month for offers with Goal Types RS (Revenue Share) and No Negative Carryover (the negative amount is not carried over to the next period). In other words, if the end-of-month balance is negative, an equal positive amount is created so that the next month starts from zero
¶ Conversion Status
Conversion status from an Advertiser:
- Hold
- Approved
- Declined
¶ Only Transactions check-box
Enabled check-box will show statistics only for those conversions whose Payout is not equal to 0.
¶ Affiliate Filters
This block contains filters for analysing data using UTM tags:
- UTM Link - allows you to filter statistics by a specific link containing UTM parameters
- utm_source - filtering by traffic source
- utm_medium - filtering by traffic type
- utm_campaign - filtering by campaign name

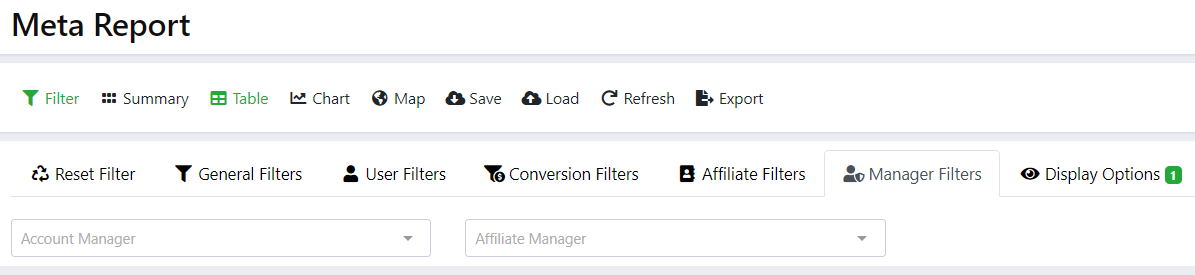
¶ Manager Filters
- Account manager - allows you to filter statistics by a specific manager to view results for the offers they are responsible for.
- Affiliate manager - filters data by a specific affiliate manager, which is useful for analysing the effectiveness of working with affiliates assigned to that manager.
If necessary, you can combine both filters.
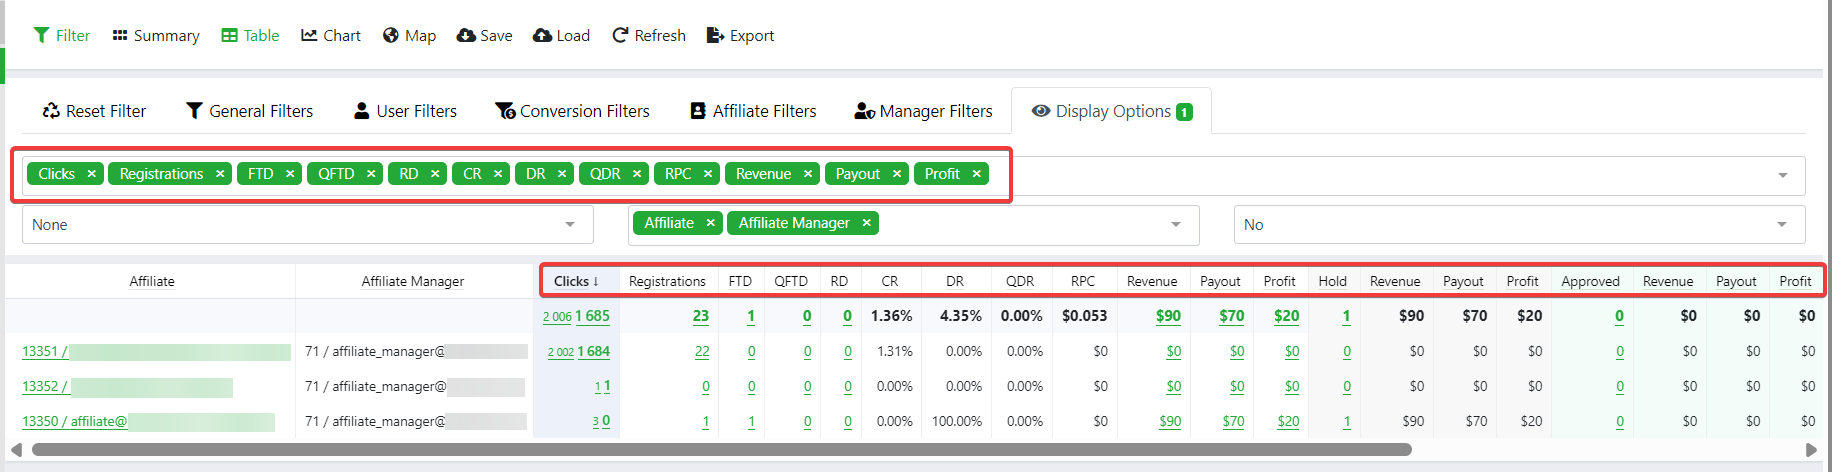
¶ Display Options
On this tab you can customize the columns displayed in the table.
¶ Display Columns
Adding / hiding the main columns of the table:
- Clicks
- Registrations
- FTD
- QFTD
- RD
- CR
- DR
- QDR
- RPC
- Revenue
- Payout
- Profit
¶ Breakdown By
Breakdown of statistics data by time interval:
- Hour
- Day
- Week
- Month
- Year

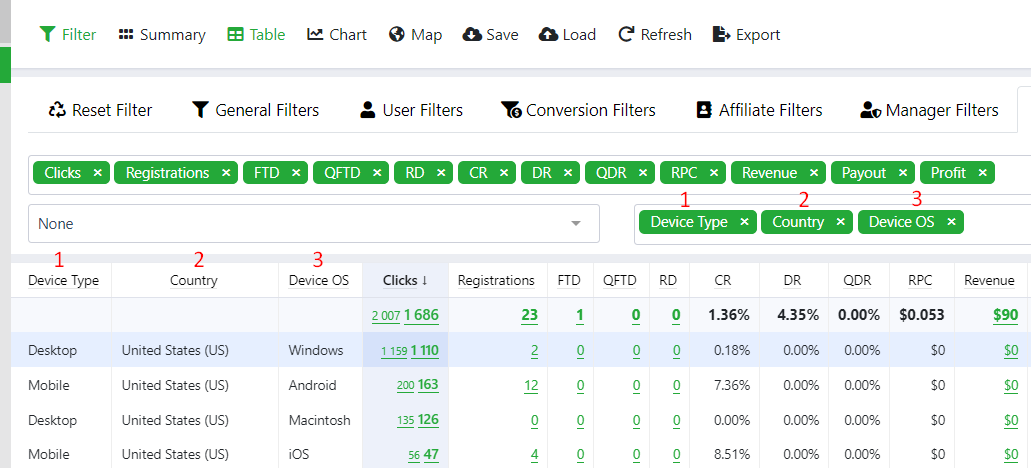
¶ Group By
Group data by parameters:
- Offer
- Landing Page
- Country
- Device Type
- Device OS
- sub1
- sub2
- sub3
- sub4
- sub5
- aff_source_id
- Affiliate manager
- Account manager
For example, if you select grouping by Device Type, all statistics will be grouped by Device Type
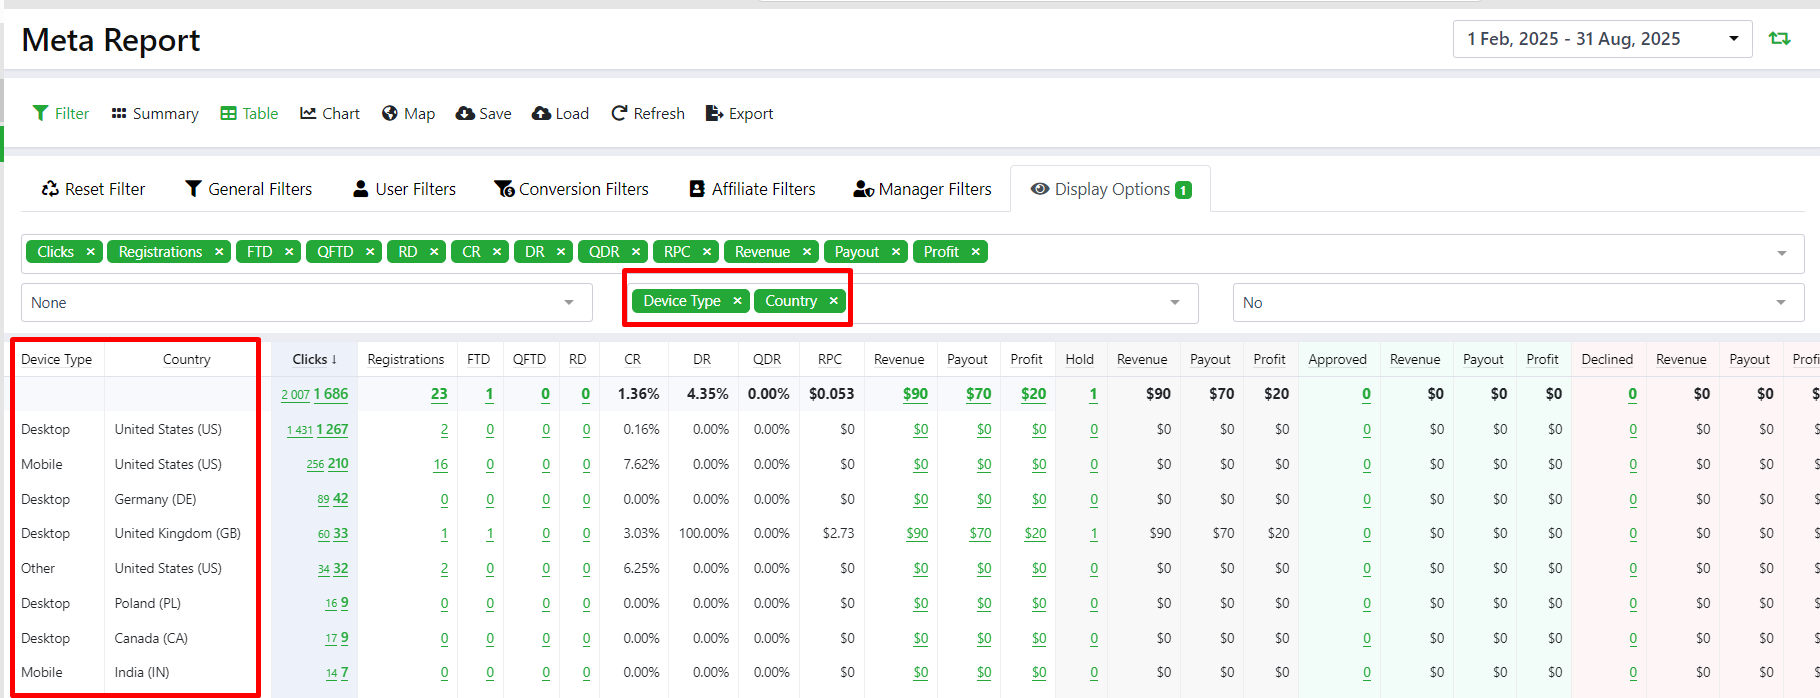
You can also group by several criteria at once. Note that the order in which parameters are selected affects the display of columns in the table.
¶ Hide Zero Values
Applying this filter will help you hide those rows where all columns except clicks are 0.
By default, when opening the Meta Report:
- all values in the Display Columns filter are selected,
- the report is grouped by Affiliate and Affiliate Manager using the Group By filter,
- zero values are hidden.
This selection is also taken into account when resetting filters.

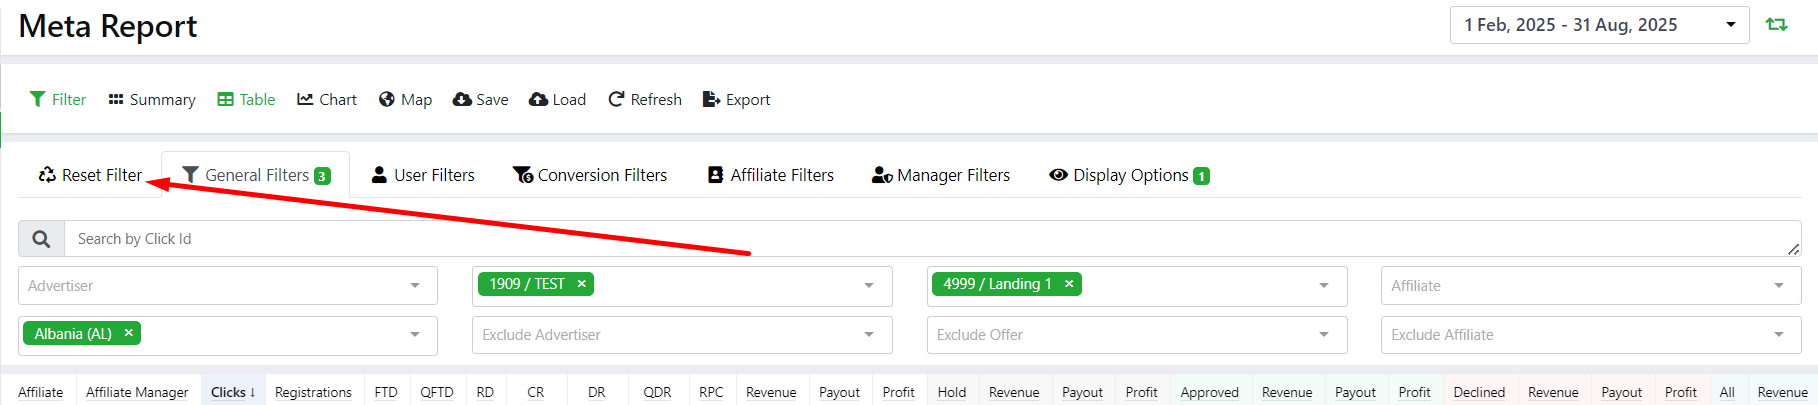
¶ Reset Filters
You can reset all configured filters by clicking the Reset Filter button
¶ Conversions
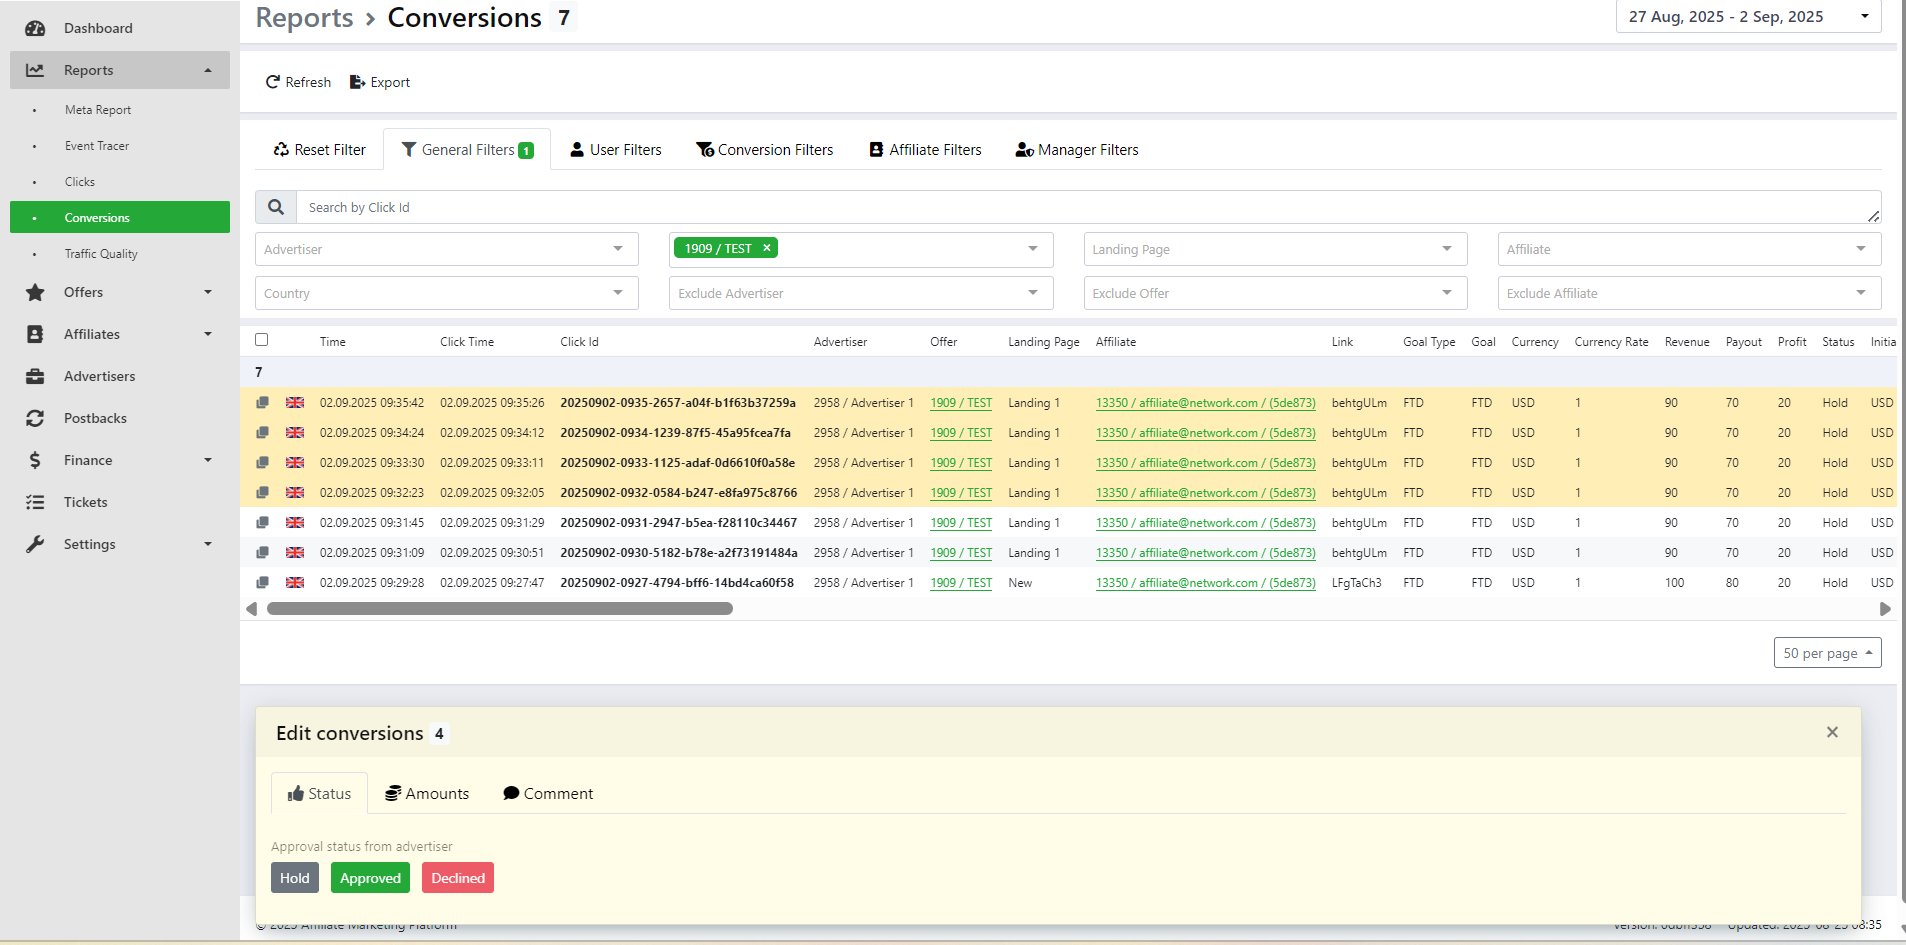
¶ Changing Conversion Status
- Go to Reports → Conversions.
- Find the conversion you need (for example, using the Advertiser, Offer, Affiliate filters, etc., or searching by Click ID).
- Select the conversion by clicking on it (one or more).
- In the panel that opens, set the required status for the conversion on the Status tab:
- Hold – on hold,
- Approved – confirmed,
- Declined – rejected.
- Changes are saved automatically after selection.
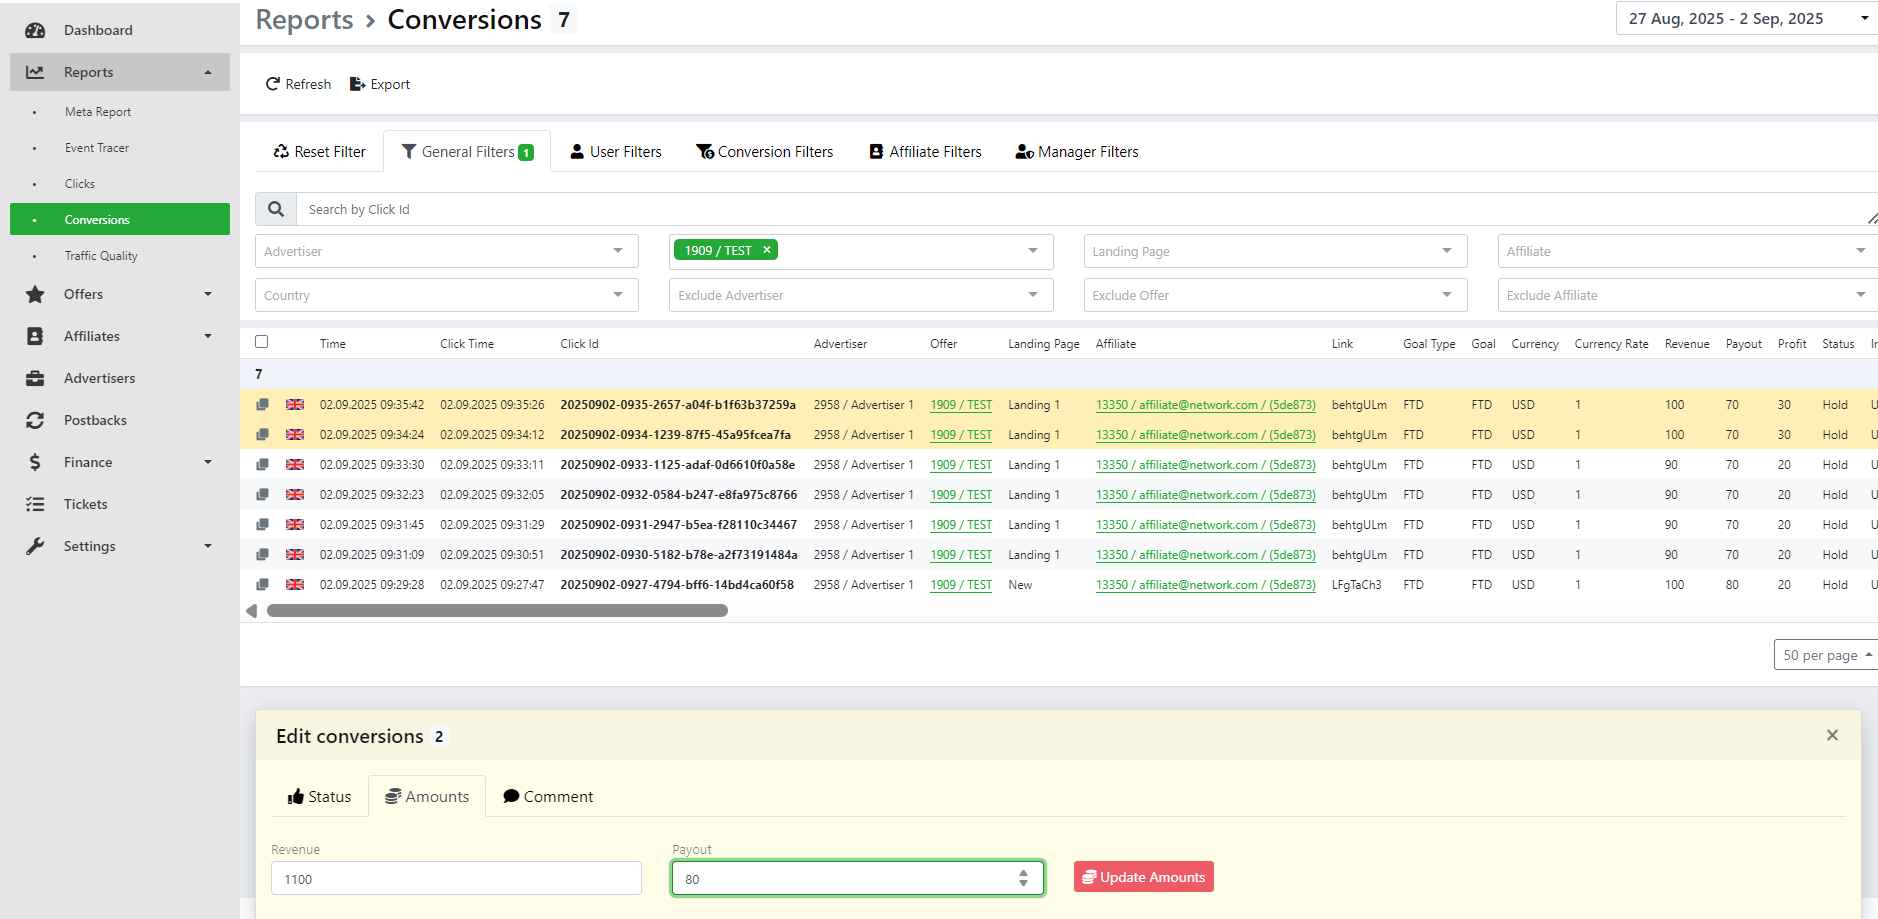
¶ Changing Conversion Payout / Revenue
- Go to Reports → Conversions.
- Find the desired conversions (one or more) and select them by clicking on them.
- In the panel that opens, select the Amounts tab.
- Change:
- Revenue – income from the advertiser,
- Payout – payment to the affiliate.
- Confirm the changes by clicking on the Update Amounts button.
¶ Meta report: Comparing statistics by periods
This feature allows you to compare statistics for two different time periods. This helps you analyse trends: growth or decline in metrics (clicks, registrations, conversions, revenue, profit, etc.).
¶ How to use
- Click on the Compare button next to the calendar

- Another calendar will appear, where the period equivalent to the current one will be automatically set. That is, if the current period selects a month with 31 days, then 31 days of the past period will also be selected

- The table will update and show data for the selected period + dynamics in % (growth or decline relative to the previous period).
¶ Data interpretation
- Green values show growth (e.g., +100%).
- Red values show a decline (e.g., -50%).
- Yellow values show no change (0%).
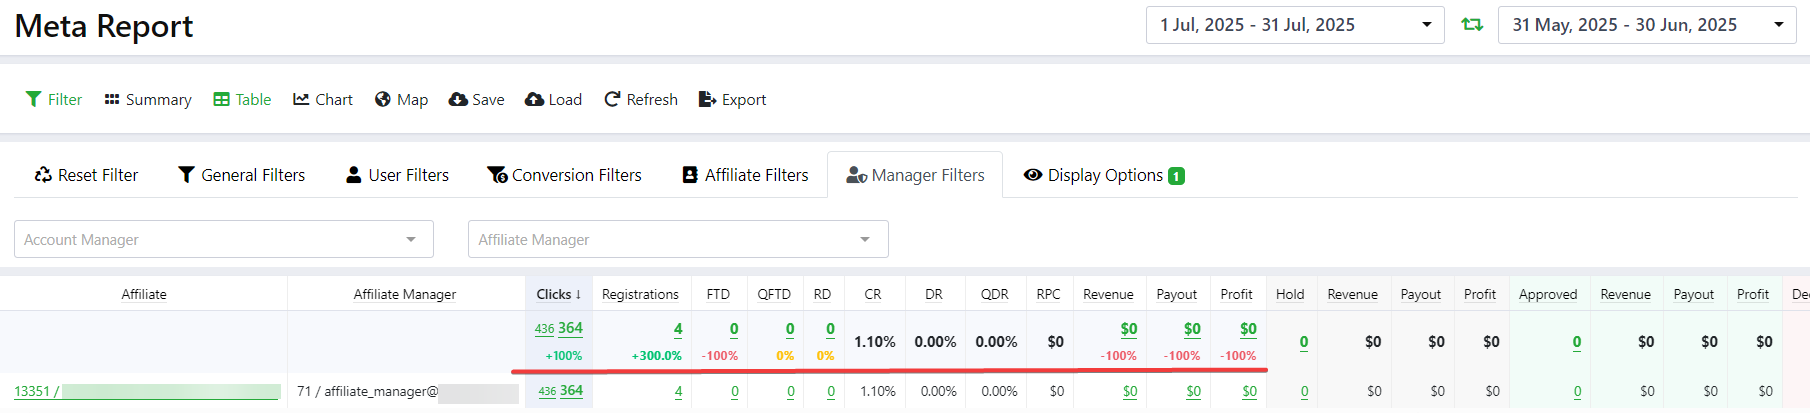
This allows you to quickly understand whether the campaign's performance has improved compared to the previous period.
¶ Reset comparison
To remove the comparison and see only one period, click the Compare button again.

¶ Switch User
¶ Login as affiliate / affiliate manager / account manager
The administrator has the opportunity to log into any user's account for verification or configuration purposes.
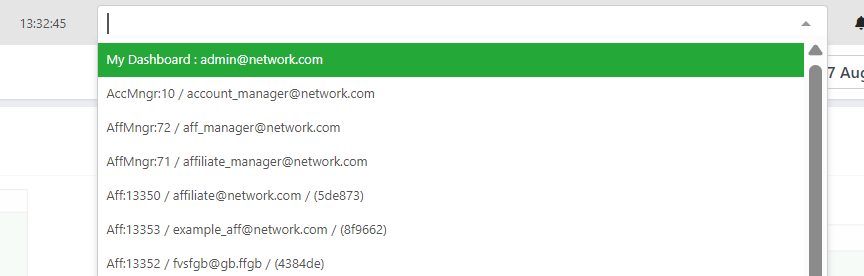
- Via the dropdown list
- Click on the current login at the top of the panel.
- In the dropdown list that opens, select the desired user (Affiliate, Advertiser, or Manager).
- After selecting, you will automatically be taken to the interface of the selected user.

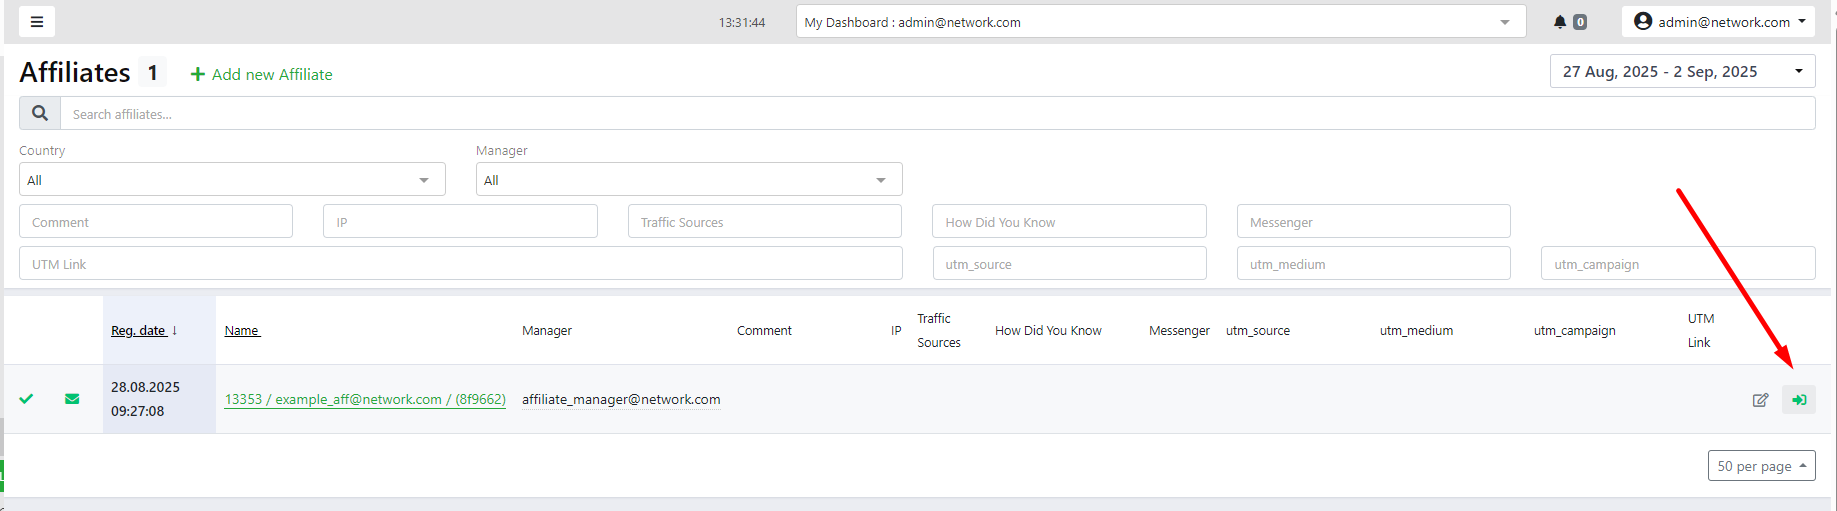
- There is another way to access an affiliate account: through the affiliate list.
- Go to Affiliates → List.
- Find the desired affiliate in the table.
- At the end of the line with the affiliate, click on the arrow icon.
- You will be taken to that affiliate's account.
¶ Returning to the Admin account
- After logging into another user's account, the administrator can always return to their own:
- Click on the current login at the top of the panel.
- In the drop-down list, select your admin account (My Dashboard / ‘your email’).
- The interface will switch back to administrator rights.
¶ Finance
¶ Affiliate payout requests
¶ Adding a payout request
¶ Who can create a request
- An affiliate can create a payout request independently in their profile. In this case, the administrator will see it in the table on the Finance → Payout Requests page with the Status Wait.
- The administrator or manager can also create a payout request manually directly on this page.
¶ How to create a payout request
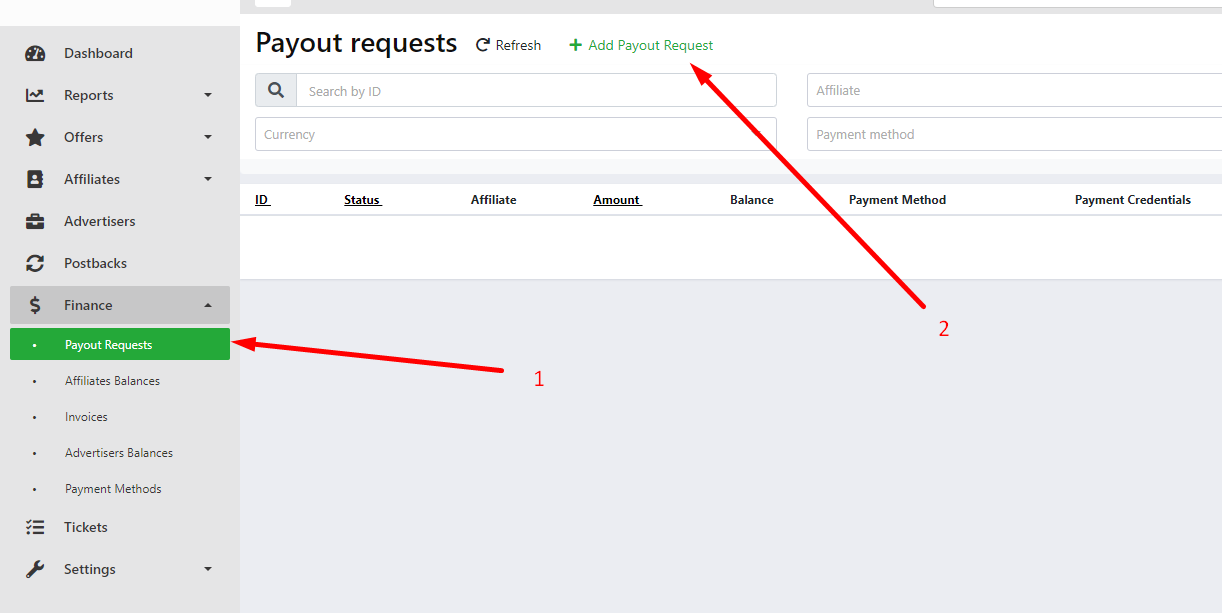
- Go to Finance → Payout Requests.
- Click the + Add Payout Request button.
- In the form that opens, specify:
- Affiliate — select an affiliate from the list.
- Balances — the affiliate's available balance in currency. You can only create a request if the affiliate has a positive balance.
- Payment method — payment method (PayPal, BTC, etc.). The affiliate must first add payment details to their account.
- Amount — payment amount. You can pay out the balance in partial amounts rather than all at once. However, you cannot withdraw more than the approved balance.
- Status — request status. Wait is selected by default.
- Comment — add a comment if necessary.
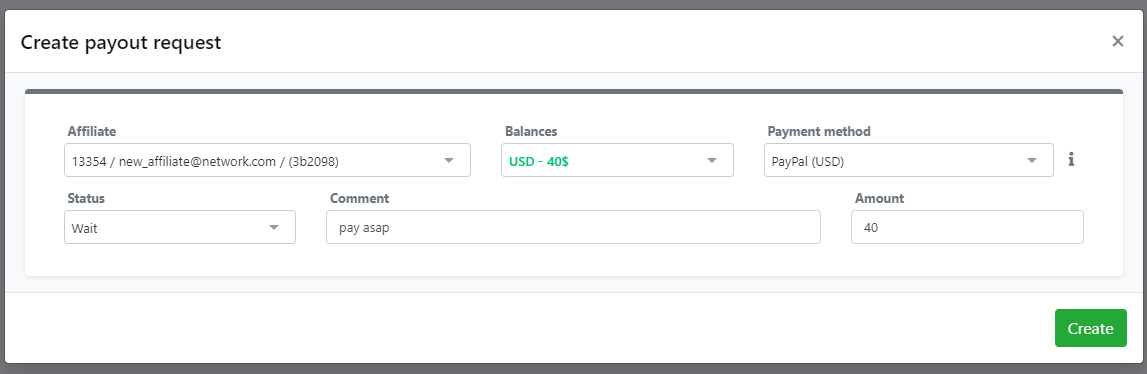
- Click Create to save the request. It will appear in the table and in the affiliate's account (unless otherwise specified by the Is Hide setting).
¶ Payout requests table
The table displays all payout requests that have been created.
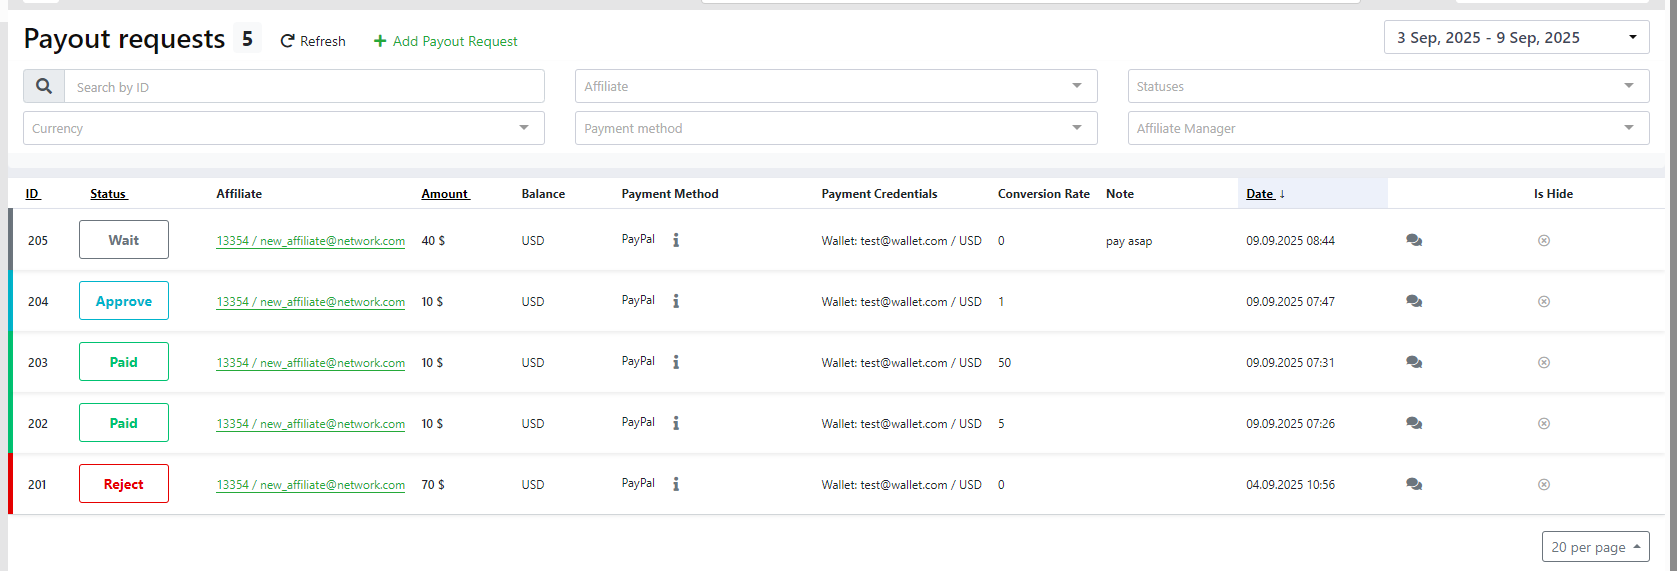
Main columns:
- ID — unique request number.
- Status — current status (Wait, Approve, Paid, Reject).
- Affiliate — affiliate who created the request (for whom the request was created).
- Amount — payment amount.
- Balance — affiliate balance currency.
- Payment Method — selected payment method. The i icon next to it allows you to view information about the method.
- Payment Credentials — payment details (e.g. wallet or e-mail).
- Conversion Rate — conversion rate, if applicable.
- Note — you can add a note via the Show details icon.
- Date — date and time of request creation.
- Is Hide — control the visibility of the request for the affiliate:
a. grey cross — the request is visible to the affiliate;
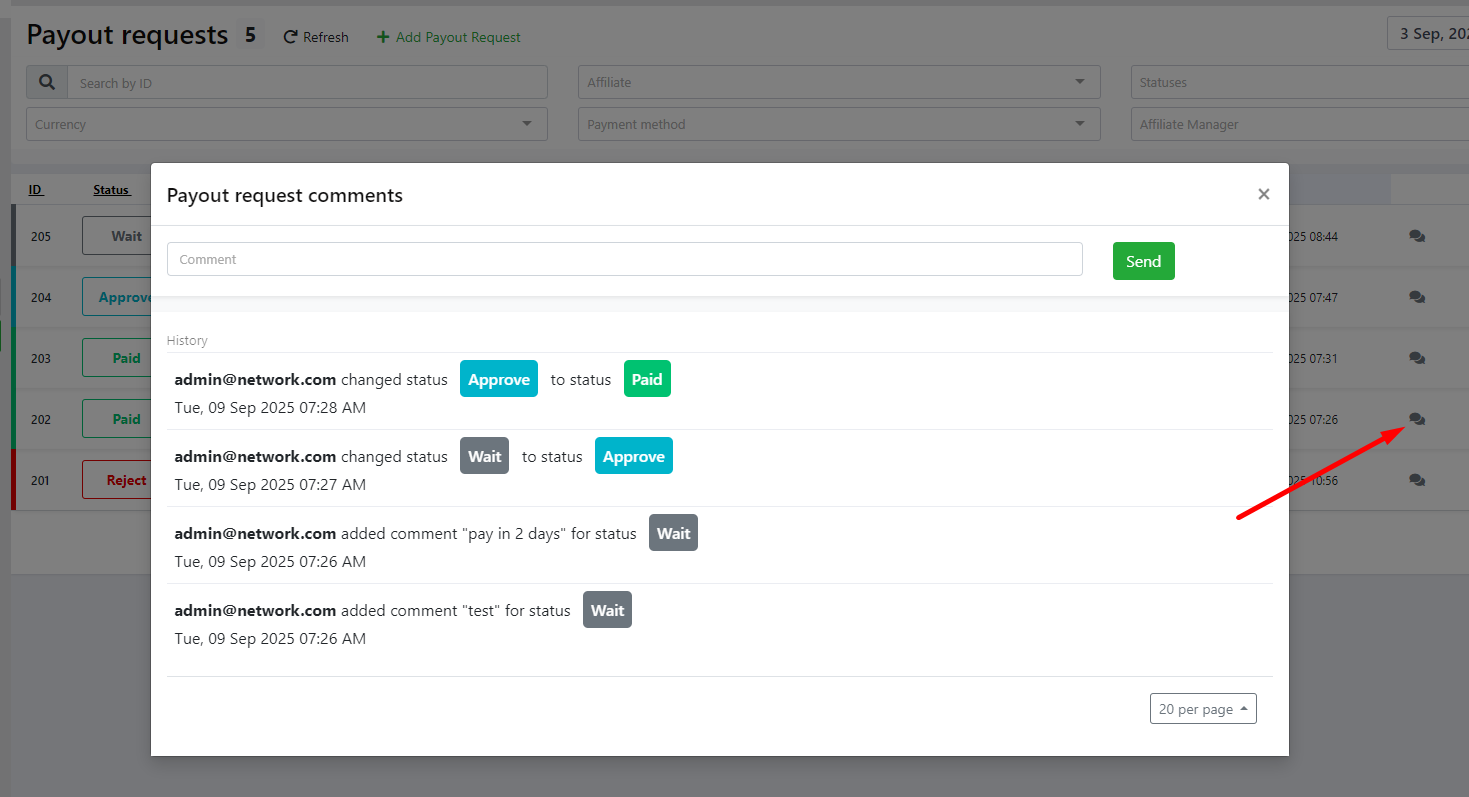
b. green tick — the request is hidden and the affiliate cannot see it. - Comments on the request (Show details)
a. By clicking on the Show details icon in the table, you can leave a comment on the payout request.
b. The window that opens displays the history of changes in status and comments.
¶ Payout request statuses
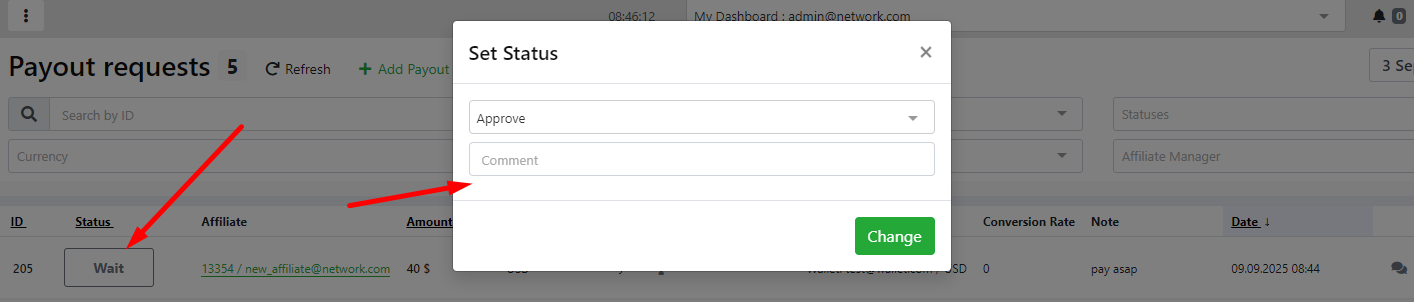
1. Wait
- The request has just been created (by an affiliate in their profile or by an administrator/manager).
- At this stage the administrator or manager must review it.
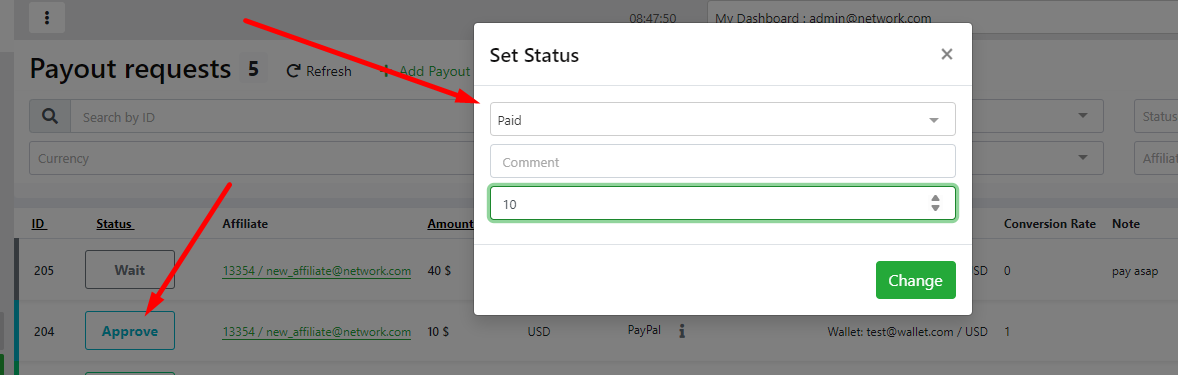
2. Approve
- The request has been verified and confirmed. This means that the request is correct and ready for payment.
- At this stage the admin can:
a. Transfer the request to Paid, specifying the actual amount paid.
b. Or reject the request (Reject) if there are reasons to do so.
3. Paid
- Payment has been made, the amount has been deposited.
- The request is considered complete.
4. Reject
The request has been rejected at any stage (from Wait or Approve), for example, due to incorrect details, insufficient funds or violation of terms and conditions.
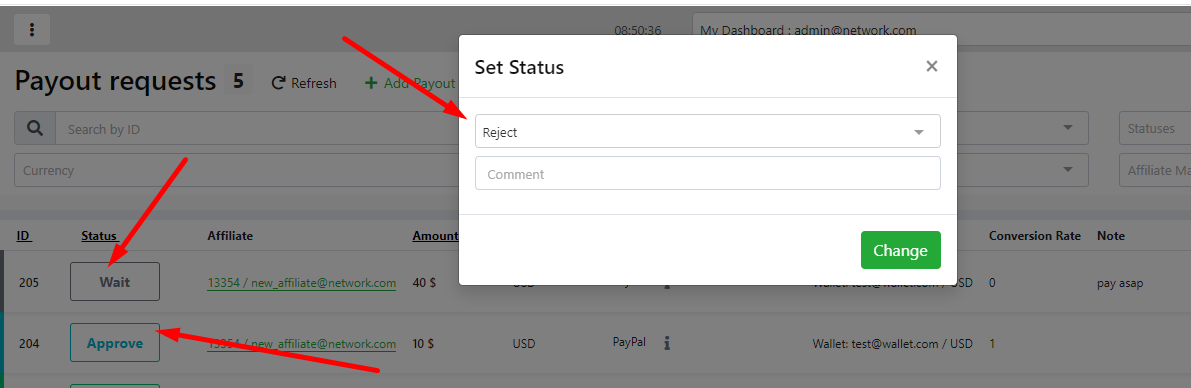
Status changes are recorded in the request comment history (Show details), where you can see who changed the status and when.
¶ Invoices for advertisers
Invoices are used to bill advertisers for services rendered.
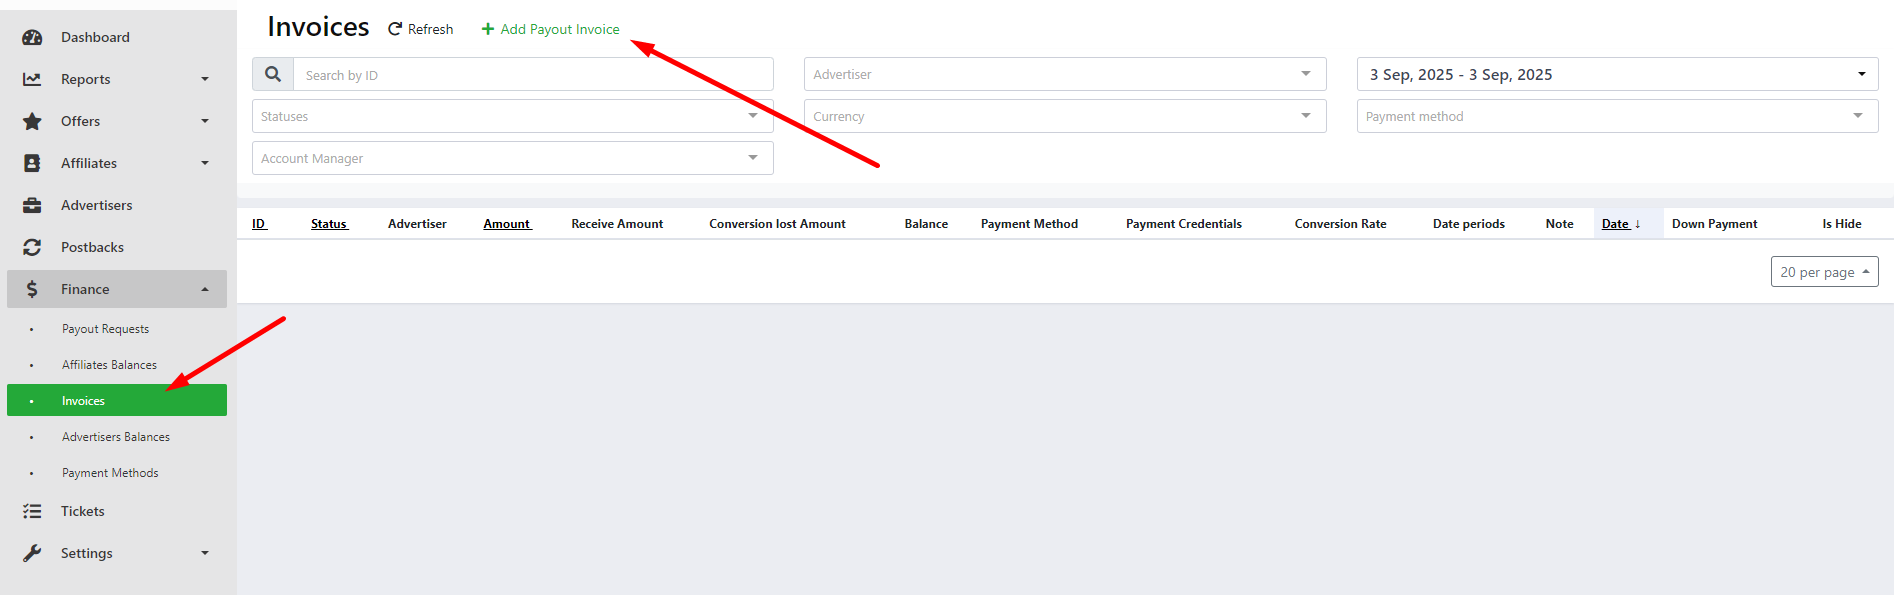
¶ Creating an invoice
- Go to the Finance → Invoices menu.
- Click the Add Payout Invoice button.
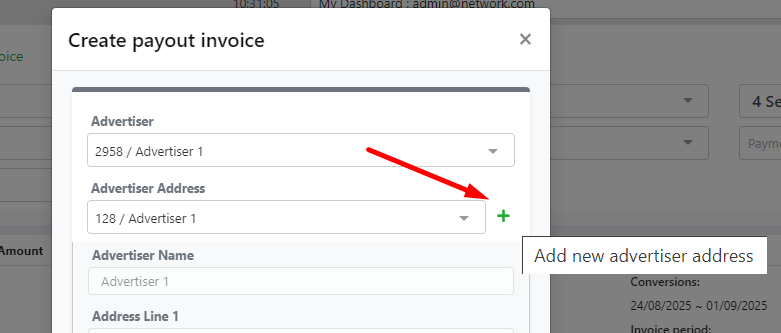
- Fill in the fields in the form that opens:
- Advertiser – select the advertiser from the drop-down list.
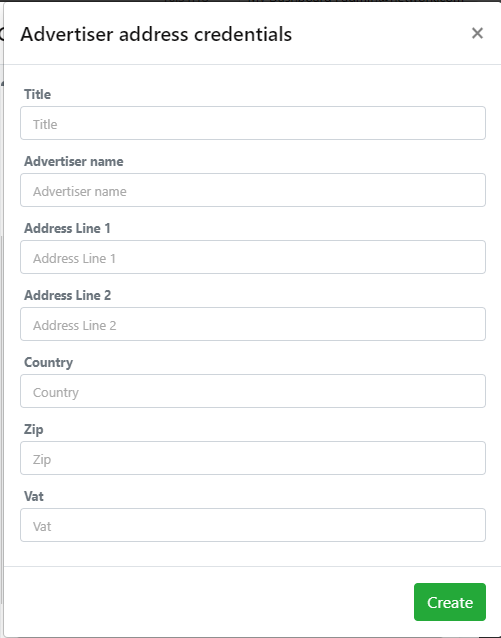
- Advertiser Address – the advertiser's legal address. The advertiser must first enter their Invoice credentials in their profile. Alternatively, if you have this information, you can add it using the ‘+’ button.
- Balances – advertiser's balance (amount and currency).
- Payment Method – e.g. bank transfer, crypto, etc. The payment method must first be added in the Finance -> Payment Methods section.
- Conversion Period – the period for which conversions are counted.
- Invoice Period – the period for which the invoice itself is issued.
- Terms (days) – payment term (number of days).
- Amount with details – an option that allows you to detail the invoice by goals (Goal), countries (Geo), quantity, rate, and amount. If this checkbox is enabled, the Amount cannot be changed.
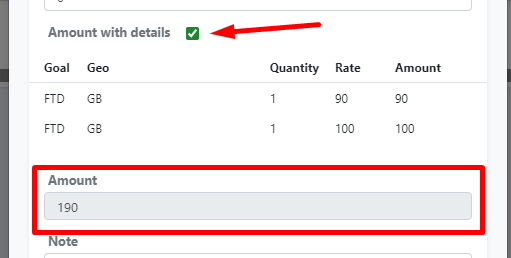
- Amount – the amount for which the invoice is issued.
- Note – a note to the invoice (optional).
- Mark if it’s Down Payment – select if this is an advance payment.
- Status – the current status of the invoice (default is Wait).
- Comment – additional comment.
- Click the Create button to save the invoice. It will appear in the Invoice table.
After creation, the invoice is immediately displayed to the advertiser in their profile, unless otherwise specified in the Is hide setting in the table.
¶ Invoice table
The Finance → Invoices section displays a list of all invoices created.
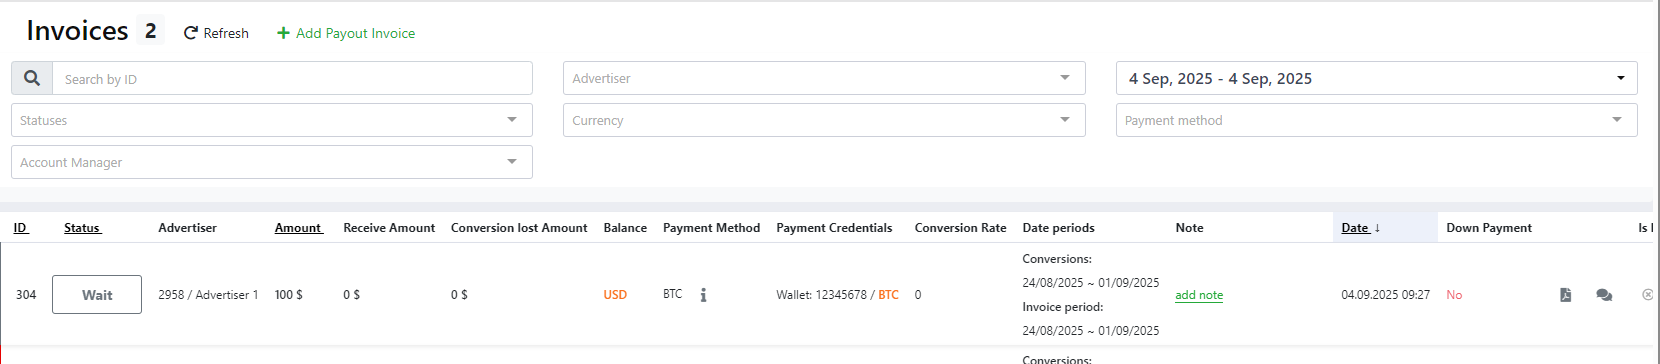
Main columns of the table:
-
ID – unique invoice number.
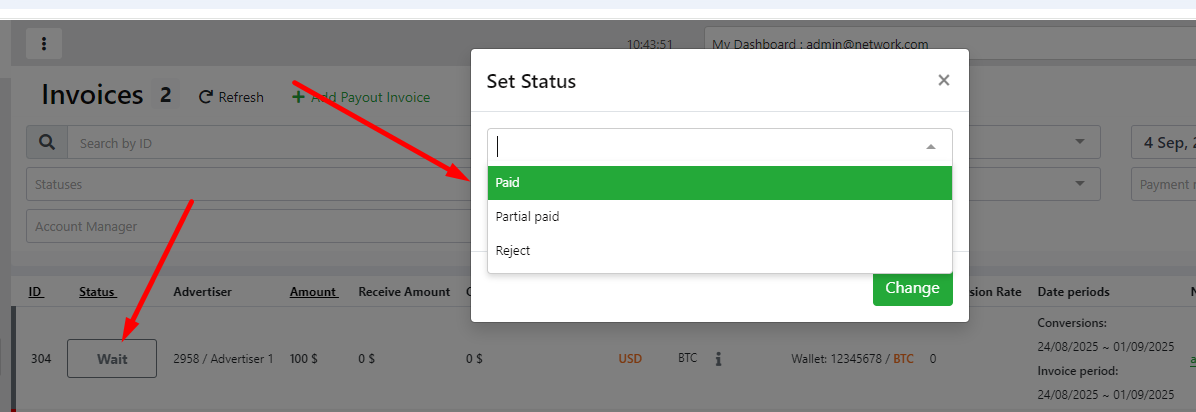
-
Status – current status. By clicking on the button you can change status.
-
Advertiser – advertiser for whom the invoice was created.
-
Amount – invoice amount.
-
Receive Amount – the amount actually received from the advertiser.
-
Conversion lost amount – the amount lost during conversion if the invoice and payment were in different currencies.
-
Balance – the advertiser's balance currency.
-
Payment Method – the selected payment method (the i icon next to it opens the method details when clicked).
-
Payment Credentials – payment details.
-
Conversion Rate – currency exchange rate at the time of conversion.
-
Date periods – conversion and invoice periods.
-
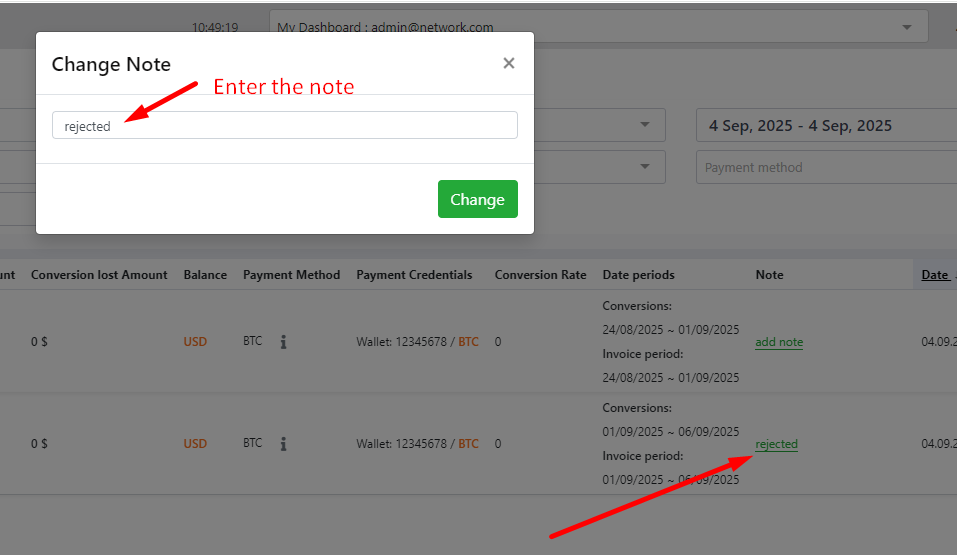
Note – note on the invoice:
- if there is no note, add note is displayed – you can click and add one;
- if there is a note, it is clickable and available for editing.
- Available actions (icons on the right):
- Download invoice (PDF) – you can download the invoice in PDF format.
- Show details – history of changes to the invoice and its payment.
- Is hide – control the visibility of the invoice for the advertiser:
a. grey cross – the invoice is available to the advertiser (NOT hidden);
b. green tick – the invoice is hidden (the advertiser cannot see it).
You cannot edit and/or delete invoices.
¶ Invoice statuses
An invoice can have the following statuses:
- Wait – invoice created, awaiting payment.
- Paid – invoice paid in full.
- Partial Paid – invoice partially paid (the amount received is less than the amount on the invoice).
- Reject – invoice rejected (e.g. due to an error or unmatched amounts).
¶ Changing statuses
After creating an invoice, the administrator can update the payment status
1. Waiting for payment (Wait)
- The invoice has been created, but the money has not yet been received.
- By default, all new invoices are in this status.
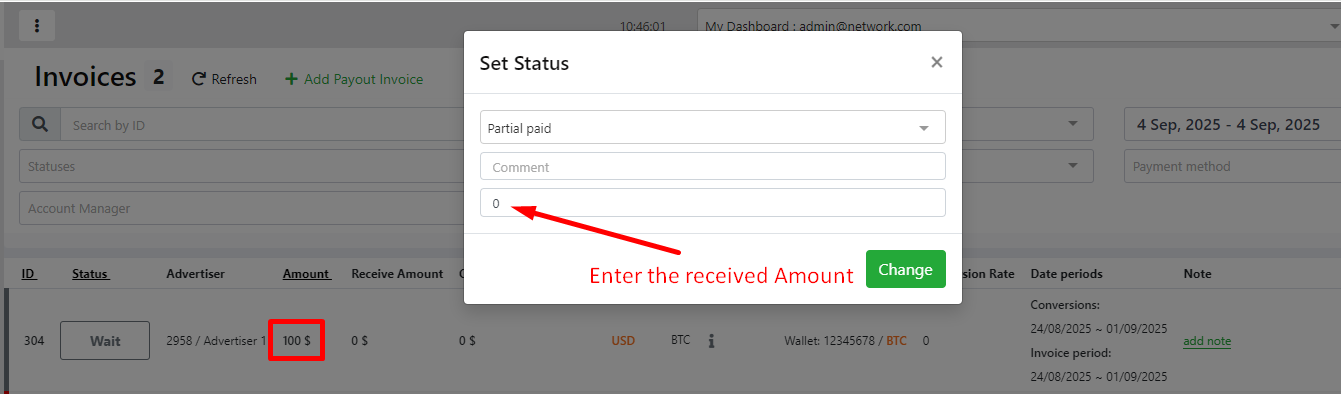
2. Partial Paid
- If the advertiser has transferred part of the amount, the administrator changes the status to Partial Paid and indicates the amount that has been received.
- The Receive Amount field is updated in the table.
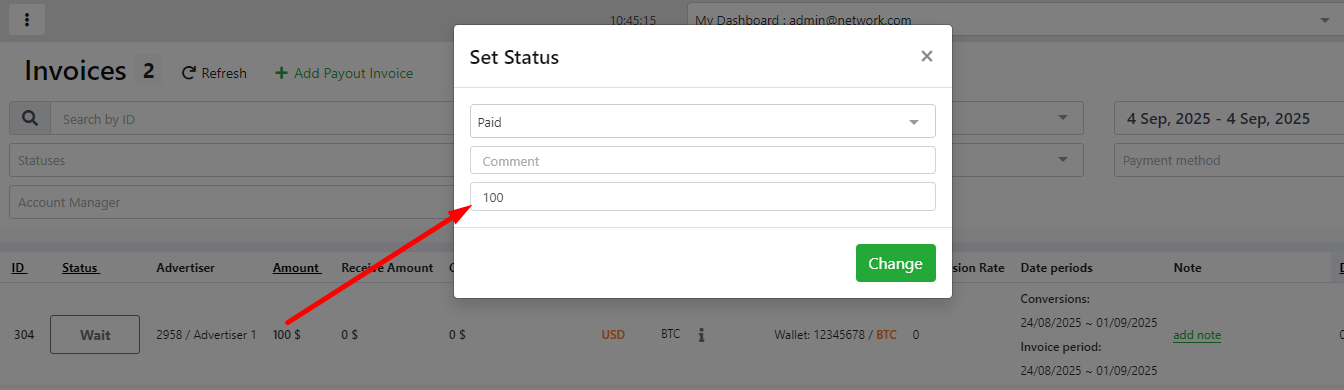
3. Paid
- After the full amount has been received, the invoice is changed to Paid status.
- The advertiser's balance is updated.
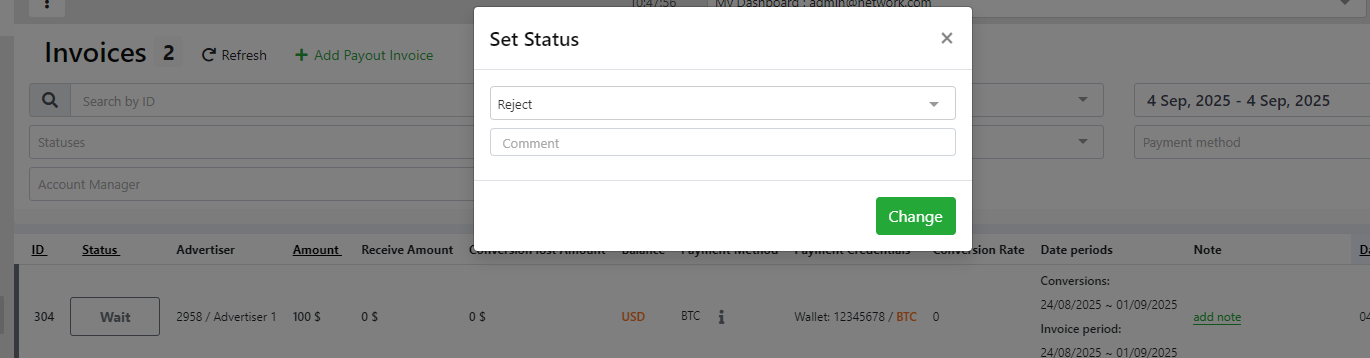
4. Reject
- If an invoice is created with an error or the advertiser refuses to pay, it is changed to Reject status.
- Such an invoice remains in the system but does not require processing.
- Once the status has been set to Rejected, it cannot be changed.
¶ Notification Panel
The notification panel allows you to track all important events on the platform.
¶ How to open the notification panel
- Click on the bell icon in the upper right corner.
- The bell displays the number of new messages.
- After clicking, a list of notifications will open.
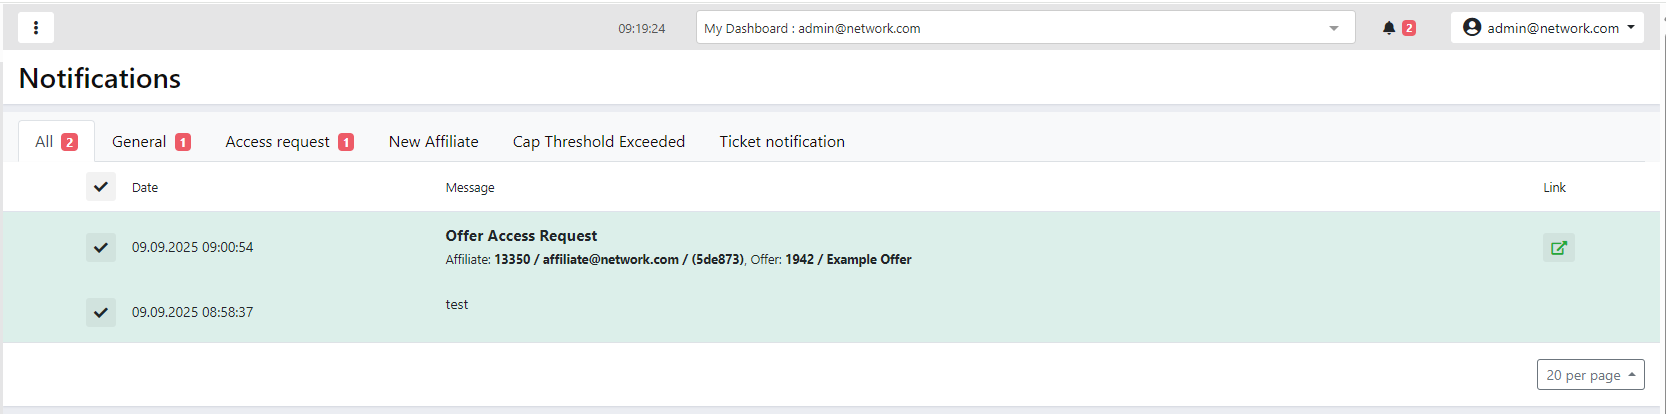
¶ Types of notifications
¶ All
All notifications are displayed without filtering.
¶ General
Notifications created by the administrator via the Settings → Notification Panel section.
¶ Access request
- Appears when an affiliate requests access to an offer.
- The notification contains the affiliate's email, offer ID, and a link to confirm or deny access.
- Clicking on the link opens the required offer in the Access tab.
¶ New affiliate
Notification of a new affiliate registration on the platform (both for manual addition and self-registration).
¶ Cap threshold exceeded
- The system sends notifications if the set traffic limits for an offer or affiliate are exceeded (Caps).
- Allows you to quickly respond and adjust the traffic load.
¶ Ticket notification
- Notifications from the Tickets section.
- They inform you about new tickets or responses to existing tasks.
Tip: Use tab filters for quick access to the type of notifications you need.
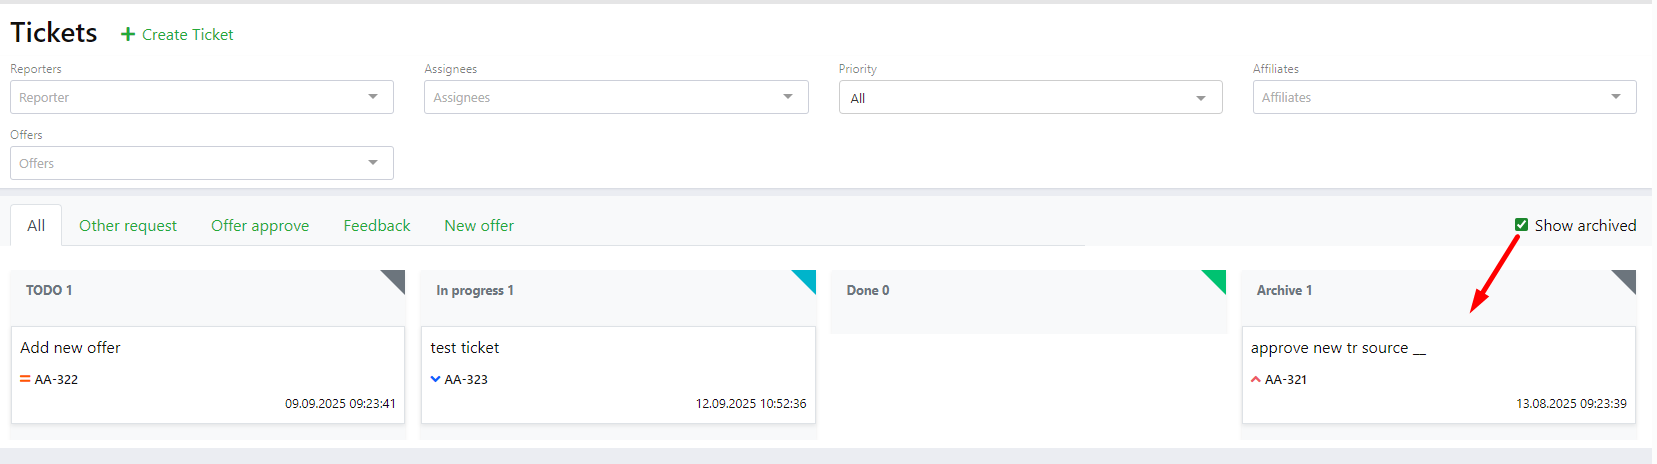
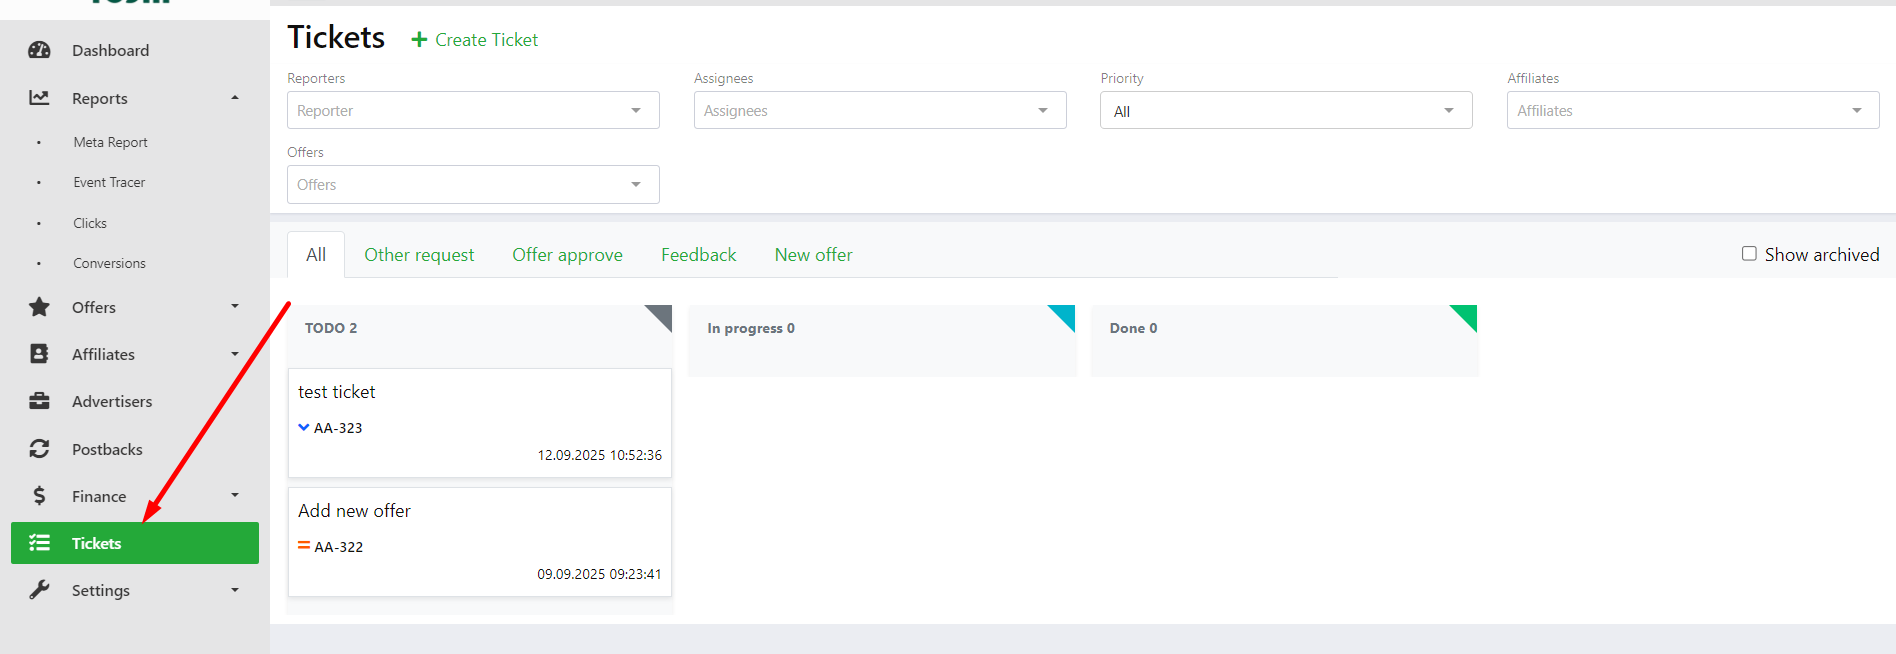
¶ Tickets
The Tickets page is used for communication between managers. It can be used to create, track, and process requests for various types of tasks.
¶ Main interface
The page displays all tickets, divided by status:
- TODO – new tasks that have not yet been started
- In progress – tasks that are currently being worked on
- Done – completed tasks
- Archive – archived tasks (to view, check the Show archived box)
For convenience, quick tabs are available when working with tickets:
- All – displays all tickets
- Other request
- Offer approve
- Feedback
- New offer
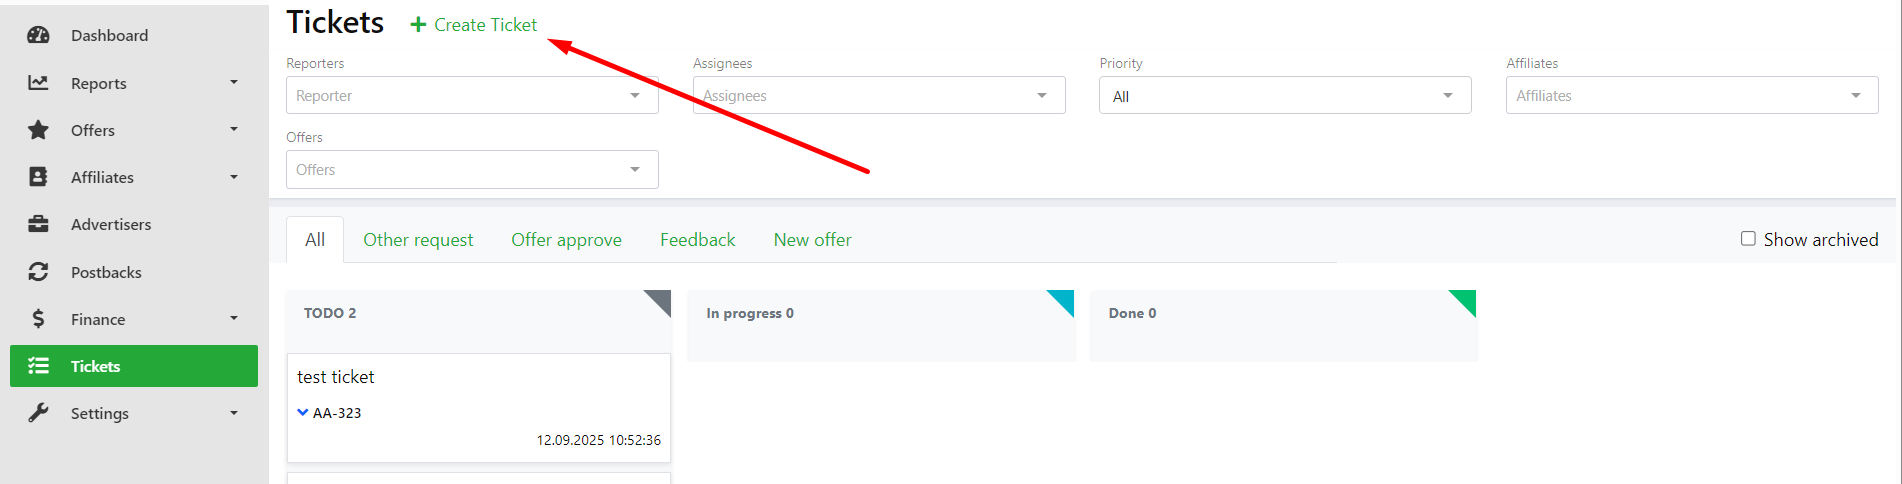
¶ Creating a new ticket
- Click the + Create Ticket button.
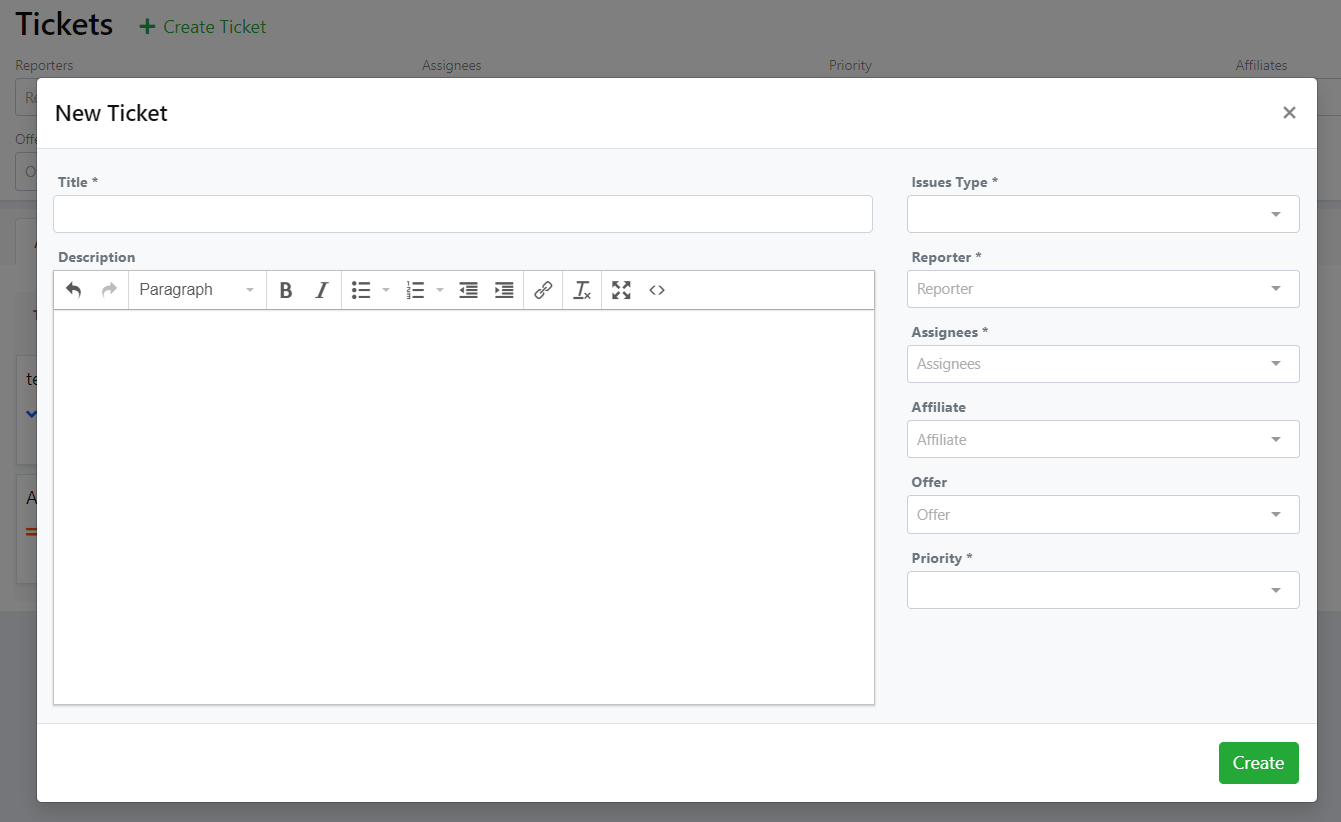
- Fill in the fields in the form that opens:
-
Title – a short name for the ticket
-
Description – a description of the task or request (you can use formatting)
-
Issues Type – type of request (Other request, Offer approve, Feedback, New offer)
-
Reporter – select the desired user from among affiliate- and account managers
-
Assignee – specify the person responsible for the task; you can select several managers.
-
Affiliate – select a partner (if applicable).
a. When you select an affiliate, the affiliate manager for that affiliate will automatically be entered in the Assignee field.
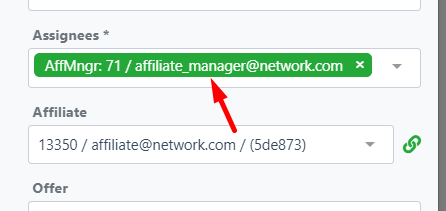
b. You can only select one.
c. Clicking on the link next to the field will take you to the affiliate's profile. -
Offer – select an offer (if applicable).
a. When you select an offer, the account manager responsible for this offer will be automatically entered in the Assignee field.
b. You can only select one.
c. Clicking on the link next to the field will take you to the offer editing page.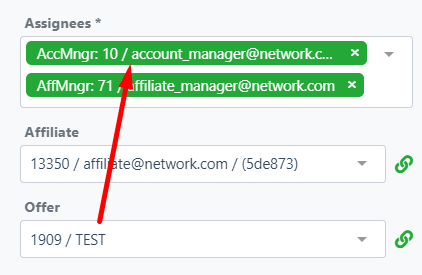
-
Priority – set the priority of the task.
- Click the Create button – the ticket will appear in the TODO column.
The card will contain:
- ticket name;
- priority icon;
- ticket number in the system;
- creation date and time.

The ticket will also be sent to the Notifications section in the Ticket notification block of the responsible manager (Assignee).
¶ Working with tickets
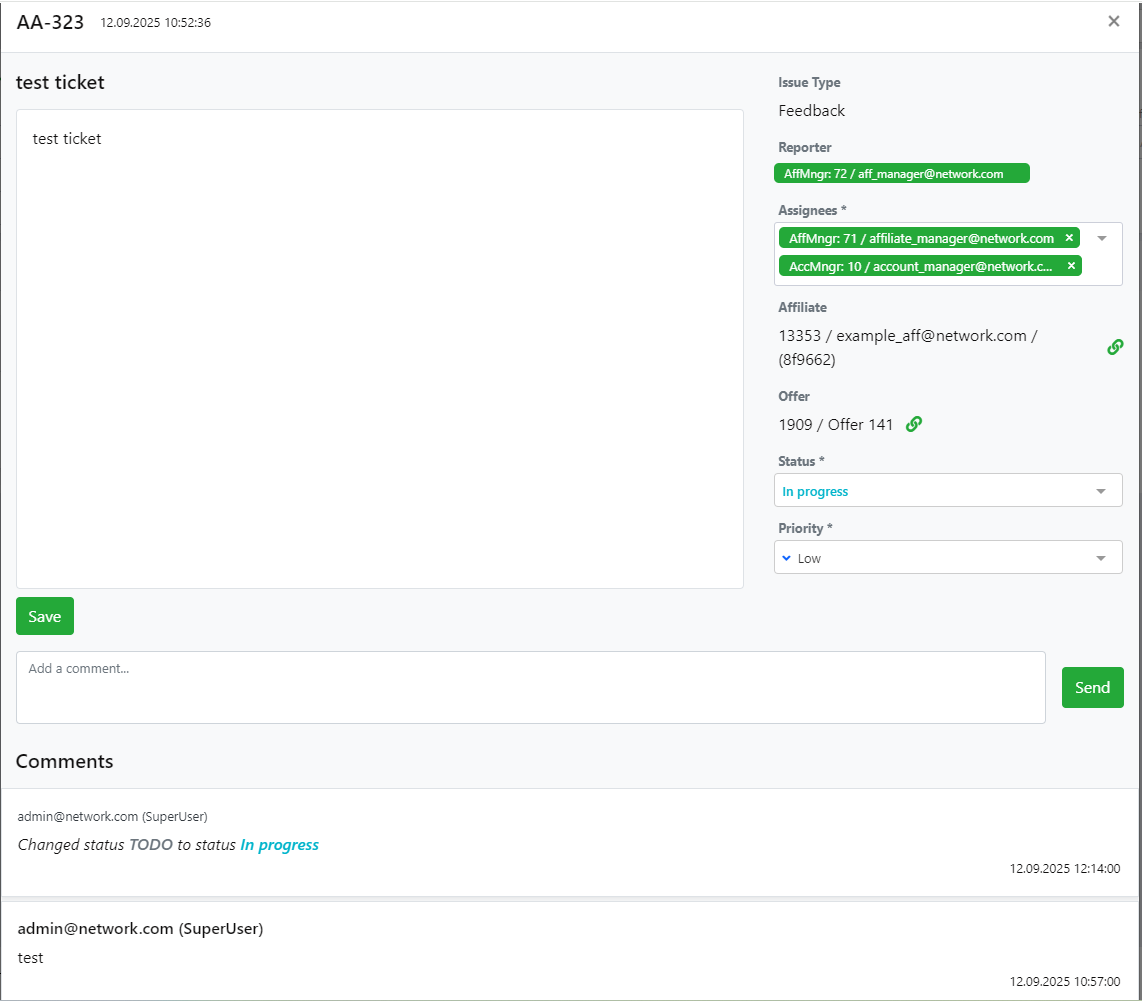
¶ Status of a ticket
- Click on the ticket.
- In the window that opens, find the Status drop-down list.
- Select the desired status (TODO, In progress, Done, Archive).
- The ticket will immediately move to the desired column.
¶ Сomments
- You can leave comments in the same window – use them for clarifications, feedbacks or to record progress.
- This section will contain the entire history of changes to the ticket.
¶ Changing the assignee and priority
The Assignees and Priority fields are available in the ticket window – they can be changed at any stage of the work:
- Assignees – select a new assignee if the task is being transferred to another employee.
- Priority — change the priority of the ticket (for example, increase the urgency of completion).
¶ Viewing the archive
To display archived tickets, check the Show archived box.